PeaZip compression tool tested
Password Management
If you want to password protect many archives for storage, you might lose the authentication data or confuse the passwords. To help you keep track, PeaZip offers an integrated password manager below Tools | Password Manager. In the dialog, the Password list tab shows the passwords you have assigned.
You can add new passwords to the list by right-clicking on the list and selecting Add in the context menu that appears. In the input window, enter the desired strings. To delete entries from the list, select the entry you want to delete, then right-click and select Delete in the context menu.
After creating a password, you will see a small triangle next to the input box for the manual password entry that releases the list when you click on it; you can now use one of the stored passwords by clicking on an entry for the archive you want to create.
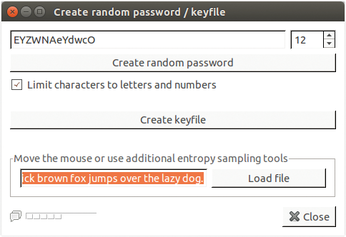
If you want to use random passwords to protect your archives for security reasons, you can use the password generator to create pass phrases. Using the same approach, you can also create keys comprising random letters and character strings for two-way authentication, if needed. To do so, go to the Tools menu and select the Create random password/keyfile entry. In the dialog, click on Create random password. Left to its own devices, PeaZip will suggest passwords with a length of eight characters. You can change the length by modifying the numeric value at the top right in the window. The input can be 64 characters max.
You can create a keyfile by pressing the Create keyfile button; the software then prompts you for a path for the keyfile. After saving at the defined location, the file is available for two-way authentication (Figure 3).
Archives
Files | Open archive shows you the content of an archive. The program then branches to a file browser, in which you can select the desired archive, and then prompts you for the password – if assigned. If you select the wrong password in the password manager or enter the wrong term in the input dialog, the software outputs a message informing you of the fact. When correctly authenticated, the application shows you the archive as a list in the program window. If PeaZip finds a matching program to display the content on your computer, you also have the option of opening files directly from this list.
Pressing the Extract button opens the dialog for decompressing an archive. You will find the same controls as for creating an archive here: Right-click on the list and select the Add file(s) entry in the context menu that pops up. In the dialog that follows, select the desired archive – you can also select multiple archives. After making a selection, enter the path in which you want to store the content in the box below the list. If one or multiple archives require authentication, enter the required data in the Enter password/keyfile box. Now click on OK bottom right for the program to decompress the archive in the selected target directory.
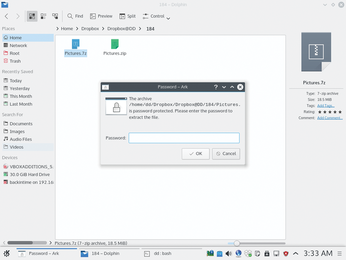
Archives packed with PeaZip can also be unpacked with any other program that supports the format you use. Some alternative tools show the content of password-protected archives, depending on the file format; you can then see which files exist in the respective archives. However, extracting only works after entering the correct password (Figure 4).
Extracting Files
If you only want to unpack one or multiple individual files from an archive, go to the File | Open archive menu and then select the archive containing the desired files. Now right-click on the selected archive in the window; in the context menu, select the Preview with | PeaZip (new instance) The software opens a second window that shows you the content.
You now have the option of selecting the file to be unpacked from the archive using point-and-click. Then, right-click to pop up another context menu in which you select the Extract | Extract selected object(s) item. PeaZip changes to the normal dialog for unpacking archives but only shows you the files you individually selected in the list. After entering a path, the password if needed, and after clicking on OK, the software unpacks the desired files.
To open the unpacked files in a single action while unpacking, go to the context menu and select the option Extract and open with. The program then shows you various applications that are linked to the selected file type in a submenu. Clicking on the required program launches the program and automatically loads the unpacked file.
« Previous 1 2 3 Next »
Buy this article as PDF
(incl. VAT)
Buy Linux Magazine
US / Canada
UK / Australia
Subscribe to our Linux Newsletters
Find Linux and Open Source Jobs
Subscribe to our ADMIN Newsletters
Support Our Work
Linux Magazine content is made possible with support from readers like you. Please consider contributing when you’ve found an article to be beneficial.

News
-
Canonical Releases Ubuntu 24.04
After a brief pause because of the XZ vulnerability, Ubuntu 24.04 is now available for install.
-
Linux Servers Targeted by Akira Ransomware
A group of bad actors who have already extorted $42 million have their sights set on the Linux platform.
-
TUXEDO Computers Unveils Linux Laptop Featuring AMD Ryzen CPU
This latest release is the first laptop to include the new CPU from Ryzen and Linux preinstalled.
-
XZ Gets the All-Clear
The back door xz vulnerability has been officially reverted for Fedora 40 and versions 38 and 39 were never affected.
-
Canonical Collaborates with Qualcomm on New Venture
This new joint effort is geared toward bringing Ubuntu and Ubuntu Core to Qualcomm-powered devices.
-
Kodi 21.0 Open-Source Entertainment Hub Released
After a year of development, the award-winning Kodi cross-platform, media center software is now available with many new additions and improvements.
-
Linux Usage Increases in Two Key Areas
If market share is your thing, you'll be happy to know that Linux is on the rise in two areas that, if they keep climbing, could have serious meaning for Linux's future.
-
Vulnerability Discovered in xz Libraries
An urgent alert for Fedora 40 has been posted and users should pay attention.
-
Canonical Bumps LTS Support to 12 years
If you're worried that your Ubuntu LTS release won't be supported long enough to last, Canonical has a surprise for you in the form of 12 years of security coverage.
-
Fedora 40 Beta Released Soon
With the official release of Fedora 40 coming in April, it's almost time to download the beta and see what's new.