Optimal DIY NAS with Rockstor Linux
Preparation
The ProLiant server initially has an unusually long initialization phase. However, this ensures that all components are doing what they are supposed to be doing. To address the mass storage devices installed in the computer properly using Rockstor, you need to configure the SATA controller built in to the server before installing the operating system.
Pressing F9 during the initialization phase runs the graphical setup, in which you select the first entry, System Options, by pressing the Enter key. Next, select SATA Controller Options, then open the Embedded SATA Configuration dialog by pressing the Enter key.
In the new window, select the option Enable SATA AHCI Support. This turns off the B120i RAID controller, and the mass storage is now under the control of the Intel SATA controller. Now quit the BIOS by pressing Esc several times, until all the dialogs are closed. To save the new settings before rebooting, press F10.
This procedure is required to install Rockstor onto mass storage. Because controlling the RAID controller requires a proprietary driver from Hewlett Packard, which is missing from the standard Rockstor, the system would not cooperate with the controller. The driver available from Hewlett Packard for the B120i RAID controller in the network is certified for SUSE Enterprise Server and Red Hat, but that doesn't mean it automatically supports all CentOS- or Fedora-based systems: Although Rockstor let me install the HP driver, it did not work properly.
After customizing the BIOS and restarting, you end up in a simple GRUB boot manager, which has an option for installing the operating system directly or after testing the medium. The third option, Troubleshooting, takes you to a submenu where you can repair a damaged system or install the system with a general-purpose graphics driver.
Because the NAS system will not have partitions – just complete mass storage devices – you should install the operating system on a USB stick if you are only using two hard disk drives or SSDs, so you can add both internal media to the storage pool.
In most cases, the default installation should work fine: Server systems rarely use extremely exotic video cards, which largely prevents problems with the modules. After selecting one of the options, the Anaconda graphical installer launches.
In the first dialog, you select the locale and set the time zone. Next, you define the disks on which to install the system; the routine will already have selected some sensible defaults. For the root filesystem, Rockstor Linux exclusively supports Btrfs; you also set the parameters for the network interface in this dialog.
The routine detects only wired access. In the case of the server, it is possible to address one of the two Ethernet ports. The software ignores WiFi hardware; as a result, the dialog offers no way to configure it. During the subsequent installation, you create a user account for the operating system administrator. The installer copies the system to the mass storage device in parallel.
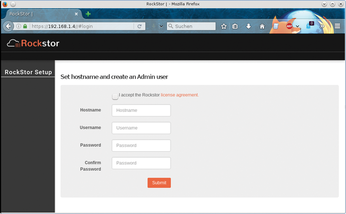
After completing the installation and rebooting, the system tells you before you log in that you can access the graphical configuration of the server, if required, from a web browser on any computer on your intranet by typing the URL https://<IP address>. Calling the address in a browser branches to a simply designed page (Figure 1). Here, you first create the Hostname of the server, as well as an account for the administrator of the management interface.
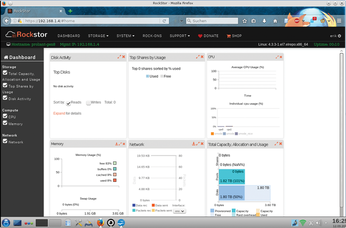
Now, you are taken to a dashboard, which provides a wealth of information summarized in groups (Figure 2). Among other things, it displays the status of the CPU, memory, mass storage, and network interface, even showing the throughput. A horizontal menubar at the top gives you access to more settings.
Getting Started
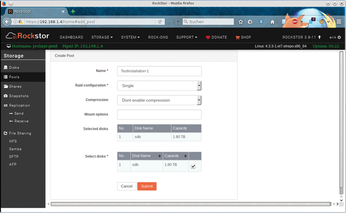
To use Rockstor Linux, you first need to create a pool and shares. The menu item Storage | Pools | Create Pool in the dashboard takes you to a dialog where you can define new pools, for which you also set the appropriate RAID level (Figure 3). If only one mass storage device is available, just set the Raid configuration box to Single. If you have several disks, choose a RAID level of 0, 1, 10, 5, or 6.
Clicking Submit completes the process, and the system displays a corresponding entry in the table. Then you can use the Storage | Shares | Create Share dialog to set up shared directories, while defining compression for the respective shares. After clicking Submit, the shares are available.
To use the shares, you need to publish them on your intranet. You have several options for doing this depending on the client operating systems: In addition to NFS shares, it makes sense to enable Samba shares for Windows machines. The Rockstor system is also capable of supporting SFTP or AFP for Apple environments.
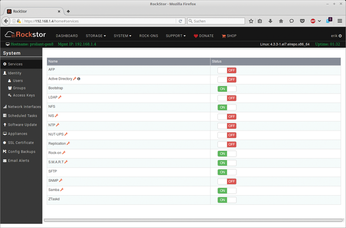
All of these options can be reached in the Storage | File Sharing menu. First, you need to enable some of the services, such as NFS and SMB, in the corresponding dialogs by flipping a virtual switch; without this feature, you would have to install the software.
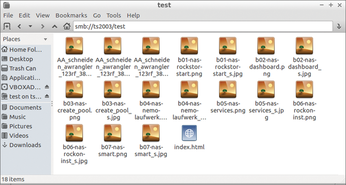
The individual network filesystems' options also let you define the permissions and specify which hosts or subnets have access. You can then start using the NAS system as a drive in the file manager of your workstation (Figure 4).
The System | Identity menu, with the subgroups Users and Groups, have dialogs structured similarly to the Storage option, giving you granular control of access privileges. Here, you create and manage your user accounts and groups.
Additions
Much like the dedicated NAS systems with proprietary operating systems, Rockstor Linux lets you integrate additional modules, which come as Docker containers. To install these modules, go to the System | Services menu and enable the Rock-on service by clicking the slider to ON (Figure 5). The system prompts you to release a share specifically for the additional components and then enables the service. On the dashboard, you will now see the available applications in the Rock-ons menu. Although the selection is not as extensive as with a dedicated NAS, it extends from file-sharing services, to the free ownCloud solution, to media servers and databases.
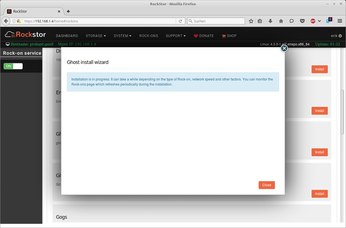
Installing the desired application is just a matter of pressing the Install button; the system creates a basic configuration before installing, depending on the service, that integrates the respective daemon (Figure 6). In the same menu, you can turn off existing applications and, if necessary, uninstall them. To do so, go to the Installed tab and push the slider to OFF; then, click on the Uninstall button.
« Previous 1 2 3 Next »
Buy this article as PDF
(incl. VAT)
Buy Linux Magazine
US / Canada
UK / Australia
Subscribe to our Linux Newsletters
Find Linux and Open Source Jobs
Subscribe to our ADMIN Newsletters
Support Our Work
Linux Magazine content is made possible with support from readers like you. Please consider contributing when you’ve found an article to be beneficial.

News
-
So Long Neofetch and Thanks for the Info
Today is a day that every Linux user who enjoys bragging about their system(s) will mourn, as Neofetch has come to an end.
-
Ubuntu 24.04 Comes with a “Flaw"
If you're thinking you might want to upgrade from your current Ubuntu release to the latest, there's something you might want to consider before doing so.
-
Canonical Releases Ubuntu 24.04
After a brief pause because of the XZ vulnerability, Ubuntu 24.04 is now available for install.
-
Linux Servers Targeted by Akira Ransomware
A group of bad actors who have already extorted $42 million have their sights set on the Linux platform.
-
TUXEDO Computers Unveils Linux Laptop Featuring AMD Ryzen CPU
This latest release is the first laptop to include the new CPU from Ryzen and Linux preinstalled.
-
XZ Gets the All-Clear
The back door xz vulnerability has been officially reverted for Fedora 40 and versions 38 and 39 were never affected.
-
Canonical Collaborates with Qualcomm on New Venture
This new joint effort is geared toward bringing Ubuntu and Ubuntu Core to Qualcomm-powered devices.
-
Kodi 21.0 Open-Source Entertainment Hub Released
After a year of development, the award-winning Kodi cross-platform, media center software is now available with many new additions and improvements.
-
Linux Usage Increases in Two Key Areas
If market share is your thing, you'll be happy to know that Linux is on the rise in two areas that, if they keep climbing, could have serious meaning for Linux's future.
-
Vulnerability Discovered in xz Libraries
An urgent alert for Fedora 40 has been posted and users should pay attention.