Needlework – Digitize your LPs and cassettes with Audacity
Spring Cleaning
As analog, mechanically scanned recordings, LPs deliver noise in addition to the payload signal. Frequently played records pop, crackle, and distort the signal because of dirty grooves. Cleaning with an antistatic brush before playing helps, but other tricks can trim an old recording for a cleaner sound (see the "New for Old" box).
New for Old
Besides the obligatory brush, you have other ways of removing dirt. One method is to place in front of the pickup arm another arm that uses a fine brush to apply a special liquid in the region about to be played back. The typical vinyl pops can be reduced significantly in this way. The liquid evaporates without any residue; however, the LP plays back when wet and will sound more weathered than when played dry.
Another alternative is to use a "disk washer," in which two brushes running through distilled water with a detergent clean the record. Covers protect the label, and the record is not played when wet but is left to dry first.
For very stubborn areas in which dirt cannot be removed in the ways already described, you can use a compound found in specialty stores that coats the record and then is pulled off when dry – like a facial mask – along with dirt particles that adhere to it. The dried film is water soluble and can be reused at least a couple of times after boiling in water (although the manufacturers do not advertise this option).
Scratches will be unimpressed by all of these efforts, and the best cleaning will not prevent the resulting pops. Pops are visible as short spikes in the view window; the levels climb steeply and stand out clearly in the wave plot. To correct, select the appropriate section with the mouse and zoom the view with the Zoom In icon in the toolbar, by selecting View | Zoom In, or with Ctrl+1 until the scratch is shown as a single pulse (Figure 2). This works best using View | Zoom to Selection to fit the highlighted area to the view and dragging the markers even further with the mouse.

Now use the Effect | Fade Out function to iron out the scratch virtually. Applying the effect once only will not knock the unwanted peak flat straightaway; as a rule, you need to repeat the procedure several times, but when you are done, the pop and crackle in the recording should disappear completely. Be sure to interrupt your work occasionally and save the project to avoid data loss.
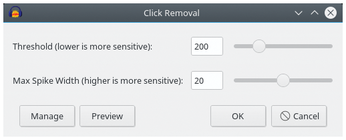
Alternatively, Audacity offers a semi-automatic scratch removal tool; just select Effect | Click Removal (Figure 3). A little tuning of the default values usually results in clearly audible improvements, but the results can hardly compare with the manual scratch removal method described first, because Audacity lets too many scratches pass. Excessive values can even affect the sounds of the percussion section if the click removal algorithm is overly rigorous, so you should be careful when using this function.
Because an LP is an analog recording, automatic routines will always find life hard. No automatic recipe can remove the typical crackle of vinyl. The Effect | Noise Reduction option built into Audacity will achieve moderate improvements, but don't be surprised if the program first asks for a noise profile: The spectral composition of noise is so diverse that it is difficult for Audacity to assess it correctly. Mark a small noisy area in front of or between tracks, and click on Get Noise Profile. Audacity then stores the profile in the project. Next, select Edit | Select | All to select the entire recording on which to apply the effect.
Do not delude yourself: The record will not sound as fresh is it did when you first picked it up from the store. Crackling is far too inhomogeneous for this method; however, you will achieve far better results when processing audio tapes, because their noise is created by the low speed of the magnetized tape and has a much smoother frequency spectrum.
Sound Development
In addition to noise removal, Audacity can digitally equalize the frequency response. A rumble filter, which minimizes the low-frequency noise of the turntable drive is a typical example. Under Effect | Equalization is a settings window (Figure 4), in which you can select from several equalizer profiles. Rumble, for example, is a high-pass filter that attenuates low frequencies. If the preset 100Hz swallows too much bass, you can change the curve by dragging it with the mouse to find a workable compromise.

The Recording Industry Association of America (RIAA) standardized the distortion of the frequency response caused by nonlinear movement of the stylus across an LP; many, but not all amplifiers compensate for this. To improve the audio recording, you should take a look at the RIAA equalization curve [2], which reduces the trebles and boosts the bass. What sounds better in the end is up to you. The standardized frequency adjustment does not necessarily represent the best choice.
Since the mid-1960s, Dolby Laboratories has developed various procedures to get rid of tape hiss that have consistently improved over the decades. Noise contains especially high frequencies, so the signal in this area is raised and lowered during playback, depending on the input level, which also reduces noise. Dolby SR (spectral recording), used in studio work, is capable of reducing the noise level by up to 25dB. The equalizer is also interesting for tape recordings. A cassette recorded with a Dolby method [3] skews the frequency response when played back with a Dolby-enabled playback device. However, Audacity does not offer a profile for this purpose. For the appropriate standards, see a discussion of Dolby noise reduction online [4].
Divide and Conquer
On an LP, but not a cassette, you can see the breaks between tracks with the naked eye. However, when you digitize an LP, the breaks vanish, giving you an album of a single file. Thus, the recording needs to be split into individual tracks.
The timeline above the recording view helps you find the breaks. If the album cover lists play times, you can easily calculate where you need to insert your virtual knife. Simply click on the view and drag while holding down the mouse button to expand a section corresponding to the desired track. Drop-offs in the recording level also give you clues, but they can be misleading, especially with live albums.
In practice, the best approach has proven to be starting at the end of the recording. It is easier to listen to just a few seconds than a whole track, just to keep the fade-out at the end of the track. Once you have found the end, drag the opposite edge of the highlighted area to where you think the track starts. You can find the exact starting point by briefly listening in and moving the marker as needed.
Once the selection fits the bill, export the current title to a standard format for audio players. File | Export Selected Audio opens a file dialog that saves the selection as an uncompressed WAV file by default. At bottom right, you can select additional codecs, such as Ogg Vorbis and MP3. When you select these options, additional options appear, such as Bit Rate Mode and Quality. If you prefer to use an exotic encoder, choose (external program) instead of a listed codec, where you can specify a custom command to be executed on the command line for an external application.
Rolling up the recording from the back is also a very convenient way to split live albums without losses. For the penultimate title, just drag the end marker of the last track forward with the mouse to the beginning of the new track. In this way, the start marker for the first track you stored becomes the end marker for the new track.
« Previous 1 2 3 Next »
Buy this article as PDF
(incl. VAT)
Buy Linux Magazine
US / Canada
UK / Australia
Subscribe to our Linux Newsletters
Find Linux and Open Source Jobs
Subscribe to our ADMIN Newsletters
Support Our Work
Linux Magazine content is made possible with support from readers like you. Please consider contributing when you’ve found an article to be beneficial.

News
-
Canonical Releases Ubuntu 24.04
After a brief pause because of the XZ vulnerability, Ubuntu 24.04 is now available for install.
-
Linux Servers Targeted by Akira Ransomware
A group of bad actors who have already extorted $42 million have their sights set on the Linux platform.
-
TUXEDO Computers Unveils Linux Laptop Featuring AMD Ryzen CPU
This latest release is the first laptop to include the new CPU from Ryzen and Linux preinstalled.
-
XZ Gets the All-Clear
The back door xz vulnerability has been officially reverted for Fedora 40 and versions 38 and 39 were never affected.
-
Canonical Collaborates with Qualcomm on New Venture
This new joint effort is geared toward bringing Ubuntu and Ubuntu Core to Qualcomm-powered devices.
-
Kodi 21.0 Open-Source Entertainment Hub Released
After a year of development, the award-winning Kodi cross-platform, media center software is now available with many new additions and improvements.
-
Linux Usage Increases in Two Key Areas
If market share is your thing, you'll be happy to know that Linux is on the rise in two areas that, if they keep climbing, could have serious meaning for Linux's future.
-
Vulnerability Discovered in xz Libraries
An urgent alert for Fedora 40 has been posted and users should pay attention.
-
Canonical Bumps LTS Support to 12 years
If you're worried that your Ubuntu LTS release won't be supported long enough to last, Canonical has a surprise for you in the form of 12 years of security coverage.
-
Fedora 40 Beta Released Soon
With the official release of Fedora 40 coming in April, it's almost time to download the beta and see what's new.