System resource monitoring with bpytop
Fast and Functional
Linux users have many options for monitoring system resources, but bpytop, a new Python port of bashtop, more than stands out from the crowd.
With a system like Linux, which is available to multiple users at the same time, it is important to keep an eye on the available resources. Is a graphical application running haywire and blocking all of the CPU's cores? Is a user running a computationally intensive script and thus making work agonizingly slow for the server's other users? Has a process gone wild and started to write increasing amounts of corrupted data to the hard disk?
Such questions can be answered by various monitoring tools. The popular distributions typically preinstall Top. The program provides an overview of the active processes and measures both the CPU load and the RAM usage. Htop offers similar functions in a visually appealing format. Other programs display the network load (iftop) or determine which applications or processes cause massive writes to the hard disk (iotop).
Bashtop [1] combines many of these functions in a text-based interface. The program displays the CPU load both numerically and as a pseudographic. It lists the active processes along with their memory and CPU consumption, visualizes the throughput rates of the individual network interfaces, and much more. The program has a downside, however. As the name already suggests, it was programmed completely as a Bash script. This makes further maintenance and development complicated; it also slows down the program. But now there's another option that addresses these issues, because bashtop's developer has released an official Python port of the utility called bpytop [2].
Installation
Bpytop was first introduced in August 2020. Accordingly, most of the major distributions have not yet added it to their package sources. Only Arch Linux and its derivatives, such as Manjaro, offer the program, and only in the Arch User Repository (AUR). Arch users can call an AUR helper such as Yay for the install. The yay -S bpytop command imports bpytop with all dependencies. For Ubuntu, there is a Snap package [3], but it makes very little sense to set up a lean command-line tool with a monster like Snap. In this case, a manual install is the preferred approach.
The commands from the first four lines of Listing 1 help you load the build dependencies onto your system and build bpytop from the source code previously downloaded off GitHub. If you keep the bpytop/ build folder, you can cleanly remove the program from the system with the command from line 5. After the install, call the program with the bpytop command in a terminal window. There is no entry in the start menu of the desktop environment.
Listing 1
Install bpytop
01 $ sudo apt install git build-essential python3-distutils python3-psutil
02 $ git clone https://github.com/aristocratos/bpytop.git
03 $ cd bpytop
04 $ sudo make install
05 $ sudo make uninstall
Operations
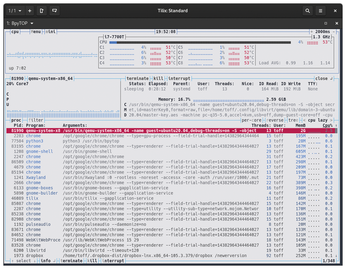
The bpytop screen is divided into several areas (Figure 1). At the top, the program displays the load and temperature of the individual cores (see the "Sensors" box), as well as a plot of the utilization as a graph. Below this on the left, you will find the main memory and data carrier usage. In the box below, bpytop displays the current transfer rates for a selected network interface card and the corresponding history. The box on the right contains a list of all active processes together with their memory usage, resulting CPU load, process ID, user, number of threads, and other data.

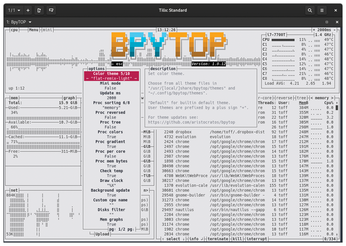
Within the application you can now use the mouse or the keyboard. Gray letters mark dialogs and switches – you have to look carefully here: The letters are small, and options are case sensitive. For example, pressing m or clicking on mini will switch to a reduced mode that only displays the taskbar and CPU history (Figure 2). Pressing M or clicking on Menu opens a menu where you can access the settings and help features or quit the program (Figure 3). Use b or n or click on <b or n> to change the network interface card displayed in the Net area.
In the settings, you can choose between 10 different color variants in Color theme. You can switch between the options with the left and right arrow keys. There is also the possibility to permanently activate mini mode or to disable the color gradient in the process list (Proc gradient). If required, additional drives can be included or excluded from the display in Disk filter. The program in the right-hand column provides information on the individual options.
Processes
Bpytop uses most of its space to display the process list. By default, it sorts the list by CPU usage. You can use the left and right arrow keys or click on the square brackets next to the current mode (for example cpu lazy) to change the sort order.
Use reverse to reverse the sort order; tree activates a tree view. With f and a search term, you can filter out certain processes from the mass of data. Press Enter to complete the filter so that you can browse the list of matches using the up and down arrow keys. If necessary, you can press Del to empty the filter again.
Once you have selected a process in the list, a menubar appears below the box with info, terminate (sends signal SIGTERM), kill (SIGKILL), and interrupt (SIGINT). You can trigger an action either by clicking on the corresponding entry or by using the highlighted shortcut keys. However, be careful when terminating processes; there are no prompts. If you shoot down the wrong process, unsaved data may be lost.
Buy this article as PDF
(incl. VAT)
Buy Linux Magazine
US / Canada
UK / Australia
Subscribe to our Linux Newsletters
Find Linux and Open Source Jobs
Subscribe to our ADMIN Newsletters
Support Our Work
Linux Magazine content is made possible with support from readers like you. Please consider contributing when you’ve found an article to be beneficial.

News
-
OSJH and LPI Release 2024 Open Source Pros Job Survey Results
See what open source professionals look for in a new role.
-
Proton 9.0-1 Released to Improve Gaming with Steam
The latest release of Proton 9 adds several improvements and fixes an issue that has been problematic for Linux users.
-
So Long Neofetch and Thanks for the Info
Today is a day that every Linux user who enjoys bragging about their system(s) will mourn, as Neofetch has come to an end.
-
Ubuntu 24.04 Comes with a “Flaw"
If you're thinking you might want to upgrade from your current Ubuntu release to the latest, there's something you might want to consider before doing so.
-
Canonical Releases Ubuntu 24.04
After a brief pause because of the XZ vulnerability, Ubuntu 24.04 is now available for install.
-
Linux Servers Targeted by Akira Ransomware
A group of bad actors who have already extorted $42 million have their sights set on the Linux platform.
-
TUXEDO Computers Unveils Linux Laptop Featuring AMD Ryzen CPU
This latest release is the first laptop to include the new CPU from Ryzen and Linux preinstalled.
-
XZ Gets the All-Clear
The back door xz vulnerability has been officially reverted for Fedora 40 and versions 38 and 39 were never affected.
-
Canonical Collaborates with Qualcomm on New Venture
This new joint effort is geared toward bringing Ubuntu and Ubuntu Core to Qualcomm-powered devices.
-
Kodi 21.0 Open-Source Entertainment Hub Released
After a year of development, the award-winning Kodi cross-platform, media center software is now available with many new additions and improvements.