Control your smart home with RaspBee II and your Raspberry Pi
Home Manager

The RaspBee II module turns your Raspberry Pi into a smart control center for Zigbee devices.
New technologies and new providers are constantly expanding the range of potential smart home applications. Solutions from various manufacturers are often mutually incompatible, which means customers cannot leverage the full potential of home automation services.
But there is another approach. Zigbee is a protocol for low-power wireless communication based on the IEEE 802.15.4 standard. The Zigbee protocol is often used for home automation devices. Dresden elektronik [1] has been working on light control systems based on the Zigbee protocol for some 10 years and now offers numerous vendor-agnostic systems for the smart home. The company also distributes the RaspBee module for home automation with a Raspberry Pi. A RaspBee device with the accompanying software can help you reap the benefits of the smart home without expensive gateways and cloud connections.
The RaspBee module, which has already reached its second generation, is a piece of hardware attached on top of a Raspberry Pi (called a HAT) that helps users convert the system into a control center for smart home devices such as lights, alarms, or smart sockets and switches. The RaspBee II module [2] supports devices from various manufacturers with home automation solutions based on the Zigbee protocol. The underlying technology is a framework for wireless networks that are especially suitable for home automation due to their low data volume and low energy requirements.
The modular Zigbee protocol supports extensions, and some manufacturers try to boost customer loyalty by adding new functions that lead to incompatibility with devices by other providers, thus preventing users from switching. The Zigbee II module takes this into account by having the developers test components from a wide range of vendors and add them to continually updated compatibility lists [3].
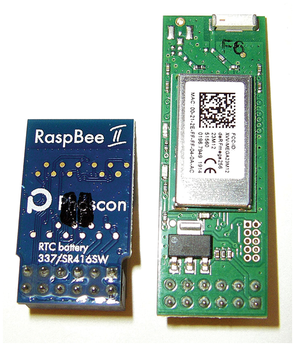
The latest RaspBee module is far more compact compared with the first-generation model (Figure 1), and it also comes with an important innovation. Thanks to a battery-buffered RTC on the HAT, the system is now able to sync with the Raspberry Pi control center after a power failure to carry out time-critical tasks. According to the manufacturer, the battery should last for at least two years and will provide power for up to eight years if the system is used daily. It is a replaceable button cell.
In addition, the RaspBee II module comes with a power amplifier that gives users an effective range of 30 meters inside buildings. Outdoors, a range of up to 200 meters should be possible. Because Zigbee installations act as a mesh network, where devices such as lights or smart sockets play the role of repeaters, you can easily extend the range without additional hardware.
RaspBee HATs are supported by two software packages. You can use the deCONZ platform to configure the hardware. The graphical tool visualizes Zigbee networks, to which you can add devices from different vendors. deCONZ runs in the background during this process. The second component is the Phoscon app, which is also graphical and browser-based. Phoscon acts as a graphical front end for controlling lighting installations [4].
Installation
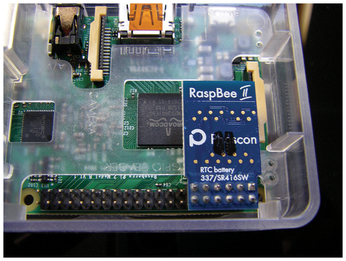
Get started by simply plugging the RaspBee II module onto the pin header of the Raspberry Pi – on the side facing the slot for the MicroSD card (Figure 2). The module supports all versions of the Raspberry Pi, so you can use an older model for home automation. You need a current version of Raspbian "Buster" or Pi OS "Bullseye" as the operating system.
The Rasbee manufacturer offers a total of four different images for MicroSD cards. These images contain a customized Raspbian "Buster" on which the deCONZ application is preinstalled. One of the images already has the Homebridge Hue plug-in, which you can use to control components of the Philips Hue lighting system. The images all have the Raspbian working environment, except for one, so you can conveniently run the configuration graphically. All images are also suitable for the first generation RaspBee module.
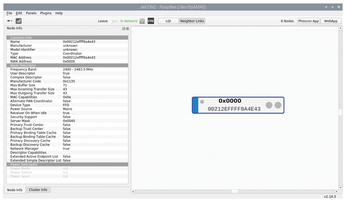
The images with the desktop environment each weigh in at just shy of 880MB, while the headless image without the graphical environment only takes up 395MB. The provider recommends using a fast MicroSD card with a minimum capacity of 8GB for all images. It should at least meet the Class 10 standard to avoid latencies during operation [5]. Alternatively, check out the vendor's website, where you will find detailed instructions for integrating the software packages required for the RaspBee II module with conventional Pi-OS images [6]. If you decide to use the preconfigured images, a system update and the deCONZ configuration software will launch automatically. In the graphical network representation in the deCONZ control interface, you will initially only see the existing gateway (Figure 3).
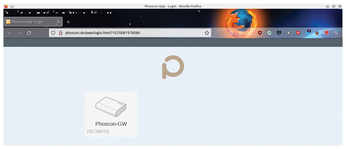
Then, working on any machine on the local network, open a web browser and type http://RaspPi_IP_address:80 as the target address. After a short startup delay, the browser window displays the gateway. Clicking on the gateway icon takes you to a configuration dialog where you can set a password for logging into the gateway. After that, future settings require logging into the gateway (Figure 4).
The routine prompts you to turn on all the lights you want to integrate with the Zigbee network. But before doing so, you have to reset the lights to the factory defaults, otherwise the RaspBee module will be unable to identify the components. Dresden elektronik supplies instructions for resetting lighting by various home automation manufacturers.
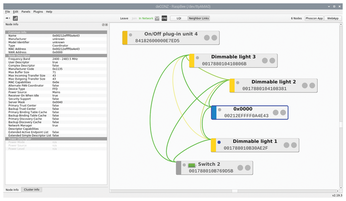
After you switch on the lights, deCONZ searches for them and lists them. The software then automatically draws connecting lines from the gateway to each device to outline the mesh network (Figure 5). The identified components appear in a table in the browser window of the Phoscon app. Click on one of the devices in deCONZ to display its technical data in a vertical pane on the left.
Because deCONZ is vendor-independent, you can add Zigbee-compatible devices from different manufacturers to your smart home setup. But before purchasing individual components, it makes sense to take a look at the compatibility list provided by the vendor to make sure your choice of device actually works with the RaspBee II system.
Grouping
Once all devices are logged onto the gateway, click Mainpage in the Phoscon app browser window. Then proceed to create an initial group in an overlapping dialog box. Groups are typically used to designate different rooms with smart home components in the Phoscon app.
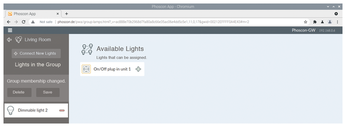
After clicking Create first group, go on to define the group name in a separate dialog box. The app makes suggestions for a group name. After you Create the new group, you are taken to the dialog for assigning the identified components. If you click on the gear icon in the bottom right, you will come across the Manage lights option. In the Available lights dialog that appears, you need to add the desired components to the group.
Be careful: Some components, such as intermediate switches that integrate a conventional device into the smart home, are also identified by the software as lights and listed accordingly. Luckily, meaningful symbols to the left of the individual nodes reveal whether the device is a light source or some other device. Use the plus sign to the right of each device to transfer it to the vertical group column on the left. Don't forget to Save your work after adding all the desired components to the group (Figure 6).
Making a Scene
In the next step, you add what are known as scenes to the installation and then configure the individual nodes in each scene. For example, you can turn switches or lamps on and off using timer controls or dim the lights in the scene editor.
The Scenes editor option lets you open the scene dialog, where you need to click on Add Scene and assign a meaningful name. After clicking Create, you can configure and save the desired settings as a function of the options supported by the enabled device (Figure 7).

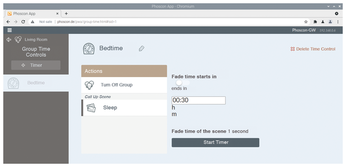
If you now switch back to the Groups menu, you can use the Schedules dialog to define when you want the tool to enable a specific scene in the current group. Schedules | Actions lets you set an alarm or a timer, to which you can assign a name.
Following the Create step, you will find yourself in the configuration dialog for timer control. Just a few mouse clicks let you define which scene is linked to which action and at what time. You can also specify the length of the fade time before starting the timer (Figure 8).
You need to repeat this procedure for each room in which you have Zigbee network components. When you are done, you can enjoy reliable automated control of your home devices.
Buy this article as PDF
(incl. VAT)
Buy Linux Magazine
US / Canada
UK / Australia
Subscribe to our Linux Newsletters
Find Linux and Open Source Jobs
Subscribe to our ADMIN Newsletters
Support Our Work
Linux Magazine content is made possible with support from readers like you. Please consider contributing when you’ve found an article to be beneficial.

News
-
So Long Neofetch and Thanks for the Info
Today is a day that every Linux user who enjoys bragging about their system(s) will mourn, as Neofetch has come to an end.
-
Ubuntu 24.04 Comes with a “Flaw"
If you're thinking you might want to upgrade from your current Ubuntu release to the latest, there's something you might want to consider before doing so.
-
Canonical Releases Ubuntu 24.04
After a brief pause because of the XZ vulnerability, Ubuntu 24.04 is now available for install.
-
Linux Servers Targeted by Akira Ransomware
A group of bad actors who have already extorted $42 million have their sights set on the Linux platform.
-
TUXEDO Computers Unveils Linux Laptop Featuring AMD Ryzen CPU
This latest release is the first laptop to include the new CPU from Ryzen and Linux preinstalled.
-
XZ Gets the All-Clear
The back door xz vulnerability has been officially reverted for Fedora 40 and versions 38 and 39 were never affected.
-
Canonical Collaborates with Qualcomm on New Venture
This new joint effort is geared toward bringing Ubuntu and Ubuntu Core to Qualcomm-powered devices.
-
Kodi 21.0 Open-Source Entertainment Hub Released
After a year of development, the award-winning Kodi cross-platform, media center software is now available with many new additions and improvements.
-
Linux Usage Increases in Two Key Areas
If market share is your thing, you'll be happy to know that Linux is on the rise in two areas that, if they keep climbing, could have serious meaning for Linux's future.
-
Vulnerability Discovered in xz Libraries
An urgent alert for Fedora 40 has been posted and users should pay attention.