Programmable light stick with the Raspberry Pi Pico
Camera Settings
For an initial shot, I went outdoors in the evening, taking care to wear dark clothing. The camera was set up on a tripod a few meters away. With a short focal length, you can capture as much of the surroundings as possible. To have sufficient time for the shot, I set the exposure time to 20 seconds at a low ISO (not greater than 800, depending on the camera). Test shots helped me determine how much of the background could be captured with a chosen aperture setting. Depending on how much ambient light you have at dusk, the aperture can be f/8.0 or smaller.
If the camera's automatic focus doesn't work because of the low light level, a little trick helps: Focus on a bright object nearby; if necessary, shine a flashlight on it. Once you are confident, measure the distance and adjust the focus manually. In the end, with a little improvisation, the picture can be taken without an expensive camera system.
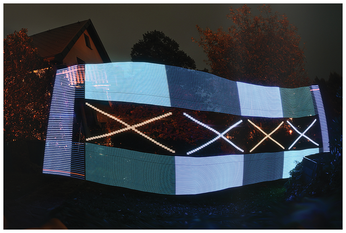
Some interesting light sequences are prepared in the source code of the project. The animations all run for about 15 seconds, so always a bit shorter than the exposure time. When shooting, it is important to move with as steady a hand as possible. For circular shots, the light stick offers a screw connection exactly in the middle. You can change everything, with nothing to limit your creativity (Figure 8). Compared with a static illuminated object, wherein only the same traces and patterns can be seen in the same image, this project shows its strengths. As far as favorable brightness and the timed sequence of LEDs are concerned, a targeted adjustment succeeds after only a few tests.
Conclusions
The Raspberry Pi light stick project has certainly not made me a light painting expert. Far more spectacular shots can be found online. However, combining my own interest in the Raspberry Pi and in photography gave me a lot of pleasure, and I still have a lot of fun designing new light images. Results from the Pi Pico toolset and MicroPython are completely satisfactory.
Infos
- Adafruit NeoPixel: https://www.adafruit.com/category/168
- Thonny: https://thonny.org
- Source code: https://github.com/swenae/lm_pico
« Previous 1 2
Buy this article as PDF
(incl. VAT)
Buy Linux Magazine
US / Canada
UK / Australia
Subscribe to our Linux Newsletters
Find Linux and Open Source Jobs
Subscribe to our ADMIN Newsletters
Support Our Work
Linux Magazine content is made possible with support from readers like you. Please consider contributing when you’ve found an article to be beneficial.

News
-
Canonical Releases Ubuntu 24.04
After a brief pause because of the XZ vulnerability, Ubuntu 24.04 is now available for install.
-
Linux Servers Targeted by Akira Ransomware
A group of bad actors who have already extorted $42 million have their sights set on the Linux platform.
-
TUXEDO Computers Unveils Linux Laptop Featuring AMD Ryzen CPU
This latest release is the first laptop to include the new CPU from Ryzen and Linux preinstalled.
-
XZ Gets the All-Clear
The back door xz vulnerability has been officially reverted for Fedora 40 and versions 38 and 39 were never affected.
-
Canonical Collaborates with Qualcomm on New Venture
This new joint effort is geared toward bringing Ubuntu and Ubuntu Core to Qualcomm-powered devices.
-
Kodi 21.0 Open-Source Entertainment Hub Released
After a year of development, the award-winning Kodi cross-platform, media center software is now available with many new additions and improvements.
-
Linux Usage Increases in Two Key Areas
If market share is your thing, you'll be happy to know that Linux is on the rise in two areas that, if they keep climbing, could have serious meaning for Linux's future.
-
Vulnerability Discovered in xz Libraries
An urgent alert for Fedora 40 has been posted and users should pay attention.
-
Canonical Bumps LTS Support to 12 years
If you're worried that your Ubuntu LTS release won't be supported long enough to last, Canonical has a surprise for you in the form of 12 years of security coverage.
-
Fedora 40 Beta Released Soon
With the official release of Fedora 40 coming in April, it's almost time to download the beta and see what's new.