Open source Symfonisk WiFi speaker
Extending Inputs
Because SD cards can die on you at any time, or because you might want to change the speaker software, the memory card of the Raspberry Pi should be accessible from the outside. To do this, use an extension that lets you insert an SD card at the back of the housing. You can also extend one of the USB ports, which opens up the possibility of connecting peripherals, such as a USB Ethernet adapter.
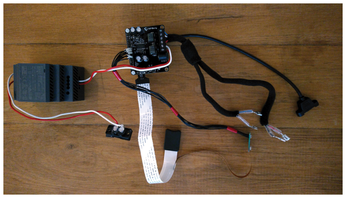
On the front of the Symfonisk speaker is a row of small control buttons. You need to keep them. Therefore, you have to redirect the key connections to the Raspberry pins. For this operation, you need an FFC/FPC 10-pin adapter with 0.5mm pin spacing. On the adapter are the 10 flat cable wires. Connect the adapter with the original Sonos cable and use a multimeter to measure which wire provides which function. The Sonos cable has small fuse tabs at the left and right ends. If you are using an FPC adapter on which these are not provided, the extensions can be removed carefully with a sharp knife.
To simplify your work, use the information in Table 2 to map the wires. Even after various Sonos conversions, the manufacturer does not appear to have changed the assignments. Play/Pause and GND are assigned twice. It is totally okay to use just one of the two wires on the adapter.
Table 2
Sonos Panel Mapping
| Adapter | Raspberry Pi |
||
|---|---|---|---|
| Pin | Function | Header Pin | GPIO No. |
| 1 |
Play/Pause |
23 |
11 |
| 2 |
Play/Pause |
23 |
11 |
| 3 |
Green LED |
16 |
23 |
| 4 |
Red LED |
18 |
24 |
| 5 |
GND |
20 |
GND |
| 6 |
Yellow LED |
22 |
25 |
| 7 |
GND |
20 |
GND |
| 8 |
White LED |
15 |
22 |
| 9 |
+ |
21 |
9 |
| 10 |
- |
19 |
1 |
Rewired
The adapter is soldered to the Amp2 pins with the switch wires according to the mapping in Table 2, which are selected so as not to interfere with the Amp2 functions. You need to solder and not use connectors; otherwise, speaker vibrations could easily loosen the connections. Because the pins are so close together, it is advisable to insulate the individual soldered pins with heat-shrink tubing.
Now use the original Sonos cables to connect the speakers. You can simply unplug the connector to the main board of the Sonos speakers. When connecting, it is essential to observe polarity: Sonos cables have the positive terminal on the larger plugs. Connecting each speaker to a stereo channel of the Amp2 (Figure 3) eliminates the need to build a crossover, which is done digitally with software later on.
You have now connected all the components, but you need to test the system before you put the components back into the housing. To do this, you have to set up the Raspberry Pi system and prepare the software.
Software
You can discover a number of other software solutions for multiroom streaming, and you are free to try them out. I decided to use SlimServer [5] (formerly known as Logitech Media Server) because the software is initially the easiest to set up.
Again the focus is on free (i.e., open source) software. Furthermore, you will want a centralized server with simple clients as playback devices, with multiroom and speaker synchronization support, expandability with plugins (e.g., for Internet radio), and of course support for streaming services.
SlimServer provides most functions. I used a server installed in a Docker container on a NAS system. The server itself is very easy to set up; you can find numerous instructions and how-tos on the web [6]. The speaker can optionally be operated as a SlimServer, but to do this, you would have to configure the function in the web front end (see the "First Start" section). I will not be looking into setting up the server, but instead cover setting up the speakers.
For the loudspeakers, I decided to go for the piCorePlayer [7]. The software is simple to set up, is easy to expand, and runs entirely in Rasp Pi memory; in this way, you cannot damage the SD card in case of power loss. Additionally, the piCorePlayer requires very little space: A simple memory card with 1GB capacity is fine.
Buy this article as PDF
(incl. VAT)
Buy Linux Magazine
US / Canada
UK / Australia
Subscribe to our Linux Newsletters
Find Linux and Open Source Jobs
Subscribe to our ADMIN Newsletters
Support Our Work
Linux Magazine content is made possible with support from readers like you. Please consider contributing when you’ve found an article to be beneficial.

News
-
So Long Neofetch and Thanks for the Info
Today is a day that every Linux user who enjoys bragging about their system(s) will mourn, as Neofetch has come to an end.
-
Ubuntu 24.04 Comes with a “Flaw"
If you're thinking you might want to upgrade from your current Ubuntu release to the latest, there's something you might want to consider before doing so.
-
Canonical Releases Ubuntu 24.04
After a brief pause because of the XZ vulnerability, Ubuntu 24.04 is now available for install.
-
Linux Servers Targeted by Akira Ransomware
A group of bad actors who have already extorted $42 million have their sights set on the Linux platform.
-
TUXEDO Computers Unveils Linux Laptop Featuring AMD Ryzen CPU
This latest release is the first laptop to include the new CPU from Ryzen and Linux preinstalled.
-
XZ Gets the All-Clear
The back door xz vulnerability has been officially reverted for Fedora 40 and versions 38 and 39 were never affected.
-
Canonical Collaborates with Qualcomm on New Venture
This new joint effort is geared toward bringing Ubuntu and Ubuntu Core to Qualcomm-powered devices.
-
Kodi 21.0 Open-Source Entertainment Hub Released
After a year of development, the award-winning Kodi cross-platform, media center software is now available with many new additions and improvements.
-
Linux Usage Increases in Two Key Areas
If market share is your thing, you'll be happy to know that Linux is on the rise in two areas that, if they keep climbing, could have serious meaning for Linux's future.
-
Vulnerability Discovered in xz Libraries
An urgent alert for Fedora 40 has been posted and users should pay attention.