Audacity
An Open Source Audio Editor and Recorder

Lead image © U.P. Images, Fotolia
If you are looking for an audio editing and creation tool, Audacity lets you create and edit professional audio files at no cost, all while using your existing hardware.
Special Thanks: This article was made possible by support from Linux Professional Institute
At some point, most of us need a tool to create, edit, or otherwise manipulate an audio file. If you’re looking for the right tool for the job, allow me to introduce Audacity. Audacity is a free, open source, multiplatform audio file creator and editor. Audacity is one of the first applications that I download on Linux, Windows, and macOS systems. Although developed by a team of volunteers, the interface is simple, the features are professional, and its overall quality rivals any commercial audio creator and editor that I’ve seen or used.
I’ve seen everyone from podcasters, bloggers, journalists, home recording artists, video editing professionals, and filmmakers use Audacity. To my surprise, I found a local professional recording studio that uses it.
Audacity's official features include the ability to:
- Record live audio.
- Record computer playback on any Windows Vista or later machine.
- Convert tapes and records into digital recordings or CDs.
- Edit WAV, AIFF, FLAC, MP2, MP3 ,or Ogg Vorbis sound files.
- Export and import AC3, M4A/M4R (AAC), WMA and other formats using optional libraries.
- Cut, copy, splice, or mix sounds together.
- Add numerous effects including changing the speed or pitch of a recording.
- Write your own plugin effects with Nyquist.
My favorite features include:
- An easy-to_use interface.
- Compatibility with a wide range of hardware.
- A lot of standard effects (e.g., Fade In, Fade Out, and Truncate Silence).
- Import from and export to multiple file formats.
- Mixing and rendering with a single menu option.
Working with Audacity
Working with Audacity is fun, and it’s very easy. It only takes a little practice to become proficient with the interface and all of the functions. There are plenty of online examples, videos, and demonstrations available. However, Audacity does have some quirks that you need to be aware of as you work with it.
One of its quirks is that you should attach record and playback hardware before you start Audacity. Generally speaking, Audacity will not recognize any hardware plugged in while it’s active. Close Audacity. Attach your microphones, headsets, or other audio devices. Reopen Audacity, and the new hardware should appear in the Microphone and Speaker lists (see Figure 2 and Figure 3). Once attached, you can switch among hardware without closing and reopening. For example, if you attach an external microphone and then start Audacity, you can use the external microphone for a recording, switch to the onboard microphone, and continue recording without closing and reopening.


As you can see from Figures 2 and 3, I have plugged in my Blue Yeti USB microphone and am using it for both recording and playback. The Yeti has a 3.5mm headphone jack, so I can record and play back the audio. Plugged directly into the laptop’s 3.5mm jack, the headset uses Audacity's default option.
Please note that if you’re either recording or playing an audio file, when you press the Stop button, the cursor returns to its last static position. If you press the Pause button, the cursor stops in its current position. For example, if you’re recording yourself with the microphone and need to stop to answer a phone call, press Pause to pick up where you took a break. Pressing Stop will send you back to the beginning of the file, which also means that if you press the Record button, you’ll start a new track rather than picking up where you paused.

To apply an effect on an entire file, press Ctrl+A to highlight the entire file, click Effect from the menu, and then select your effect. Most effects have their own settings that you can adjust to suit your needs. Before you apply an effect, click the Preview button to listen to a sample of the applied effect using your custom settings. Keep adjusting and previewing until you’re satisfied with your selections, and then click OK to apply the effect. You can apply effects to a portion of your audio file, too. To do so, highlight the area you want to adjust, and then repeat the above steps to apply an effect. Remember the universal undo key sequence, Ctrl+Z, if you want to reverse a change (see Figure 5).

Advanced Features
Audacity has some interesting advanced features. Several of them hide under the Generate menu (Figure 6), including Chirp, DTMF Tones, Noise, Silence, and Click Track.

The one I use most is Silence. I often add 10 or more seconds of silence at the beginning of an audio file that I know I’m handing off to another person for production to allow for intro music, sponsored ads, or voiceover mixing. To add silence to a track, click the mouse to set the cursor. Then, select Generate | Silence to provide a duration (Figure 7).

If you’re interested in some advanced editing techniques made easy by Audacity’s designers, one of my favorites is separating audio into left and right channels. This is a feature that has some interesting applications for both dialog and teaching. For example, if you’re learning a new spoken language, you could have English in one ear and the new language in the other. You can also use this effect to simulate people speaking from different sides of a room.
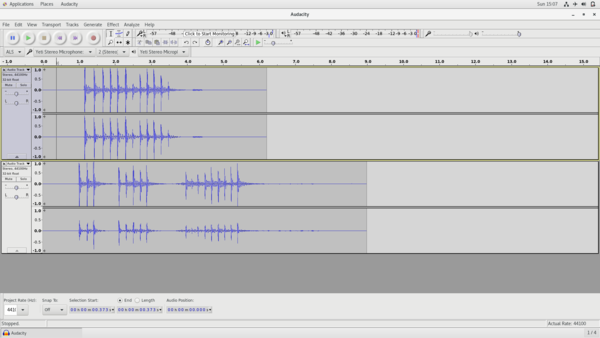
The effect is easy to apply to your audio files. You will need to have two tracks to make this work as shown in Figures 1 and 6. Select one of the tracks to play on the right side and move the slider in the left window all the way to the R. Do the same for the other track for the left side by moving the slider all the way to the L (see Figure 8).

Saving Projects and Exporting Audio
After you’ve perfected your audio file, you’ll want to save it. You have some options for doing this. If you need to save your project and come back to it later, preserving your edits and history, select File | Save Project. This will save your tracks just as they are now and will preserve your edit history as well. The file saves with a AUP extension. You can save your project and still export the audio for playback on other devices.
To save your file as a completed audio file, select File | Export Audio. Doing so opens a dialog (Figure 9), prompting you to select a file type. Note that MP3 is not available by default. It is shown in my options, because I installed the LAME MP3 encoding library so that I can export audio files into the MP3 format. The LAME library is easy to install on most systems. For Windows and macOS, you can go to the LAME download page and download the library and install as you would any other program.

For Linux, the process is different. For my CentOS 7 system, the process was easy. Other Linux distributions may require separate downloads for the LAME library. The Audacity documentation provides information for installing LAME for multiple distributions. Try using your package management system first to satisfy any dependencies. Audacity packages do exist for other distributions.
To download and install the LAME and associated dependencies for my system, I used the Yum installer:
# yum -y install lame
To check or activate this plugin after install, go to Edit | Preferences | Libraries (Figure 10).

If the MP3 Library Version appears, then the library is registered (see Figure 10). If the MP3 Library Version does not exist, you will need to click the Locate button and browse to the correct library file (see Figure 11).

Clicking the Download button either on the Locate Lame or in the Preferences | Library dialog will open the MP3 LAME library install directions in a browser, but it does not actually download the required files.
You may also download the source code for Audacity and LAME, compile them on your system so that you can enable or disable options, and customize your installation. I have never needed to compile from source, because the standard features and locations have always worked for me.
Buy Linux Magazine
Subscribe to our Linux Newsletters
Find Linux and Open Source Jobs
Subscribe to our ADMIN Newsletters
Support Our Work
Linux Magazine content is made possible with support from readers like you. Please consider contributing when you've found an article to be beneficial.
News
-
Linux Kernel Reducing Long-Term Support
LTS support for the Linux kernel is about to undergo some serious changes that will have a considerable impact on the future.
-
Fedora 39 Beta is Now Available for Testing
For fans and users of Fedora Linux, the first beta of release 39 is now available, which is a minor upgrade but does include GNOME 45.
-
Fedora Linux 40 to Drop X11 for KDE Plasma
When Fedora 40 arrives in 2024, there will be a few big changes coming, especially for the KDE Plasma option.
-
Real-Time Ubuntu Available in AWS Marketplace
Anyone looking for a Linux distribution for real-time processing could do a whole lot worse than Real-Time Ubuntu.
-
KSMBD Finally Reaches a Stable State
For those who've been looking forward to the first release of KSMBD, after two years it's no longer considered experimental.
-
Nitrux 3.0.0 Has Been Released
The latest version of Nitrux brings plenty of innovation and fresh apps to the table.
-
Linux From Scratch 12.0 Now Available
If you're looking to roll your own Linux distribution, the latest version of Linux From Scratch is now available with plenty of updates.
-
Linux Kernel 6.5 Has Been Released
The newest Linux kernel, version 6.5, now includes initial support for two very exciting features.
-
UbuntuDDE 23.04 Now Available
A new version of the UbuntuDDE remix has finally arrived with all the updates from the Deepin desktop and everything that comes with the Ubuntu 23.04 base.
-
Star Labs Reveals a New Surface-Like Linux Tablet
If you've ever wanted a tablet that rivals the MS Surface, you're in luck as Star Labs has created such a device.