Network knowledge at your fingertips with NetBox
Redis
Your next installation step is to install Redis [6] using:
$ sudo apt install -y redis-server
You need to verify that you are now running at least version 4.0 of Redis with:
$ redis-server -v
The output you see should be something like this:
Redis server v=6.0.16 sha=00000000:0 malloc=jemalloc-5.2.1 bits=64 build=a3fdef44459b3ad6
Lastly, you need to verify that the Redis service is working properly. Enter the following command:
$ redis-cli ping
which should result in PONG as the response.
NetBox and Dependencies
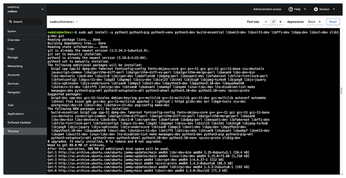
You will need to also install the NetBox dependencies (as shown in Figure 3) using:
$ sudo apt install -y python3 python3-pip python3-venv python3-dev build-essential libxml2-devlibxslt1-dev libffi-dev libpq-dev libssl-dev zlib1g-dev git
Double-check that you have at least version 3.8 of Python [7] installed by running:
$ python3 -V
Now you need to create the installation directory and cd (change directory) into it and download NetBox with:
$ cd ~
$ sudo mkdir -p /opt/netbox/
$ cd /opt/netbox/
$ sudo git clone -b master --depth 1 https://github.com/netbox-community/netbox.git .
Note: The period (.) at the end of the last command is required for the command to work properly.
Next you need to create the NetBox user and change ownership of the installation directory to that user with:
$ sudo adduser --system --group netbox
$ sudo chown --recursive netbox /opt/netbox/netbox/media/
Configuration
If you read the NetBox documentation, you will notice that my configuration instructions vary somewhat from the documentation. The documentation does mention doing what I recommend, but it doesn't make it obvious, so I will try to make these steps a bit easier to understand.
First, I'll edit the NetBox configuration file using Cockpit [8] on Ubuntu Server (see the "Config Editors" box) as follows:
$ cd /opt/netbox/netbox/netbox/
$ sudo cp configuration_example.py configuration.py
$ sudo nano configuration.py
Config Editors
I did the install for this article using Cockpit on Ubuntu Server because (in my experience) it makes administration very easy. I installed a 45Drives add-on for Cockpit called cockpit-navigator [9], which greatly improves running servers in general, especially if you need to edit lots of config files and create configs from templates and perform other common configuration actions regularly. You can also do all of this in the terminal (which Cockpit also includes) if you prefer to use something like nano [10] or Vim [11].
If you are also installing this on Ubuntu Desktop, use:
$ sudo gedit configuration.py
For versions of Ubuntu newer than 20.04, use:
$ sudo gnome-text-editor configuration.py
You will then be able to edit the file directly in a text editor. This might be easier if you are less familiar with using Vim or nano from the terminal.
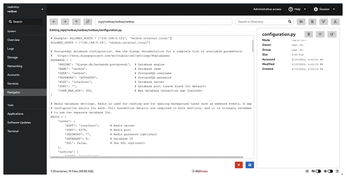
You will need to modify four keys in the config file (Figure 4). First, you will change the ALLOWED_HOSTS parameter:
ALLOWED_HOSTS = ['netbox.example.com', '192.0.2.123']
If you unsure about what to enter here, use your server's IP address, which you can get by typing $ ip address into the terminal. You can also type $ hostname into the terminal and put your server's hostname here as well, or you can use both if that makes sense. My installation has four entries here, separated by commas. You will enter this in a web browser later to get to the NetBox web GUI.
Warning: Do not type this in the example ALLOWED_HOSTS comment directly above the ALLOWED_HOSTS parameter. If you get a 400 bad request error, I suggest checking the ALLOWED_HOSTS comment to see if you accidentally entered your IP address or hostname there.
Next you need to modify the database parameters as shown in Listing 1.
Listing 1
Modifying Database Parameters
01 DATABASE = {
02   'ENGINE': 'django.db.backends.postgresql', # Database engine
03   'NAME': 'netbox',                          # Database name
04   'USER': 'netbox',                          # PostgreSQL username
05   'PASSWORD': 'SuperSecurePassword',         # PostgreSQL password
06   'HOST': 'localhost',                       # Database server
07   'PORT': '',                                # Database port (leave blank for default)
08   'CONN_MAX_AGE': 300,                       # Max database connection age (seconds)
09 }
You then need to modify the Redis parameters as shown in Listing 2.
Listing 2
Modifying Redis Parameters
01 REDIS = {
02   'tasks': {
03     'HOST': 'localhost',  # Redis server
04     'PORT': 6379,         # Redis port
05     'PASSWORD': '',       # Redis password (optional)
06     'DATABASE': 0,        # Database ID
07     'SSL': False,         # Use SSL (optional)
08   },
09   'caching': {
10     'HOST': 'localhost',
11     'PORT': 6379,
12     'PASSWORD': '',
13     'DATABASE': 1,        # Unique ID for second database
14     'SSL': False,
15   }
16 }
Finally, you will need to modify the secret key parameter. First, you need to generate your secret key with:
$ python3 /opt/netbox/netbox/generate_secret_key.py
Copy and paste the generated key into the SECRET_KEY parameter space below the REDIS parameter. You will use this key if you decide to set up a second NetBox server for backup, so jot it down for future reference. If you forget to do this, you can always get back into configuration.py to retrieve the secret key if needed later.
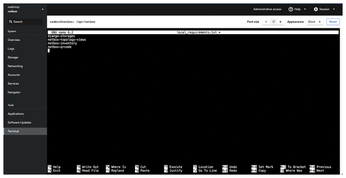
Now you need to create and edit the local_requirements.txt file with:
$ cd /opt/netbox/
$ sudo nano local_requirements.txt
If you intend to use a remote database as mentioned in the online documentation, you will want to enter django-storages [12] here. What is not clear in the documentation is that you also need to enter any other plugins that you intend to use in the local_requirements.txt file in /opt/netbox. (For a list of NetBox plugins, see the NetBox Community Plugins GitHub page [13].) In addition, the plugins need to be listed in the previously modified configuration.py file in /opt/netbox/netbox/netbox.
In local_requirements.txt, simply enter each desired plugin (Figure 5), one per line, as follows:
django-storages
netbox-topology-views
netbox-inventory
netbox-qrcode
In local_requirements.txt, note that the plugins use dashes (-). When you edit the configuration.py file, you will change some of the dashes to underscores (_). I found this super frustrating and inconsistent because it is not always dashes in one place and underscores in the another, but it is often different between the two. (If you build plugins for NetBox and can avoid this, please consider making your plugin names one word to avoid this issue.)
Now that you have edited and saved the local_requirements.txt file to include your desired plugins, you also need to enable them by once again modifying the configuration.py file. You can open configuration.py with:
$ cd /opt/netbox/netbox/netbox/
$ sudo nano configuration.py
Look for the PLUGINS parameter and, depending on the plugin, you may also need to change PLUGINS_CONFIG as well. Based on the plugins I added to my local_requirements.txt file, my PLUGINS section should look like this:
PLUGINS = [
  'netbox_inventory',
  'netbox_qrcode',
  'netbox_topology_views'
]
I will use a configuration that is similar to the default suggested plugin configuration as shown in Listing 3.
Listing 3
Plugin Configuration
01 PLUGINS_CONFIG = {
02   "netbox_inventory": {},
03   "netbox-qrcode": {
04     'with_text': True,
05     'text_fields': ['name', 'serial'],
06     'font': 'ArialMT',
07     'text_location': 'up',
08     'qr_version': 1,
09     'qr_error_correction': 0,
10     'qr_box_size': 4,
11     'qr_border': 4,
12     'cable': None,
13     'rack': {
14     'device': {
15       'qr_box_size': 6,
16       'custom_text': None,
17     }
18     }
19   },
20   "netbox_topology_views": {
21     'static_image_directory': 'netbox_topology_views/img',
22     'allow_coordinates_saving': True,
23     'always_save_coordinates': True
24   }
25 }
I tend to switch things up between using nano in the terminal and using Navigator from 45Drives to modify files, but you can also use gedit [14] (or Gnome Text Editor [15]) if using Ubuntu Desktop to modify the configuration.py file and to create and populate the local_requirements.txt file. I prefer troubleshooting configs with a graphical editor to remembering the quit and save commands in a terminal text editor. It is all the same to NetBox in the end, so use whichever is easiest for you.
I strongly recommend setting the allow_coordinates_saving and always_save_coordinates to False because they ended up causing me quite a bit of grief. It appears that what happens is that they will set a custom field for each device. The problem with that is that you will actually need to create that custom field, and failure to do so will stop you from being able to edit the devices in any way after using the topology view. In short, I would set those parameters to false and read the plugin page carefully. If you get errors when trying to make changes to your devices after using the topology view plugin, create a custom field called Coordinates that is data type text and is hidden. Then follow the instructions on the plugin page to do the needed conversion. After that you will again be able to edit devices without getting an error message each time.
Having said that, the topology views plugin looks downright awesome, and I highly recommend it for creating topology maps. Just be aware that this error could occur and that there is a fix, even if it is a bit convoluted. I was able to tweet at the NetBox team, and the wonderful folks there helped me to find the GitHub issue on the plugin page that I needed to get it all sorted out. (Unfortunately, prior to that, I had given up the night before and tried recreating all of my devices – only to find myself in the same exact situation after looking at the topology view. Luckily for me, it wasn't too many devices and it was a great learning experience.)
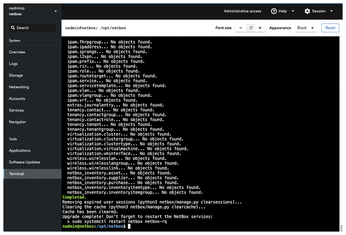
With the plugins sorted, you are ready to run upgrade.sh to install the plugins:
$ sudo /opt/netbox/upgrade.sh
Note, the syntax needs to be exact for the configuration.py file. I have found that even copying and pasting often results in errors. If you make an error, carefully read the output from the terminal and then go back and edit the configuration.py file until you get it right. The terminal output will tell you which line the issue is on and give a best guess as to the source of the problem. Remember, you can always add plugins and their configurations later by putting them into local_requirements.txt and configuration.py and running the upgrade.sh command in the future. I ended up using the configuration above, but that was not without some frustration. Bear in mind that the sample configurations in the NetBox documentation are just that and might need to have something added, removed, or otherwise changed in order to work properly.
NetBox now will tell you to restart the NetBox services (Figure 6). If you restart at this time, you will get the failure to restart message shown in Listing 4. You get the failure message because you have not yet created those services.
Listing 4
Failed Restart Message
$ sudo systemctl restart netbox netbox-rq
Failed to restart netbox.service: Unit netbox.service not found.
Failed to restart netbox-rq.service: Unit netbox-rq.service not found.
If you decide for whatever reason that you no longer want a plugin, then you can simply remove it from both files. If you are unsure, or if you would like to temporarily disable a plugin for some reason, then you can do so by removing it from configuration.py but leaving it in local_requirements.txt. In order to enable or disable a plugin, you will need to restart the NetBox service, which I will explain shortly.
You now need to create the NetBox superuser by entering:
$ source /opt/netbox/venv/bin/activate
The (venv) added to the command prompt is normal. Now, add the superuser:
(venv) $ cd /opt/netbox/netbox
(venv) $ python3 manage.py createsuperuser
You can use a deactivate command to leave the virtual environment and get back to a normal terminal window, but I usually found myself closing and opening a new terminal (or rather refreshing the page because I was connected using Cockpit).
With the superuser added, you will want to add the housekeeping script as a cron job to occasionally do some cleanup. To do this, add a link to the script in the cron.daily folder as follows:
$ sudo ln -s /opt/netbox/contrib/netbox-housekeeping.sh /etc/cron.daily/netbox-housekeeping
At this point, you should have a running NetBox instance that you can connect to by entering the IP address or hostname that you defined earlier in configuration.py. You will need to have the Uncomplicated Firewall (UFW), which might require running:
$ sudo ufw allow 9090
$ sudo ufw allow OpenSSH
$ sudo ufw allow https
$ sudo ufw allow http
$ sudo ufw enable
$ sudo ufw status
I added ports 9090 and 22 because I was using Cockpit and also wanted the ability to connect to this server using SSH, but that is beyond the scope of this article. If you don't know how to SSH into a server or haven't installed and used Cockpit or a similar server admin web GUI such as Webmin, I suggest you do those things first, because it will help to familiarize you with running servers without a GUI from the terminal. You can connect to your machine with SSH or Cockpit even if you are running the desktop version of Ubuntu.
« Previous 1 2 3 4 Next »
Buy this article as PDF
(incl. VAT)
Buy Linux Magazine
US / Canada
UK / Australia