Creating photo and video presentations with ffDiaporama
Showmaster

Your images and videos can look twice as good when presented correctly. ffDiaporama helps you create a great slideshow in almost no time.
Family and vacation photos are unique mementos. If you want to present them to a wider audience, however, the good old photo album quickly reaches its limits. A visually appealing photo presentation on your TV or video projector is more contemporary and sophisticated, especially if it is visually enhanced and accompanied by background music. ffDiaporama [1] lets you conjure up not only an attractive slideshow from conventional digital photos in an instant, it also archives it in many formats if needed.
The ffDiaporama software is found in the repositories of almost all the major distributions, but the version is not always up to date. Thus, it's a good idea to visit the project site to see whether newer packages exist: The developers also regularly provide the latest version for older operating system versions. Additionally, extensions such as clipart or background textures for ffDiaporama are also available.
Settings
After the install, you will find a program launcher by the name of Movie creator ffDiaporama in the Entertainment media or Multimedia submenu. The software then takes you to a split screen: In the upper part are four horizontal tabs on the left that each form a menu structure with a different function buttons directly below. Below these buttons, you will see an empty panel that spreads across the entire width of the window; this is where you later drop the photos for the slideshow into a timeline. Bottom left is a small movie player that plays the new presentation at the press of a button.
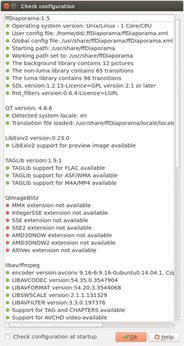
Before you start a new presentation project, you should first verify that your system has all the necessary codecs and other components. Click on the Settings button and then the Check Configuration button in the Application Settings window that appears. ffDiaporama then checks that the audio and video codecs exist as well as the various libraries and system components that it needs.
In a separate window, the program shows the results of the test and marks each correctly functioning component with a green dot. A yellow marker indicates a partially functioning component; a red dot indicates that the required codec or library is missing. Especially with audio and video codecs, ffDiaporama does not need all the potentially available formats, because it actually only uses a few of them as a rule (Figure 1).
In the Application Options tab of the settings window, you can define some basic settings, although the defaults are usually fine. If you are working on an older computer, however, you will want to reduce the Frame rate and the Max video preview height in the Preview options section; the default values could otherwise cause dropouts when playing the slideshow in preview mode.
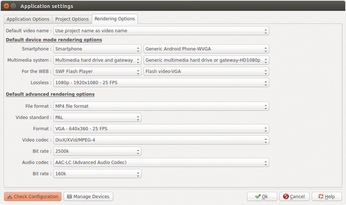
The settings in the Project Options tab are fairly extensive. You will primarily want to look at the Project geometry option. If you will be watching the presentation on an older TV set or need to integrate older analog video sequences, you'll probably want to switch the default screen format from 16:9 to 4:3. Many projectors also natively support the 4:3 aspect ratio. However, modern flatscreen TV sets feel more comfortable with 16:9 format.
In the Rendering Options tab, you need to specify which codecs, bitrates, and resolutions to use for movie clips. ffDiaporama makes it easy for you and selects a matching audio format depending on the desired video output format (Figure 2),
And Action!
To start a new project, click the New Project button on the left of the program window. In the resulting dialog, enter a title, an author, and an optional comment. Then, complete the basic settings by pressing Create Project. Go to the Project tab and design the lead image for the slideshow by clicking Add Title on the top left in the window.
Selecting the Add a Predefined Title Slide menu item displays a selection window with various title templates. ffDiaporama offers various settings and various predefined animations for this. After clicking OK, the software adds the lead image to the slide timeline in the edit window. If you opt for Add Empty Slide, ffDiaporama lets you choose the design.
Now you can fill the slide timeline with the actual content. To do so, press Add Files and, in the file manager that then opens, select the desired images. Then, press OK to add your selection to the bar with the slides. The program displays the slides sequentially in the bar; you can select the slides individually for editing if necessary. To change the order of the slides in the timeline, just drag and drop them to the desired location. At the bottom of the program window, you can start a preview by clicking on the play button.
The timeline that runs below the preview gives you a precise overview of the duration of each slide and the total playing time. In the slide bar above, you will find the image transition effects characterized by small icons on the left next to the images. Double-clicking on them opens the selection menu where you can choose both the type and the length of the transition. To do this, the software displays a view with various animated thumbnails so that you can easily choose a different effect for each slide.
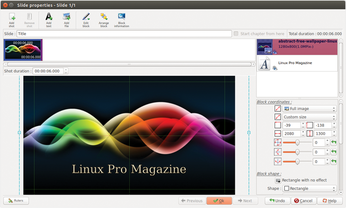
ffDiaporama does not initially integrate any text into your presentation, so you might want to add text manually now. Double-clicking on the desired image opens the Slide properties dialog. To add text, click the Add a new title block button. The software then opens a small text editing window, where you can enter and format descriptive text (Figure 3). The grid that appears in the preview above the slide, facilitates moving and positioning the text. Click OK to finish editing.
To move to the previous or next slide, click the blue arrows with those labels at the bottom of the window. The software then automatically saves the settings of the completed slide.
Music Box
If you want to add music accompaniment to your slideshow, first select the slide from which you want the music to start. Then, in the Project tab, press Edit | Edit music or use the right-click context menu. In the dialog, you can then add one or more audio files to the project. The audio files then appear in a list at the bottom of the settings window. If needed, you can remove songs or change their order.
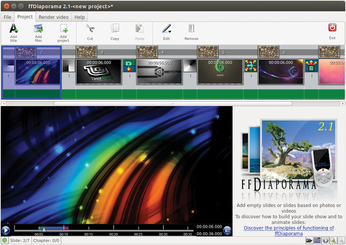
After pressing OK to confirm, the program adds a green bar that represents the audio file (Figure 4) to the timeline at the bottom of the main window. Make sure that the length of the audio files and the slideshow match. If your audio files are too long, ffDiaporama will just chop them off at the end of the presentation. The software does not offer a tool for fading music in or out or for editing the length; you need to do this in advance with a program like Audacity.
Buy this article as PDF
(incl. VAT)
Buy Linux Magazine
US / Canada
UK / Australia
Subscribe to our Linux Newsletters
Find Linux and Open Source Jobs
Subscribe to our ADMIN Newsletters
Support Our Work
Linux Magazine content is made possible with support from readers like you. Please consider contributing when you’ve found an article to be beneficial.

News
-
Canonical Releases Ubuntu 24.04
After a brief pause because of the XZ vulnerability, Ubuntu 24.04 is now available for install.
-
Linux Servers Targeted by Akira Ransomware
A group of bad actors who have already extorted $42 million have their sights set on the Linux platform.
-
TUXEDO Computers Unveils Linux Laptop Featuring AMD Ryzen CPU
This latest release is the first laptop to include the new CPU from Ryzen and Linux preinstalled.
-
XZ Gets the All-Clear
The back door xz vulnerability has been officially reverted for Fedora 40 and versions 38 and 39 were never affected.
-
Canonical Collaborates with Qualcomm on New Venture
This new joint effort is geared toward bringing Ubuntu and Ubuntu Core to Qualcomm-powered devices.
-
Kodi 21.0 Open-Source Entertainment Hub Released
After a year of development, the award-winning Kodi cross-platform, media center software is now available with many new additions and improvements.
-
Linux Usage Increases in Two Key Areas
If market share is your thing, you'll be happy to know that Linux is on the rise in two areas that, if they keep climbing, could have serious meaning for Linux's future.
-
Vulnerability Discovered in xz Libraries
An urgent alert for Fedora 40 has been posted and users should pay attention.
-
Canonical Bumps LTS Support to 12 years
If you're worried that your Ubuntu LTS release won't be supported long enough to last, Canonical has a surprise for you in the form of 12 years of security coverage.
-
Fedora 40 Beta Released Soon
With the official release of Fedora 40 coming in April, it's almost time to download the beta and see what's new.