Creating a LibreOffice Music Database
LibreOffice Base Database
LibreOffice makes use of wizards in most of its applications. I find that wizards are very helpful in LibreOffice Base, especially for users that are not expert in the SQL language. The first step is to create a new database. While LibreOffice Base is capable of importing data directly from a spreadsheet, I prefer to copy and paste the table data from Calc into a predefined template in Base using a wizard.
Create New Database
Next I create and register a new database as follows (Figure 4):
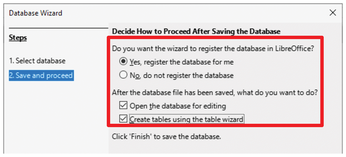
- Open LibreOffice Base and the Database Wizard appears
- Click Create a new database
- Click Next >
- Check the following options:
- Yes, register the database for me
- Open the database for editing
- Create tables using the table wizard
- Click Finish
- Click Save As MusicLibrary.odb
Note: Registering the database allows the database to be used by other LibreOffice components such as Writer. It is not required. You can use it at your own discretion.
Next, the Table Wizard (Figure 5) opens, prompting you to do the following steps:
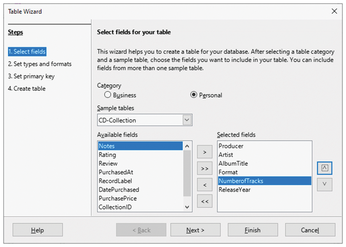
- Click on Select fields under Steps. Select Personal under Category. Then select CD-Collection from Sample tables drop-down list. Next, select and move the following fields from Available fields to Selected fields: Producer, Artist, AlbumTitle, Format, NumberofTracks, ReleaseYear. (Note: Some of these field names will be modified.) Finally, click Next >.
Click on Set types and formats. First, change the Field name but keep the corresponding Field type. For the Song, Artist, and Album fields, set Length to 150 (Figure 6). Next change the Field name of the following fields: Producer to Song, AlbumTitle to Album, Format to Genre, NumberofTracks to Track, and ReleaseYear to Year. Then, click Next >.
Figure 10: Assigning aliases.- Click on Set the primary key. Check the Create a primary key box if not marked already. Select options: Create a primary key, Automatically add a primary key, and Auto value. Click Next >.
- Click on Create a table. First change the name to MyTable, and then select the option Insert data immediately. Click Finish.
(The Table Wizard now closes and Table Data View opens. Confirm column labels and close the window. The LibreOffice Base window appears with Database, Tasks, and Tables sections visible.)
Once the table is created in Base, open the Music.txt spreadsheet in LibreOffice Calc. Select and copy all data cells from A1 through the last cell (that includes column label cells).
Now, switch back to Base to paste the copied table data into MyTable in Base.
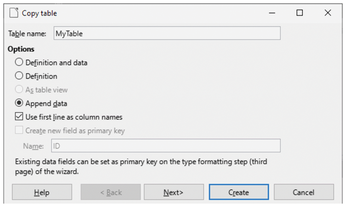
In the Tables section, select MyTable. Right-click and choose paste from the drop-down menu (the Copy table dialog opens, see Figure 7). Select Append data, check Use first line as column names, and click Next > (which will take you to the Assign columns dialog). Review to confirm that the Source table data aligns with the destination table labels, and then click Create.
Double-click MyTable to open the Table Data View dialog and confirm that the data copied correctly. Set the width of the columns (the width of the query result field is determined by the width of the table fields.) Uncheck Automatic.
Set Up and Run Query
I now have the database ready to run SQL queries to find songs, artists, and album information from my music library. The next step is to set up and run queries on the database.
LibreOffice Base provides three methods to create SQL queries: Create Query in Design View, Use Wizard to Create Query, or Create Query in SQL View. I use the Use Wizard to Create Query method to set up and run a query. As an example, I first set up a query search for all songs by a particular artist. Then, I use the Standard Filter on the query results to refine my searches.
To begin, click on the Queries icon in the Database section. Then click on Use Wizard to Create Query, and complete the following steps in the Query Wizard:
Click on Field selection in the Query Wizard: Select Song, Artist, and Album in the Available fields window, and then move them to the Fields in the Query window. Use the up and down arrows to change the order if necessary (Figure 8).
Figure 10: Assigning aliases.- Click on Sorting order: Sort in ascending order by Artist first, then Album, and then Song.
Click on Search conditions: Select MyTable.Artist in the Fields drop-down list (Figure 9). Select like from the Condition drop-down list and enter %Herbie H% in the Value field.
Figure 10: Assigning aliases.
Note: In SQL, the % sign is used as a wildcard character. The like condition matches string patterns. The SQL view shows the SQL statement as:
SELECT "Artist" AS "Artist", "Song" FROM "MyTable" WHERE "Artist"LIKE '%Herbie H%'
(Skip the Grouping and Grouping conditions steps in the Query Wizard because grouping will not be used for this project.)
Click on Aliases (listed at Step 7 in the Query Wizard). The alias for MyTable.Artist defaults to Artist, and the alias for MyTable.Song defaults to Song. I use the defaults (as shown in Figure 10).
Figure 10: Assigning aliases.- Click on Overview. In the Name of the query field, I change the default name Query_MyTable to Query_ArtistsAndSongs. Next review the contents in the Overview window. Use the default Display Query option.
« Previous 1 2 3 Next »
Buy this article as PDF
(incl. VAT)
Buy Linux Magazine
US / Canada
UK / Australia
Subscribe to our Linux Newsletters
Find Linux and Open Source Jobs
Subscribe to our ADMIN Newsletters
Support Our Work
Linux Magazine content is made possible with support from readers like you. Please consider contributing when you’ve found an article to be beneficial.

News
-
Canonical Releases Ubuntu 24.04
After a brief pause because of the XZ vulnerability, Ubuntu 24.04 is now available for install.
-
Linux Servers Targeted by Akira Ransomware
A group of bad actors who have already extorted $42 million have their sights set on the Linux platform.
-
TUXEDO Computers Unveils Linux Laptop Featuring AMD Ryzen CPU
This latest release is the first laptop to include the new CPU from Ryzen and Linux preinstalled.
-
XZ Gets the All-Clear
The back door xz vulnerability has been officially reverted for Fedora 40 and versions 38 and 39 were never affected.
-
Canonical Collaborates with Qualcomm on New Venture
This new joint effort is geared toward bringing Ubuntu and Ubuntu Core to Qualcomm-powered devices.
-
Kodi 21.0 Open-Source Entertainment Hub Released
After a year of development, the award-winning Kodi cross-platform, media center software is now available with many new additions and improvements.
-
Linux Usage Increases in Two Key Areas
If market share is your thing, you'll be happy to know that Linux is on the rise in two areas that, if they keep climbing, could have serious meaning for Linux's future.
-
Vulnerability Discovered in xz Libraries
An urgent alert for Fedora 40 has been posted and users should pay attention.
-
Canonical Bumps LTS Support to 12 years
If you're worried that your Ubuntu LTS release won't be supported long enough to last, Canonical has a surprise for you in the form of 12 years of security coverage.
-
Fedora 40 Beta Released Soon
With the official release of Fedora 40 coming in April, it's almost time to download the beta and see what's new.