Data Rescue
Lifebuoy
ByArmed only with standard Linux tools, users can recover files, resurrect partitions, and rescue damaged media.
Just imagine a good friend coming back from vacation totally downcast: Iceland was a total failure, she says – bad weather, lousy hotel, and her camera ate up its memory card. All the geysers and trolls she photographed are now gone. Fortunately, special rescue tools exist precisely for such cases. You get to work immediately, hoping to make your friend happy.
Don’t Panic
To avoid causing even more damage, it is important to keep calm in this kind of emergency. If you see a read error during normal operation, make a backup of the disk immediately, thus rescuing the remaining readable files at least (see the “Examination Board” box). As in the digital camera example here, if you are missing multiple files and directories or experience severe read errors, switch off the power quickly. This is the only way to prevent further writes, which would exacerbate the damage. The approach that follows will help you save not only hard disks, memory cards, and SSDs, but also scratched CDs, DVDs, and Blu-rays – assuming the disks do not use copy protection.
First, you should enable physical write protection for the defective medium as soon as possible. This means that the rescue attempt cannot destroy the operating system, and the rescue tools cannot destroy the data. The memory card from the digital camera, in the case initially described, turned out to be a slightly older 2GB SD card; write-protecting it was easily accomplished by moving the small write-protect tab on the right side.
USB sticks, hard drives, and SSDs usually do not have a write-protect switch. For critical data, you can buy a write-protection adapter, as used in computer forensics. A hard drive or SSD with less important data can be removed and plugged into an external USB enclosure, which at least prevents the Linux system used to rescue data from arbitrarily using the same disk. This method is quite common with swap partitions – or partitions that Linux incorrectly assumes to be swap.
Where’s Waldo?
Now you can boot the PC on which you want to perform the rescue. If it does not have Linux installed, you can simply boot from any Live CD. When Linux is running, connect the defective medium. An SD card, for example, can be slotted into a USB card reader and plugged into the Linux PC. Do not mount the data storage medium, even if Linux suggests doing so.
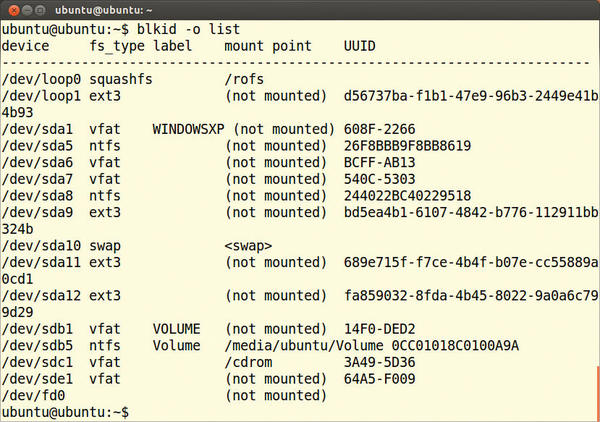
Next, you need to find out which device file you can use to access the defective medium. The command to help you with this is
blkid -o list
which you need to run as root, like all the other commands in this article. The command outputs a list of all the connected media and their device files (Figure 1). You can use the label column for orientation. The size of the partitions provides further evidence, as does the output by the
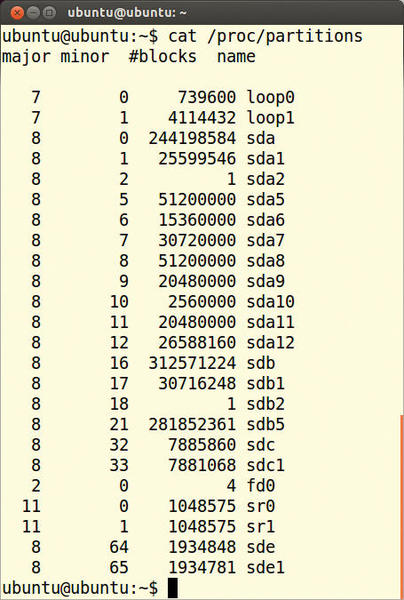
cat /proc/partitions
command (Figure 2).
Make a note of the name of the partition or entire disk that you want to rescue. In Figure 1, blkid identified a partition with the device name /dev/sde1 (Figure 3). If the programs cannot find any partitions, that doesn’t necessarily mean all is lost: You can then call fdisk -l, which lists all connected data storage media. In this case, you need to make a note of the device file for the complete volume; in the example, this is /dev/sde.

Clone Wars
Trying to restore files directly on the failed disk is not a good idea. The risk that the tools destroy even more of the data is simply too great, and then you have no way to make a second rescue attempt. Therefore, it is advisable to first make a bit-perfect copy of the volume.
Of course, the hard disk on the rescue PC must have enough free disk space for the copy, and you need to store the restored data somewhere. Consequently, at least two, and preferably three, copies of the entire data storage medium should fit on the disk. For a 2GB memory card, you should therefore have at least 6GB of free space on the rescue disk. If you need to save an entire hard disk instead of just a partition, you might need to install an additional empty, larger hard drive to recover the data.
The duplicate itself is created with a small tool named GNU ddrescue, which reads a medium bit-by-bit and stores the content into a file known as an image. You will generally need to install ddrescue via the package manager; in Ubuntu, it is in the gddrescue package. GNU ddrescue has replaced the dd_rescue tool in many distributions; in some repositories, you will even find both tools.
The two programs differ in terms of their parameters and their approach: The newer ddrescue reads from the disk in quite large steps, skipping bad blocks first. After it has copied the good blocks, it checks the bad blocks again and tries to read as much data as possible from them.
The program remembers its actions, so you can interrupt the read operation and then continue some time later. This is particularly useful for large disks because reading can take several hours. In contrast, dd_rescue first attempts to identify the unreadable sectors. If you have a choice, you should go for GNU ddrescue.
Padding
Both tools replace unreadable locations in the image file with zeros. Although this method might make it impossible to save the full structure, you might at least rescue part of it. Because the image generated by ddrescue can be extremely large, you need to save it to a partition that can deal with these chunks of data. This means that external USB hard disks with FAT32 filesystems are not suitable.
The following example copies the content of the /dev/sde1 partition to /home/tim/copy.img:
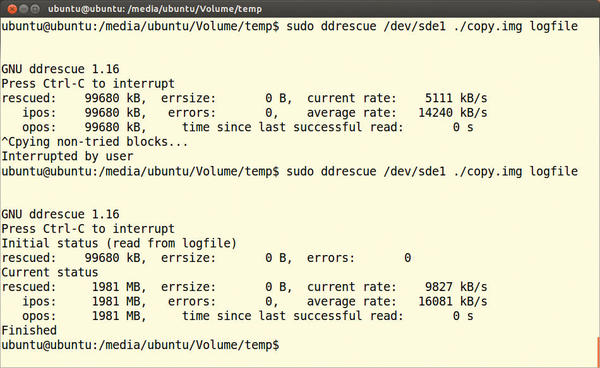
ddrescue /dev/sde1 /home/tim/copy.img logfile
This command stores information in logfile that allows you to interrupt the copy with Ctrl+C and then continue later with the same command (Figure 4). You can also save the entire disk, rather than just the sde1 partition:
ddrescue /dev/sde /home/tim/copy.img logfile
This command makes sense in particular if blkid does not recognize any partitions or if you know that the partition table is damaged. If possible, you should create a copy of the image you create. If rescue attempts fail, at least you do not need to waste time reading the faulty disk again. On a more granular level, if you cannot read an individual file, you can at least save its readable parts with the
ddrescue file.txt /media/rescue/file.txt
command.
Cliffhanger
Once you have used ddrescue to back up a partition, you can try to mount the partition. The following command mounts it as read-only in the /mnt directory for safety’s sake:
mount -o loop,ro /home/tim/copy.img /mnt
Now back up all the important files from the /mnt directory. In the case of the memory card from the camera, a few photos have already appeared again below /mnt. After quickly checking with the photographer, it seems that more than half the shots are still missing. So, now it’s time to fire the big guns, which only work on umounted media; in other words, time to umount /mnt.
Checker
If the partition in question uses an ext filesystem, you can now use the command fsck to fix it:
fsck.ext3 -p copy.img
The parameter -p tells fsck to correct the problems directly. On an ext4 filesystem, you would use fsck.ext4 instead of fsck.ext3. Similarly, fsck.vfat repairs partitions with a FAT32 filesystem, which is used on USB sticks and SD cards. Once fsck has completed its work, you can mount the image as before and read the files.
Similar repair tools exist for other filesystems. On NTFS filesystems, for example, ntfsfix will help; it is part of the ntfsprogs collection, which in turn is part of the NTFS driver. The tool is therefore installed by default on most distributions, so that the ntfsfix copy.img command will fix the image directly.
Disk Workshop
If you need to use ddrescue to rescue a whole data storage medium rather than just one partition, you can run fdisk -l copy.img to see whether the partition table is still present and correct. This gives you a list of all partitions, with the numbers behind the names in the first column matching the respective numbers in the device files.
If you are repairing a disk with the newer GPT (GUID partition table), use gdisk. You might have to install this tool using the package manager. On Ubuntu, it resides in the gdisk package. The following command:
gdisk -l copy.img
lists partitions in the image.
Finds
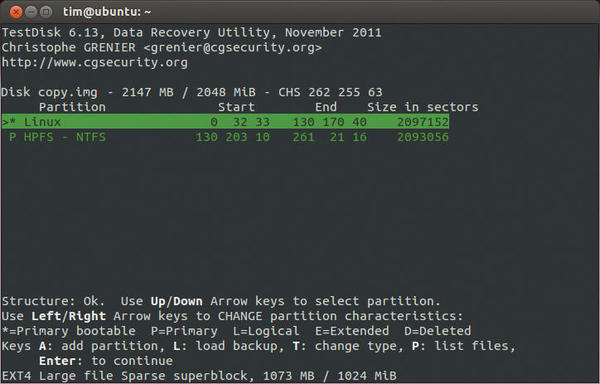
If you are missing one or more partitions, you can run TestDisk against the image [2]. This program tries to detect and recover partitions. You will need to install TestDisk using the package manager; on Ubuntu, it resides in the testdisk package. Then, you simply call the tool and pass in the image file with testdisk copy.img, which takes you to the text-based user interface (Figure 5).

At the top, TestDisk again presents the image file. Make sure that [Proceed ] is highlighted at the bottom and press Enter. Next, you need to let TestDisk know whether the drive uses the modern GPT. In this case, select [EFI GPT]; otherwise, use [Intel]. Finally, restart with [Analysis].
TestDisk now shows a summary of the current situation in the upper part of the window. Missing or duplicate partitions in the list indicate a defect. In this case, launch [Quick Search]. TestDisk runs a search and then lists all the partitions it finds (Figure 6). Pressing P lets you look at the files and directories on a partition; the arrow and Enter keys are used for navigation. Pressing Q takes you back to the list of all partitions.
After the tool has tracked down all the partitions, select [Write]. If you are still missing one or several partitions, select [Deeper Search]. TestDisk then performs an in-depth analysis, which takes a little longer. It might even reveal ancient partitions that partially overlap. Access the previously missing partition in the list; if in doubt, just guess. Use the arrow keys to make a primary or logical partition from the rediscovered partition. This partition is then restored by TestDisk.
TestDisk ignores all partitions with a D in the first column, so they remain deleted. When you are satisfied, press Enter and write the new partition table with [Write]. Press Y to confirm the prompt and then press OK to enable the write. [Quit] lets you go back a menu until TestDisk finally quits.
Choices
To mount the restored partitions, use the package manager to install the kpartx program, which is part of the multipath-tools package (on Ubuntu, the package goes by the same name) and then point it to the image file:
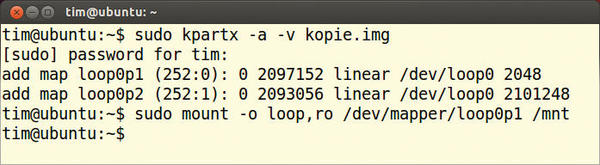
kpartx -a -v copy.img
The tool now creates a separate device below /dev/mapper for each partition in the image file. You only have to read the device file for your partition in the information displayed and then mount (Figure 7):
mount -o loop,ro /dev/mapper/loop0p1 /mnt
The command in this example mounts the first partition (loop0p1) from the image in the /mnt subdirectory.
Smile Please
If files are still missing, as in the case of the memory card with the photos, the PhotoRec tool can help. PhotoRec tries to recover deleted files by searching the entire disk for signs of life or for typical identifying characteristics of files. As the name suggests, it was originally invented for recovering deleted photos, but it can also bring many other files back to life. PhotoRec is usually found in the testdisk package. If you have not yet installed it, use the package manager to do so. Then, simply pass the name of the image file to the tool:
photorec copy.img
PhotoRec shows the image name in the upper part of the screen; now, you can press Enter to confirm and see a choice of all the partitions found by the tool (Figure 8). In the Partition list, PhotoRec shows all the file types that it can restore; click [File Opt] to mark the file types you want PhotoRec to recover.

To select the partition you want PhotoRec to search, use the arrow keys and press Enter. Next, select the filesystem used on the partition. If you are unsure, you can use the commands introduced previously: fdisk and gdisk. The memory card with photos is FAT16, which isn’t listed, so the [Other] item is the right choice. In the next step, check [Whole] to tell PhotoRec to check the entire partition, not just the empty space.
Finally, you must choose a directory on your rescue computer to which PhotoRec will store any files it finds. Because the tool might restore individual files multiple times, you need to make sure the selected directory has enough free space available. Once you have found a suitable location, press C, and PhotoRec immediately sets about its work. Depending on the size of the partition to be examined, this could take some time to complete. Once the summary appears, press [Quit] until PhotoRec terminates. Now it’s time for a little extra manual work: PhotoRec distributes all the files it finds over several subdirectories with fairly cryptic names. You will need to fish the missing documents out of these directories yourself.
Conclusions
In the example of the missing holiday photos, PhotoRec saved the day. The small tool was able to retrieve all the missing shots. However, none of the programs presented here is a panacea: If an application has overwritten your missing thesis with garbage, not even PhotoRec can get it back. Thus, you should recognize this simple rule of thumb: Files without a backup do not exist.
Info
[1] smartmontools
[2] “Data Rescue with TestDisk” by Klaus Knopper, Linux Pro Magazine, issue 134, January 2012, pg. 14
Subscribe to our Linux Newsletters
Find Linux and Open Source Jobs
Subscribe to our ADMIN Newsletters
Support Our Work
Linux Magazine content is made possible with support from readers like you. Please consider contributing when you’ve found an article to be beneficial.

News
-
Substantial Update to IPFire Now Available
The lastest version of IPFire features a fundamental change to how the system handles DNS.
-
Gnome Working on Test Center App to Make Testing Easier
It's now possible to test experimental features on the Gnome desktop without worrying that you'll break things.
-
New Vulnerability Discovered in Linux Kernel
Hiding out for nearly 15 years, the Ghostlock vulnerability allows a standard logged-in user to gain root privileges.
-
New Linux Flaw Lets Attackers Escape VMs
A 16-year-old vulnerability allows an attacker to escape a virtual machine, gain access to the host, and execute malicious code.
-
Hannah Montana Linux Is Back!
Developer Noah Cagle decided the world needed the once obscure but beloved Linux distribution and gave it a decidedly pink refresh.
-
System76 Refreshes the Lemur Laptop
If you're looking for a laptop with tons of power and battery, look no further than the latest iteration of the System76 Lemur Pro.
-
More than 43 Million Lines of Code in Linux Kernel 7.2
Using the cloc utility, Michael Larabel of Phoronix discovered that Linux kernel 7.2 has over 43 million lines of code.
-
Kubuntu Focus Goes Ultra
The Kubuntu Focus team has upped the performance ante of its M2 and Zr laptops with the latest, greatest CPUs from Intel.
-
Linux Gamers May Soon See Less Mouse Lag in KDE Plasma
Gamers using KDE’s Plasma desktop have been suffering from a slight input delay in mouse movement that could lead to getting fragged.
-
Three Lines of Code Improve Linux Storage Performance
A developer changed three lines of code, giving Linux storage performance a 5% bump.