Exploring the Tiny $9 C.H.I.P. Computer
Up Close with C.H.I.P.
ByThe C.H.I.P. is a cute little thing, but don't let appearances fool you: It is quite the beast deep down, and you can squeeze some seriously fun projects out of it.
At less than half the size and a third of the price of the Raspberry Pi (Rasp Pi), the tiny C.H.I.P. computer packs quite a punch. C.H.I.P. comes equipped with a 1GHz Alwinner R8 processor. The C.H.I.P. board has had WiFi and Bluetooth support longer than the Rasp Pi. C.H.I.P. has 512MB of RAM and, instead of using an SD or a microSD card, it relies on 4GB of on-board flash memory to store the operating system and files, which means that the operating system and the firmware are one and the same. This design has its own set of consequences – some good, and some tricky.
On one hand, C.H.I.P. boots very quickly and is less prone to the operating system corruption that has plagued the Rasp Pi. On the other, you can't just download the operating system and copy it onto a memory card. Instead, you have to go through the slightly more complex (and scary) process of "flashing." But, don't worry, the creators of C.H.I.P. have developed a graphic tool that make the process much easier.
As for ports, the C.H.I.P. has one USB Micro B connector. That's the same kind of USB connector you'll find on your phone or to power the Rasp Pi. As with the Pi, you would usually use this port to provide power for the C.H.I.P. However, since you can also power the C.H.I.P. through the pin headers or a battery, you can use the USB port for different things. By default, connecting C.H.I.P.'s micro USB to a computer will create a USB Serial connection, so you can access C.H.I.P. with a screen or cu session in a terminal. With Linux kernel modifications, it is possible to enable the USB for other uses, such as an Ethernet bridge.
The other USB port is a Type A female connector, which is like the USB connectors you would typically find on the side of your laptop. This port is good for plugging a keyboard or mouse into the C.H.I.P. If you want to run a keyboard and a mouse together, invest in a powered USB hub.
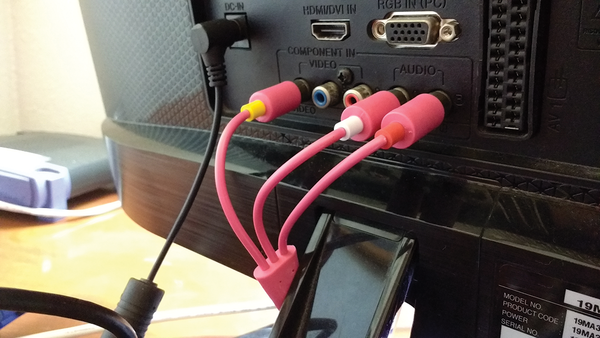
The C.H.I.P. designers devised an interesting way of hooking the C.H.I.P. up to a display. It looks like a throwback to the 80s and the days of Commodore 64 and Sinclair Spectrum mini-computers. C.H.I.P. doesn't come with an HDMI or even a VGA connector. Instead, the C.H.I.P. has an 1/8" TRRS connector and a bright pink adapter (Figure 1). You plug one end into the TRRS (the TRRS is the circular port sandwiched between the USB ports and that looks like it's waiting for a headphone jack – in fact you can use it for a headphone jack), the other end goes into three female RCA on the back of your TV. On my TV, after trying several combinations (Figure 2), I got a video after selecting the TV's AV2 input.
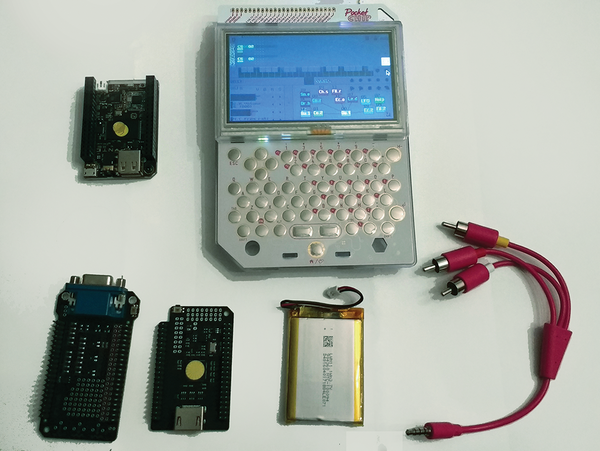
If you want a higher-quality image, you can also pay for a VGA or an HDMI adapter, but then you would also have to update the firmware. Another thing you can get for your C.H.I.P. is a battery, because your nine-dollar computer will happily run off one of those too.
Booting Up
Once you boot up, the interface should be immediately familiar. The C.H.I.P.'s default firmware is standard Debian (just like the Rasp Pi's) compiled for the Alwinner microprocessor. The default desktop is not LXDE like the Pi, but the very similar Xfce.
In the upper right corner of the screen, you'll see the icon that will allow you to access your WiFi network. Click on it, choose your network, input your password, and the C.H.I.P. will connect. (See the box entitled "Wifi Problems" if you have any issues with setting up wireless networking.)
While I was using the C.H.I.P., I noticed the WiFi would cut out from time to time. I also found it hard to access the C.H.I.P. from a desktop computer over SSH. We couldn't even get it to respond to ping commands. These problems might have been caused by the fact that WiFi power save management was switched on by default.
To correct this problem, first check to see what interface you are using:
ip addr
This command should reveal at least one interface up and connected to the network. Usually it is wlan0. To check and see if the power save feature is connected, run the following:
# iw dev wlan0 get power_save
Power save: on
If you get the on in the output, as shown above, you can disconnect the power save with:
iw dev wlan0 set power_save off
Then run iw dev wlan0 get power_save to make sure you have deactivated it.
Another common problem is the SSH server not starting properly. Check to ensure the SSH server is installed with:
sudo apt-get install openssh-server
APT will download, install, and run the server automatically. See if everything is working with:
systemctl status sshd
If there are no errors and the last line of output says something like
SOME DATE - SOME TIME chip server[SOME PID]: Server listening on :: port 22
you're good to go.
However, if you do get an error complaining about Could not load host key: ..., delete all the host keys with
sudo rm /etc/ssh/ssh_host_*
And regenerate them again with:
sudo ssh-keygen -A
Next, restart the SSH server:
sudo systemctl restart sshd
Now, if you check the status of the server, as shown above, everything should show up clean, and you should be able to connect from another computer on the network. You can connect using user chip and the default password chip.
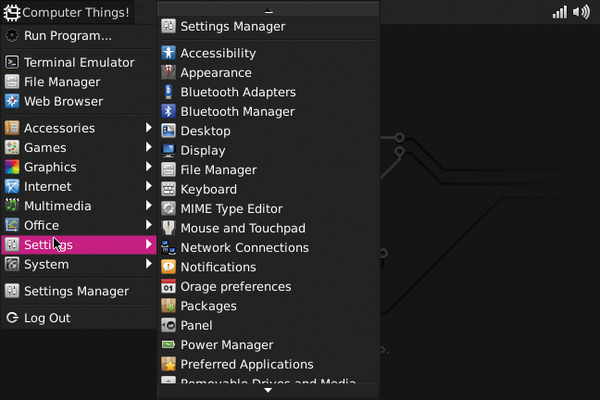
Click on Computer Things! to open the application menu (Figure 3), and you will be able to access all the graphical software. You can use the Settings Manager to adjust your keyboard, the language, and the look and feel of your C.H.I.P.
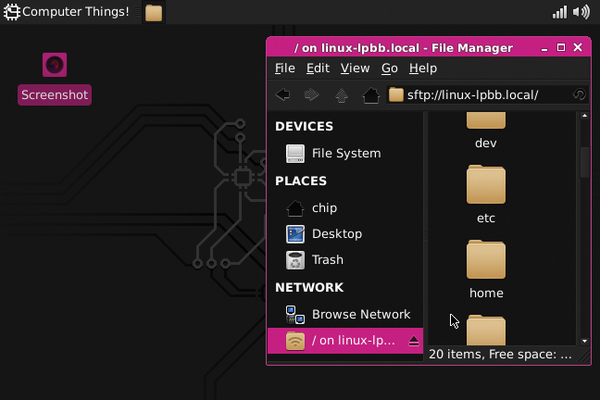
Apart from Xfce's configuration manager, a web browser, graphics programs, a terminal emulator, and so on, there are two great and original games you must try: Alex the Allegator 4 (that's not a typo, by the way, and I wonder what happened to 1 through 3), and Spout, an incredibly addictive 8-bit wonder. With the Thunar file manager (Figure 4), you will able to navigate through your folders and files – and even connect to servers using most network protocols.
Eventually, you will want to install your own software. Reach the package installer, choose System, and pick the Package updater. You should run this from time to time, maybe daily, to make sure your system is fully up to date.
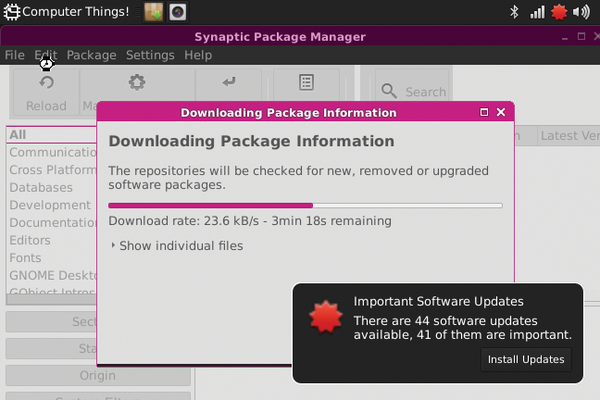
You have two available package tools: Packages and Synaptic. Theoretically, they both do the same thing. Synaptic (Figure 5), however, is a graphical software management system that Debian users have been using for years, and it seems more complete. Open Synaptic and first click on the Reload button to see the complete catalog of available packages.
Of course, you can also install packages from the command line with:
apt-get update
apt-cache search <packagename>
apt-get install <packagename>
Flashing
Sooner or later, you will probably want to get your C.H.I.P. doing something else. Maybe you bought it with the Pocket console and you want to use it connected to a regular monitor and hook up a regular keyboard and mouse. Or maybe it's the other way round, you read this article, and it tempted you to splash out on the Pocket console, but your C.H.I.P. came configured as a regular computer.
Being a little beast, and the key word being little, the C.H.I.P. doesn't have much space for the firmware/operating system. This means that there are several firmwares around for each specific use you're going to give your micro-computer. With the Pi, you can just power down, switch to another SD/microSD card, and power up again. But, as mentioned above, the C.H.I.P. doesn't use an external card. Instead, the operating system is stored in a 4GB flash memory chip soldered onto the board. To get an operating system onto that, you're going to need to flash it.
Don't worry, because flashing the C.H.I.P. is quite easy. You will need to use the Chrome or Chromium web browser for this, since the tool requires a Chrome-specific extension.
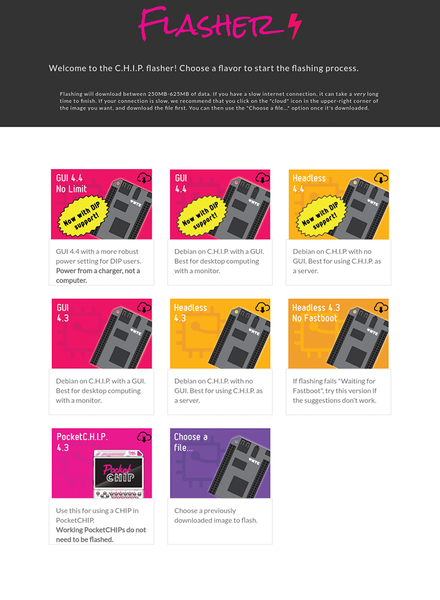
Visit the C.H.I.P. Flasher site [1] to download and install the extension. You will have the choice of a variety of firmwares (Figure 6). You can install the firmware on the fly, downloading and installing at the same time, or, if you click on the cloud icon in the upper right corner of each picture, you can download the firmware to your computer and then choose Flash from a file. The Flash from a file option is probably the safest.
The chrome extension will then guide you through the process (Figure 7):
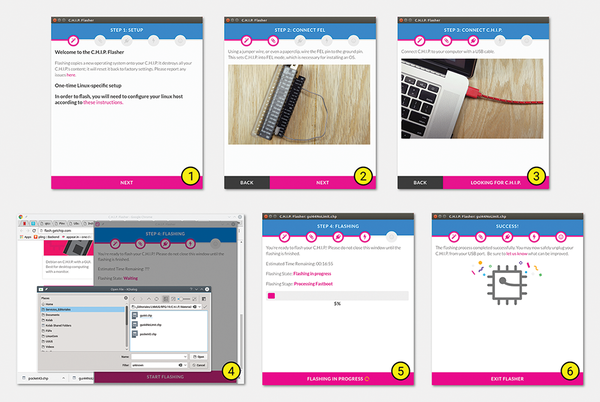
1. The first screen is just a welcome screen. Press Next.
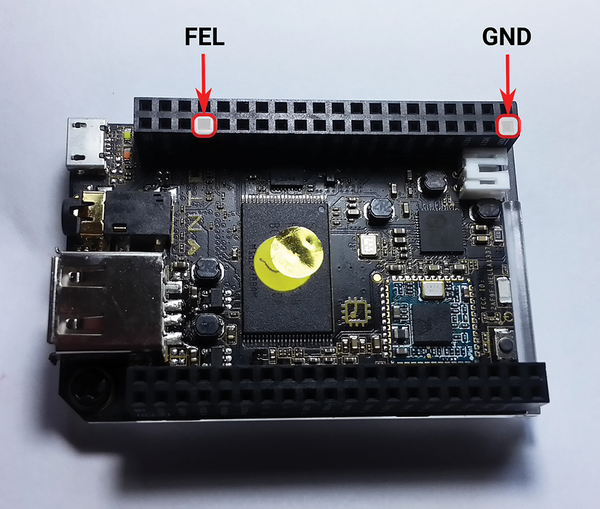
2. You will be asked to put the C.H.I.P. into FEL (flashing) mode. You put the system in flashing mode by connecting two pins: the FEL pin and a GND pin. Just in case it is not clear from the Flasher's animations, if you hold the C.H.I.P. with the USB ports towards you and facing upwards, the FEL pin is on the bank on the right, on the inner column, and fourth from the top (see Figure 8). You can use a jumper cable or an unfolded paper clip to connect to the GND pin at the bottom of the column. When you're done, press NEXT.
3. Use a USB cable to connect the micro USB on the C.H.I.P. to a USB port on your computer. The Flasher should detect the C.H.I.P. automatically. If it doesn't, make sure the USB port on your computer is not a USB 3 port (the ones with the blue "tongue" inside). If it is, try connecting the C.H.I.P. to a USB 2 port, since many users have reported problems with USB 3. If you don't have a USB 2 port on your computer, try using a USB hub with USB 2 ports connected to your computer.
4. If you have chosen to install from a pre-downloaded file (the recommended way), you will be asked to pick your file now.
5. Flashing then starts and doesn't need any intervention. Be very careful that the C.H.I.P. does not get disconnected from your computer, and make sure your computer is plugged into the mains. Otherwise, if the flashing gets interrupted for any reason, you could brick your C.H.I.P. [2]
6. After a while (between 20 minutes and half an hour in my experience), the flashing update will complete.
GPIOs for Projects
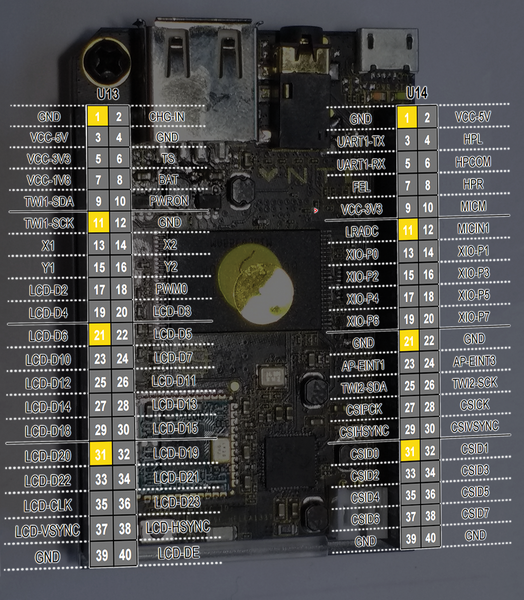
The C.H.I.P. comes with no fewer than 80 pins (Figure 9), most of which are programmable, and you can use them for your hardware projects. The most obviously useful pins are the XIO pins (referred to as "GPIOs" in the C.H.I.P.'s documentation pages). Although the official documentation only lists 8 GPIOs (XIO-P0 through XIO-P7), in fact, you can use practically everything that is not a GND pin or supplies a constant voltage (VCC). For example, you can hook up an LED to an LCD pin and still see it blink.
The steps you need to take to read from or write to a GPIO are as follows:
1. Export the GPIO so a special directory gets created under /sys/class/gpio.
2. Set the GPIO's direction file to in for reading (the default) or out for writing.
3. Get the GPIO's value if you're reading, or push a or a 1 into the GPIO's value file to set it to LOW or HIGH.
But, before you try it out, you have to figure out what addresses your Linux has assigned to the XIO pins, because the addresses vary from kernel version to kernel version.
Execute the following in a terminal:
cat /sys/class/gpio/gpiochip*/base
0
1016
If you are using the regular desktop firmware with kernel 4.4, the most likely output will be telling you that XIO-P0 (pin 13 on U14 as shown in Figure 9) is address 1016 in your system. That means XIO-P1 will be mapped to port 1017, XIO-P2 will be mapped to 1018, and so on. To export port XIO-P0, so you can start using it for input and output, do the following:
sudo echo 1016 > /sys/class/gpio/export
This command will create the directory /sys/class/gpio/gpio1016, which contains, among other things, the port's direction and value files.
If you read from direction with cat /sys/class/gpio/gpio1016/direction, it will probably output in, which means it is configured for input. To test it for output so you can blink an LED:
sudo sh -c 'echo out > /sys/class/gpio/gpio1016/direction'
Connect your LED's anode (+) leg to pin XIO-P0 and its cathode (-) leg to any GND pin. To light up the LED, push a 1 into the GPIO's value file:
sudo sh -c 'echo 1 > /sys/class/gpio/gpio1016/value'
If you can't see it, do it in dark room, since the LED lights up very faintly.
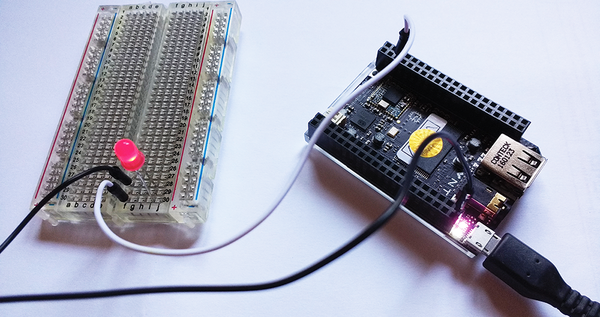
Experimenting, we discovered we got better results using the LCD pins instead of the regular XIO pins. The LCD pins – pins 17, 19 to 38, and 40 on U13 (see Figure 9) – are mapped to ports 98 through 123 in the operating system [3]. Connecting the anode leg of your LED to LCD-D2 (pin 17 on U13) would be similar to the preceding example, but you would change 1016 for 98 (Figure 10).
To read a digital input from, say, a button connected to XIO-P0, you would set the port to in:
sudo sh -c 'echo in > /sys/class/gpio/gpio1016/direction'
And then get the contents of value:
cat /sys/class/gpio/gpio1016/value
If all this seems cumbersome, you're right, it is. Fortunately, the very active C.H.I.P. community has a working Python module you can use instead.
The C.H.I.P. also comes with a PWM pin (pin 18 on U13 and mapped to port 34) , which is something even the latest iterations of the Rasp Pi lack. This special pin allows you to modulate your output. You can only send a 0 or a 1 over a digital pin, but you can send between 0 and 255 to a PWM. You can use this feature to control the brightness of your LED or the speed of a motor, for example.
Surprisingly, you also have an analog input, which is another feature you won't find on a Pi. Pin 11 on U14 (labeled LRADC in Figure 9) can read from thermometers, potentiometers, and so on. However, at the moment of writing, there is no fully functioning driver for operating the analog input, although, by the time this issue reaches the newsstand, a driver might be available [4].
C.H.I.P. Pocket
The LCD pins are put to great use with the Pocket C.H.I.P. The Pocket C.H.I.P., which is a bit like an antique Game Boy on steroids (Figure 11), has a full keyboard and a touch screen. Also, along the top, you have access to many of the pins from the C.H.I.P.'s GPIOs. Plug the C.H.I.P. into the back, and you have a portable C.H.I.P. workstation.
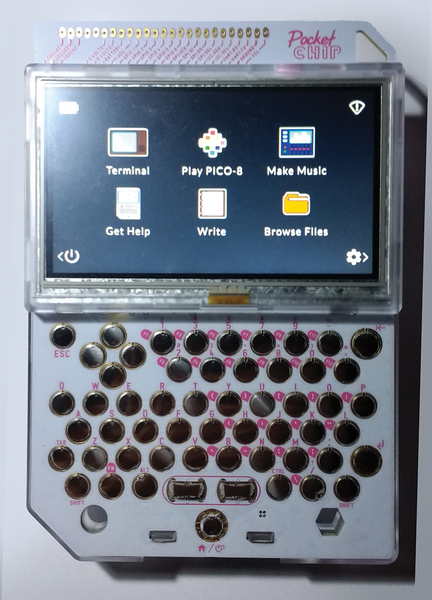
You can run the standard firmware with the Pocket, but you will have to plug an external mouse into the C.H.I.P., since the touch screen won't work properly. Adding a mouse kind of defeats the point of having a touch screen at all. A better idea is to flash the C.H.I.P. with the Pocket's own, especially customized, Pocket firmware. This firmware configures the touch screen properly and comes with a graphic, touch-friendly interface, with big, easy-to-tap icons.
The Pocket can do most of the things you can do using the regular firmware, including writing documents using AbiWord, surfing the web using IceWeasel, or programming your GPIOs from a terminal, but where the Pocket really shines is with games. You'll find some really lovely retro, 8-bit games that are a delight to play on the Pocket. The aesthetics of the Pocket are delightfully reminiscent of the 80s.
Conclusion
Can a computer be lovable? If so, the C.H.I.P. is it. Everything about the C.H.I.P. is cute and quaint, from its tiny form factor, to its smiley logo, to the nostalgic process of hooking it up to an analog TV. The Pocket C.H.I.P. has also got a nice retro air about it.
But, at the same time, the C.H.I.P. is amazingly well-equipped. It is incredibly powerful for its size, plus it comes with WiFi, Bluetooth, and dozens of programmable input/output pins.
Any maker worth his or her salt should invest the mere $9 asking price for the remarkable and versatile little C.H.I.P.
- C.H.I.P. Flasher site: https://flash.getchip.com
- C.H.I.P.s that don't boot: https://bbs.nextthing.co/t/my-chip-seems-not-work/1618/18
- All pins mapped: https://bbs.nextthing.co/t/solved-gpio-pin-numbers/2931
- Work in progress: driver for the analog pin: https://bbs.nextthing.co/t/lrad-get-readings/8140
next page » 1 2 3
Subscribe to our Linux Newsletters
Find Linux and Open Source Jobs
Subscribe to our ADMIN Newsletters
Support Our Work
Linux Magazine content is made possible with support from readers like you. Please consider contributing when you’ve found an article to be beneficial.

News
-
New Linux Flaw Lets Attackers Escape VMs
A 16-year-old vulnerability allows an attacker to escape a virtual machine, gain access to the host, and execute malicious code.
-
Hannah Montana Linux Is Back!
Developer Noah Cagle decided the world needed the once obscure but beloved Linux distribution and gave it a decidedly pink refresh.
-
System76 Refreshes the Lemur Laptop
If you're looking for a laptop with tons of power and battery, look no further than the latest iteration of the System76 Lemur Pro.
-
More than 43 Million Lines of Code in Linux Kernel 7.2
Using the cloc utility, Michael Larabel of Phoronix discovered that Linux kernel 7.2 has over 43 million lines of code.
-
Kubuntu Focus Goes Ultra
The Kubuntu Focus team has upped the performance ante of its M2 and Zr laptops with the latest, greatest CPUs from Intel.
-
Linux Gamers May Soon See Less Mouse Lag in KDE Plasma
Gamers using KDE’s Plasma desktop have been suffering from a slight input delay in mouse movement that could lead to getting fragged.
-
Three Lines of Code Improve Linux Storage Performance
A developer changed three lines of code, giving Linux storage performance a 5% bump.
-
AUR Hit Again with Malicious Packages
Once again the Arch User Repository is plagued by a high volume of malicious packages.
-
Alpine Linux 3.24 Features Fresh Desktops and a Newer Kernel
If you're a fan of Alpine Linux, it's time to upgrade because the latest version has been released with KDE Plasma 6.6, Gnome 50, and Linux kernel 6.18 LTS.
-
EU Open Source Strategy Plays Key Role in Tech Sovereignty Package
Comprehensive measures adopted by the European Commission aim to reduce dependency on non-EU countries.