One Document for Multiple Uses
Single Sourcing in LibreOffice Writer
ByWith a little planning and a few LibreOffice tricks, you can create one document that contains text customized for various end users.
Writer provides several means to hide text. You can hide text with fields or a section, or by selecting the Hidden box among the Font Effects for a character or paragraph style. But why, you might wonder, would anyone want to hide text? Perhaps as an Easter egg or as proof of authorship in work done for a client you don’t trust? The most obvious reason is for single sourcing: the maintenance of several versions of a document within a single file.
Multiple versions of documents that differ only in some details are common in business or academia. For instance, you might have one version each of a software manual for users, system administrators, and programmers, or a separate version of the curriculum for more than one level of user. Similarly, you might have one version of an exam to be given to students and another version that shows the answers for markers.
The only trouble is that maintaining multiple versions of a document is difficult. Placing each version in its own file complicates keeping all the versions in sync. Forget just once to update both, and information may be presented to the wrong reader.
Yet maintaining all versions in a single file can complicate printing, forcing you to create a duplicate copy first and then delete all the parts not needed for the version you are printing and hope that you don’t make a mistake.
LibreOffice’s solution to this dilemma is to create a single source file in which selected paragraphs are hidden or revealed as needed.
Like other uses of styles, using hidden text is faster than manual formatting and reduces the chances of making mistakes. It also eliminates the need to print from copies, which with careless hands or tired brains can lead to the accidental overwriting of the original file.
Choosing a Method for Hiding Text
Features for hiding and showing text can be used in two ways:
- If two versions of the document share common text, enter one using ordinary paragraph styles and create unique paragraph styles for the other that can be hidden and shown as needed. This method works with both styles and with sections and fields but can sometimes be difficult to organize.
- Create a special set of paragraph styles for each version of the document, turning them on and off as needed. You might even have a special set of paragraph styles for material that is common to certain versions, but not others. This second method can be used by setting up multiple variables for fields (see below), one for each version, but is best suited for working with styles only.
No matter how you work, single sourcing can be confusing, so choose the name of styles and fields to help you keep everything straight. You can even give each paragraph style a different color to make it easy to recognize. Each style’s color can be replaced quickly by using Edit | Find & Replace. If you are printing in black and white and use dark enough colors, you might not even need to change the colors when you print.
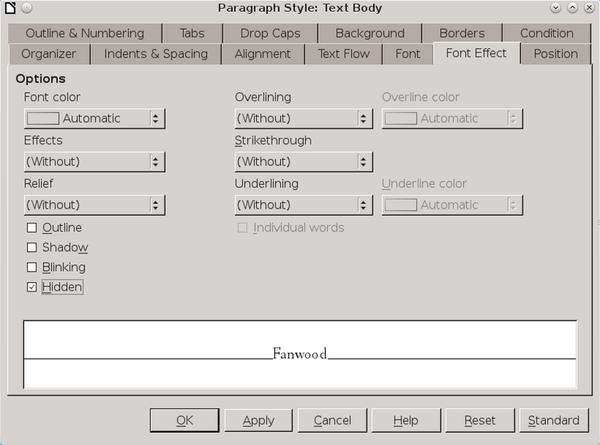
To hide or reveal text, press F11 to open the Styles and Formatting window, and toggle off or on the Hidden box on a style’s Font Effects tab for a character or paragraph style (Figure 1). You can either choose part of the document to hide to produce one alternative version or create a different set of paragraph styles for each version of the document.
Whatever method you choose:
- Create one set of character and paragraph styles for text that appears in all versions of the document.
- Create the common styles needed for each version of the text. For example, in a student quiz with an answer key, you might have one set of styles with names like User – Text Body and Teacher – Text Body. These styles are formatted exactly the same as the common styles, except when you select or unselect Hidden before printing.
- Check Hidden in the Format | Character | Font Effects tab as needed before printing. Notice that spacing above or below a paragraph is hidden along with the text. By contrast, you need to select the space after a string of hidden characters.
- Uncheck the Hidden box after you print a version from a single-source file, so you can see the complete file the next time you open it.
Hiding Text Using Fields
An alternative but more time-consuming way of single sourcing is to place each passage in its own field. You can either toggle one version of the document on or off or create a separate variable with a unique value for each version of the document. Usually, this second method is practical only for relatively short documents.
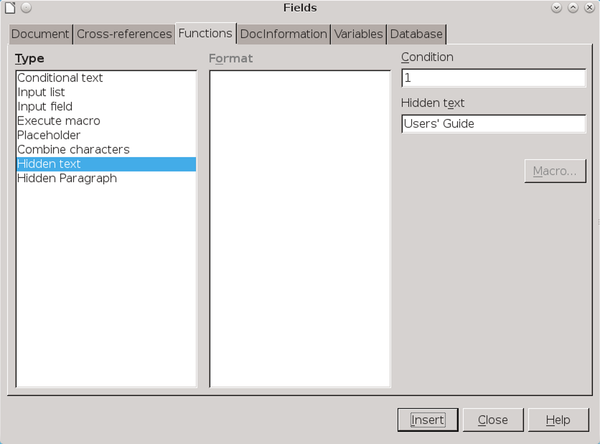
The Functions tab of the Fields dialog, reached by clicking Insert | Fields | More Fields (or Other in some versions of LibreOffice Writer; Figure 2) contains several tools that assist with single sourcing: Hidden text, Hidden Paragraph, and Conditional text. Other types of fields exist, but except for Set variable under the Variables tab, they are not relevant to single sourcing.
The Hidden option in a character or paragraph style is the stylistic equivalent of some of the field types under Insert | Fields |More Fields| Functions, such as Hidden text and Hidden Paragraph. However, make sure that View | Field Shadings and View | Hidden Paragraphs are turned on when you use these fields; otherwise, you will be lucky to find the hidden text or paragraphs.
The fields used for single sourcing are in an off (0) or on (1) condition (i.e., a simple Boolean statement) for hiding and unhiding. A Condition is merely a state of a document or, if you prefer, a version with different content.
For instance, when Condition is set to 0, then the content in the fields is hidden, creating one version of the file. When Condition is set to 1 (or any other number), then the content is shown, creating a second version. For convenience, the condition that turns one version of a document on could be the name of the version, such as User Guide. This arrangement is no different from checking or unchecking the Hidden box in a style.
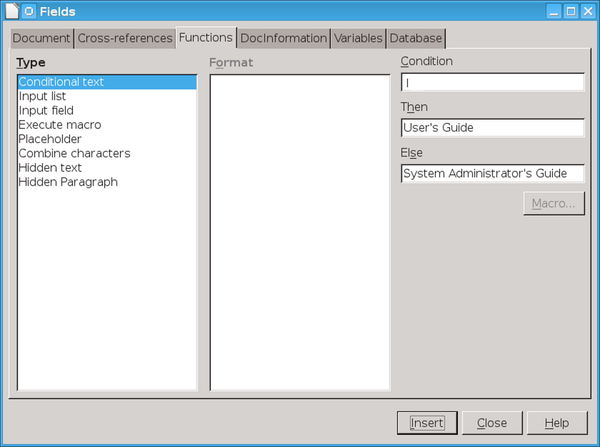
Alternatively, in a Conditional text field, a simple expression is set up using the Condition, Then, and Else fields on the right side of the window. For instance, if the condition is 1, then the text that appears in the document is whatever is entered in the Then field, such as User’s Guide. However, change the condition to anything else, and the text in the document becomes whatever is entered in the Else field, such as System Administrator’s Guide.
This arrangement is almost as handy as the Hidden box in a style. The main disadvantage of this method is that each condition needs to be changed separately, while using the Hidden font effect means toggling a single box.
Automating the Use of Fields and Sections
Field windows stay open after you insert a field, allowing you to move to the next position for a field in the document. Section windows do not, but you can use the navigator to jump from one section to the next.
However, changing the conditions for each field or section individually eats up time. If the same field appears more than once, you can copy and past or use Edit | AutoText so that you can add information with a couple of keystrokes instead of making changes manually.
Better yet, you can set a general variable that toggles all fields at the same time:
- Place the cursor at the start or end of the document, or anywhere else that is easy to locate.
- Click Insert | Fields | More Fields | Variables | Set variable.
- Set the Format. You can leave it as General or specify it as Text or one of the number formats.
- Give the variable a name at the bottom of the window. The name can indicate one of the document versions or be something like MasterSwitch.
- Enter a value. It can be text or simply 0 or 1, but make sure it uses the format entered in the fields.
- Click the Invisible box so that the variable cannot be seen in the document. Then click the Insert button. Locating the variable later can be difficult, which is why you should place it in some easy to find place. You might choose to leave it visible while you work.
- Set the condition to the variable name, followed by the value in quotation marks (e.g., MasterSwitch "0" or AdminGuide "1"), in all the Conditional text, Hidden text, and Hidden Paragraph fields in the Functions tab, as well as Sections (which I discuss in the next section).
Now you show or hide all the fields in the document by changing only the variable, much as you would with a style.
If you have more than two versions of the document, you can create other variables to toggle each one off and on. However, make sure that the values are different for each and that each is placed where you can easily find them.
Hiding with Sections
Sections are areas that have properties that are different from the main body of text. These properties may be formatting, or content that is password-protected from editing. Sections work in much the same way as fields:
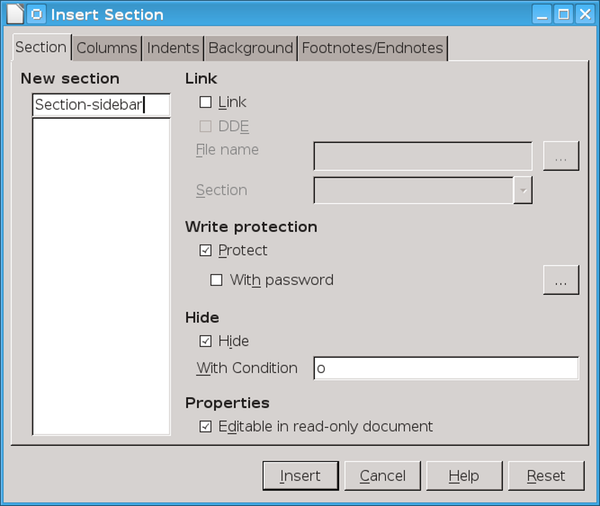
- Place the cursor where you want an empty section or highlight existing text. Select Insert | Section. The Insert Section dialog window opens (Figure 4).
- Give the section a unique name that reflects its contents and, if desired, protect it with a password.
- Click the Hide box or set the With Condition field to 1. One or the other is necessary, but not both. When you close the dialog window, the section and the space above and below it are no longer visible in the document. A section set to hide is visible until you remove the mouse cursor from it, so do not be surprised if it remains visible for a moment.
- Click Format | Sections when you want to edit the section. The dialog window lists the document’s sections with an open or closed lock beside the name to indicate whether it is hidden. Sections can be formatted without unlocking them, but they must be unlocked to edit the text.
Getting Organized
Hiding text might seem confusing at first, especially when Boolean logic is mentioned. However, if you think of these features as essentially off and on switches, then perhaps they may seem more straightforward.
Of course, being organized always helps, as well. If you are faced with maintaining multiple versions of a text, specify in your outline which version or versions to include each topic. You might change your mind as you write, but if you do, a change of paragraph or character style should be all you need to revise the document.
Subscribe to our Linux Newsletters
Find Linux and Open Source Jobs
Subscribe to our ADMIN Newsletters
Support Our Work
Linux Magazine content is made possible with support from readers like you. Please consider contributing when you’ve found an article to be beneficial.

News
-
Linux Kernel Project Releases Project Continuity Document
What happens to Linux when there's no Linus? It's a question many of us have asked over the years, and it seems it's also on the minds of the Linux kernel project.
-
Mecha Systems Introduces Linux Handheld
Mecha Systems has revealed its Mecha Comet, a new handheld computer powered by – you guessed it – Linux.
-
MX Linux 25.1 Features Dual Init System ISO
The latest release of MX Linux caters to lovers of two different init systems and even offers instructions on how to transition.
-
Photoshop on Linux?
A developer has patched Wine so that it'll run specific versions of Photoshop that depend on Adobe Creative Cloud.
-
Linux Mint 22.3 Now Available with New Tools
Linux Mint 22.3 has been released with a pair of new tools for system admins and some pretty cool new features.
-
New Linux Malware Targets Cloud-Based Linux Installations
VoidLink, a new Linux malware, should be of real concern because of its stealth and customization.
-
Say Goodbye to Middle-Mouse Paste
Both Gnome and Firefox have proposed getting rid of a long-time favorite Linux feature.
-
Manjaro 26.0 Primary Desktop Environments Default to Wayland
If you want to stick with X.Org, you'll be limited to the desktop environments you can choose.
-
Mozilla Plans to AI-ify Firefox
With a new CEO in control, Mozilla is doubling down on a strategy of trust, all the while leaning into AI.
-
Gnome Says No to AI-Generated Extensions
If you're a developer wanting to create a new Gnome extension, you'd best set aside that AI code generator, because the extension team will have none of that.