Rescuing Lost Files with TestDisk and PhotoRec
Saved!
ByTestDisk and its cousin PhotoRec will help you recover the data you thought you’d lost.
TestDisk is a name you might associate with a disk performance measuring tool, but Linux experts who specialize in data recovery know that TestDisk is a tool that can restore damaged or overwritten partition tables. The important ability to restore damaged files is the reason why TestDisk has been part of the Knoppix base software collection for a long time.
If you dig a little deeper and read the TestDisk wiki pages,you will soon realize that TestDisk and its colleague PhotoRec are much more than ordinary recovery tools: Together, they are one of the best choices for rescuing data from partly damaged or overwritten filesystems, and they incorporate some of the best features from other data rescue tools, such as the well-known foremost.
I have to admit that I have also underestimated TestDisk and PhotoRec for a long time, and only recently have I discovered some advanced features that are not all available in the current Debian and Ubuntu TestDisk packages. In this article, I show you how to bring back lost partitions and files with TestDisk.
TestDisk and PhotoRec
Christophe Grenier initially wrote TestDisk as a partition repair tool under DOS, which explains the DOS-like command-line syntax, with /flag options instead of the Unix-typical --longflag or --shortflag syntax.
The current stable version (as of this writing) is 6.12 with NTFS-3G and ReiserFS support, but I’m using the development version 6.13 for my tests, because it has enhanced features, such as improved recovery of video/multimedia files and support for listing NTFS Alternate Data Streams.
The GPL-licensed TestDisk and PhotoRec also are available as packages inmost current GNU/Linux distros.
Compiling by Yourself
Unfortunately,the latest TestDisk version available as an official package in Debian is 6.11. This slow uptake on distro packages might be related to the fact that some of the dependencies for building with the new features are also missing in Debian (one of these dependencies is libreiserfs). The TestDisk wiki lists the following as requirements, although some are optional features:
build-essential (gcc and related tools)
e2fslibs-dev
libncurses5-dev
libncursesw5-dev
libjpeg62-dev
libreiserfs0.3-dev (optional)
uuid-dev
zlib1g-dev
lib
ntfs-dev (or better, ntfs-3g-dev since testdisk version 6.12)
With the needed libraries and include files present at build time,TestDisk can read some filesystems – and even filesystem fragments – directly.
It is a good idea to install the corresponding development libraries and include files for as many of the supported filesystems as possible.The build procedure is the standard:
wget...
tar -xvf archive
cd src-directory
./configure
make
sudo make install
which is handled in the scripts used to build the packages of various distributions.
If you want to run testdisk from a very small rescue system, which might not contain all of the filesystem access libraries, you can build a statically linked version using make static instead of make.
You can also download precompiled and statically linked versions for 32- and 64-bit Linux from the TestDisk website. For my experiments, I built testdisk and photorec version 6.13 (WIP) with ReiserFS and NTFS-3G support.
A Not-So-Unusual Case
Consider the following scenario, in which I would like to archive my photos and videos to different SD cards and delete them from my main hard disk to free up some disk space. I’d like to format the destination SD card with a filesystem capable of holding the desired data types (FAT32 can only store files up to 4GB), move the files to their new destination, and switch to the next SD card. Figure 1 shows the scenario.

The original ext2 filesystem, which contained the photos/videos, was unintentionally reformatted to become an empty FAT32 filesystem – similar to what happens if you select format SD card from the menu of a video recorder or digital camera.
Luckily,“formatting” (or “making the filesystem,” mkfs) does not overwrite the majority of data; instead, it creates an empty file index, so the connection between a file’s name and its content is lost when the file allocation table is erased, yet it is possible to detect and restore file data by knowing signatures of their contents.
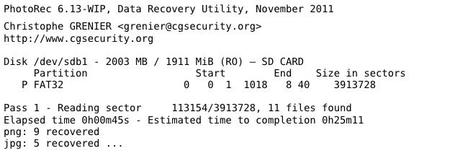
Most multimedia file types contain a header with information about the file’s content and size. PhotoRec can use this information, together with start signatures of other files, to copy file data into new files, with little or no knowledge of the original filesystem structure (Figure 2).
After PhotoRec has completed, most files from the “formatted” flash disk – and even previously deleted files on the same medium (regardless of the fact that I reformatted to ext2) – now have a copy located in the destination directory specified in the dialog. Unfortunately, the original file names and paths are gone, and you just have lots and lots of files with funny names like f2933584.jpg. With some manual sorting and checking of the file contents (which you can do easily by looking at the thumbnails in a file browser), you can restore everything to the initial state. TestDisk might do an even better job, and it is actually my first choice when trying to restore data, with the same directory and naming structure as before.
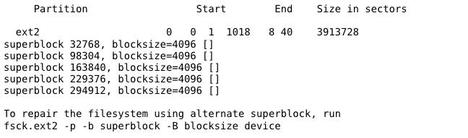
Starting with testdisk/dev/sdb1, TestDisk finds the signature of the previous ext2 filesystem and tells me which backup superblock and block size to use for attempting to repair the filesystem (Figure 3).
I copy the partition into a new filesystem image (testdisk has an option for this), and then I perform the actual filesystem check on this copy, so the original partition remains unchanged for possible further investigation.
Note: Don’t attempt to “repair” the original disk, because with every byte you overwrite, you can lose valuable information that could be used by other forensic tools. Rather, work on a copy (image file).
After doing a filesystem check with
fsck.ext2 -b 294912 -B 4096 /dev/sdb1
the MyPhotos directory is located in the lost+found directory on the re-established ext2 filesystem, which you can now mount again. With even a little more luck, and slightly shifted partition starts that reveal more of the previous ext2 filesystem structure, TestDisk might be able to find the old filesystem data directly and accesses the data with an internal file browser.
Also, TestDisk can detect the file owner, date, and permissions (Figure 4).

This is possible because TestDisk knows enough about the ext2 filesystem to read the file metadata. This metadata support also works well with the NTFS filesystem supported through libntfs or NTFS-3G.
Undeleting Files
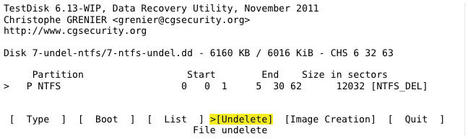
For some filesystems, it is relatively easy to recover files that have been deleted. The FAT* filesystems (including exFAT), NTFS, and ext2, for example, just mark a file as “deleted” in their file allocation structures (FAT, by changing just 1 byte) and update the free block list – two operations that are quite trivial to revert, so the file can be “undeleted” completely if the actual file data is not overwritten by a new file in a subsequent operation. For a first test case, I used a sample NTFS filesystem from the Digital Forensics Tool Testing Images.
7-ntfs-undel.dd (Figure 5) contains a small NTFS filesystem with some deleted files, one of which has an NTFS specialty – Alternate Data Streams (ADS) – which are “hidden files inside of other files.” Windows Explorer does not show the hidden data, nor does the additional data contribute to the file size displayed under Windows.
An obvious use case for ADS would be viruses or trojans hiding their main data inside “innocent-looking” files, like MP3 files or videos, or malware stashed in simple text documents as invisible attachments. However, the original intention of this filesystem design feature was probably adding more information and program data into a single file. ADS also serves as an available (although quite insecure) way of “hiding” personal data from being discovered.
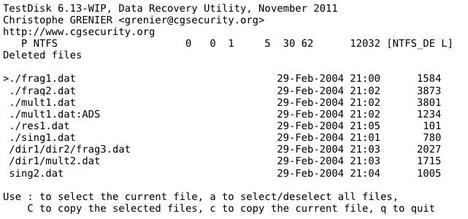
TestDisk can read ADS and display the data with the following syntax,
filename:ads_streamname syntax
which might help forensic investigators find hidden or suspicious data on an NTFS filesystem. The files and directories shown in Figure 6 can now be copied to a new location with their correct file names.
For the second test case, I created an ext3 filesystem, copied over some files, synced the data, and then deleted one of the files. File deletion in ext3 and ext4 is somewhat different from deletion in ext2: A file to be deleted first gets its block pointers zeroed (but not the file data itself) for safe recovery in case of a crash, and then its reference is removed from the filesystem allocation structure.
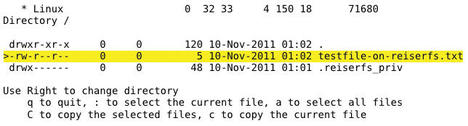
When browsing the filesystem partition with testdisk, I get the list shown in Figure 7.
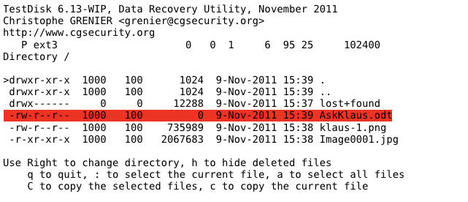
Here you can see the deleted file, AskKlaus.odt, which is declared with a file size of zero – but, of course, that was not the case before it was deleted. Apart from copying a zero-sized file with at least the correct name, I can’t do much here in TestDisk, so I will switch over to PhotoRec to rescue the file data (Figure 8).
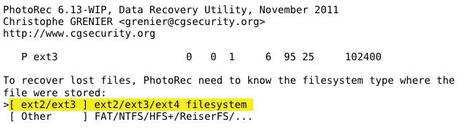
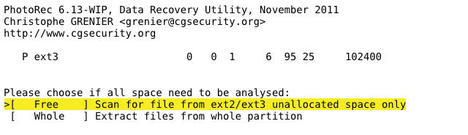
Specifying the filesystem helps PhotoRec gather more information about the file, especially for detecting discontinuous file fragments in linked chunks. Because I am only interested in the deleted file, I can scan in the “unallocated” area of the ext3 filesystem (Figure 9).
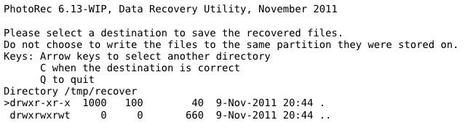
Next comes a selector that asks for the destination of the rescued data. PhotoRec handles the source disk as “read-only” and therefore needs a writable directory on a second disk, into which it copies all the rescued files (Figure 10).
Currently, PhotoRec can detect and handle about 300 file types; you can enable or disable detection in the File Options menu. My deleted LibreOffice file is among the known file types, so I will find it in the selected destination directory /tmp/recover/, together with a report in XML format (Figure 11).

Repairing Partition Tables
TestDisk was initially created for the task of repairing partition tables. When entering the Analyse menu, a quick check takes place first, in which the main partition table and correctly located extended partition tables are scanned; then, you have the option of doing a “deeper search,” which will investigate the entire disk for the beginnings of filesystem structures and unreferenced partition signatures. When analyzing a disk that has been repartitioned a few times, you will most likely find conflicting partition starts and ends, which TestDisk shows in a colorized fashion. If you are attempting to repair a partition table, you have to decide which combination of partitions is correct. The browse files option might be helpful, to see if there is an actual filesystem structure present on the partition in question.
Also, there is an option that gives you a hexdump with a printable text representation for a partition, so you can check if the data at the beginning of a partition, such as an NTFS partition, contains the necessary information, such as a volume signature or a bootloader message (Figure 12).

Of course, it is advisable to work with a copy of the disk and keep the original unchanged until you know that your attempt at fixing partitions was successful, but you have to get a large enough second disk to hold an image of the entire original disk.
In the following test case, I first partitioned a small disk into two partitions: one ReiserFS partition (type 83) and one swap partition (type 82). Then I copied a file onto the ReiserFS partition and repartitioned with a single primary FAT32 partition, also formatting and copying a single file.
Figure 13 shows what testdisk can still find (output shortened to the relevant parts of the screens).

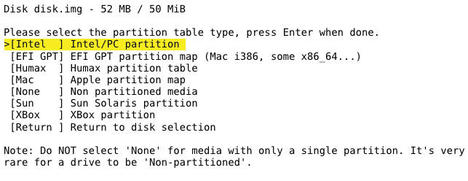
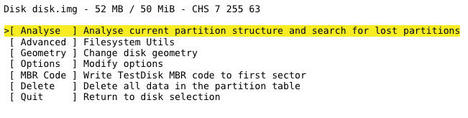
Select Proceed to define additional information for the rescue. Select the partition type (Figure 14), then select Analyse to search for lost partitions (Figure 15).
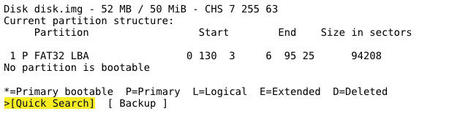
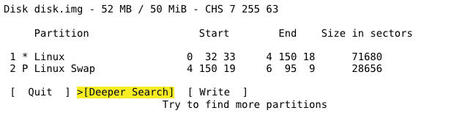
TestDisk says there is one FAT32 partition (Figure 16).
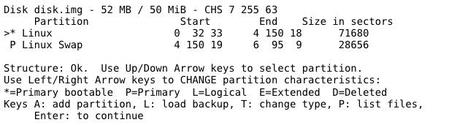
A Quick Search now finds the previously existing Linux partitions (Figure 17).
Pressing P lists the partition’s contents, telling whether the filesystem is still (mostly) intact, even though the partition does not exist anymore (Figure 18).
Going back to the previous screen (Figure 17) and hitting Return lets me select Deeper Search (Figure 19), which will scan the entire disk for more partitions.
TestDisk also offers an option for writing back the displayed partition table to the disk (or the disk image), which allows you to access the old partitions by mounting. You could use this feature if you want to restore the old partition table permanently.
The result of the deeper search is a set of partitions (marked as deleted) that overlap. You can enable a subset of those partitions that have no conflicts by selecting the partition with the Up/Down arrow key and then the Right/Left arrow for selecting the partition option (Figure 20).
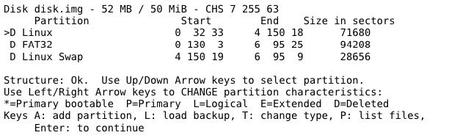
If the new partition setup does not contain any inconsistencies, you can activate it with a Return and use the write option for saving it permanently.
Scripting!
Once you get started using TestDisk interactively, it is exciting to consider that you can also invoke testdisk (or photorec) through scripts using the various command-line options, so you don’t have to go through all the menus for oft-repeated tasks.
Invoke testdisk non-interactively with the /cmdoption:
testdisk /cmd device-or-image sequence-of-commands ...
The sequence of commands is basically the order of selections in the interactive menus, just with predefined names for each.
The following command tells photorec to recover all files from an ext3 partition image test.ext3 to destination directories named /tmp/recover.*:
photorec /d /tmp/recover /cmd test.ext3 partition_none,options,mode_ext2,fileopt,everything,enable,search
See the TestDisk wiki for the full scripting manual.
Credits
Thanks to Christophe Grenier and his team for creating a great and easy-to-use data rescue and forensics toolkit – and for patiently answering all of my beginner questions.
next page » 1 2
Subscribe to our Linux Newsletters
Find Linux and Open Source Jobs
Subscribe to our ADMIN Newsletters
Support Our Work
Linux Magazine content is made possible with support from readers like you. Please consider contributing when you’ve found an article to be beneficial.

News
-
Kubuntu Focus Goes Ultra
The Kubuntu Focus team has upped the performance ante of its M2 and Zr laptops with the latest, greatest CPUs from Intel.
-
Linux Gamers May Soon See Less Mouse Lag in KDE Plasma
Gamers using KDE’s Plasma desktop have been suffering from a slight input delay in mouse movement that could lead to getting fragged.
-
Three Lines of Code Improve Linux Storage Performance
A developer changed three lines of code, giving Linux storage performance a 5% bump.
-
AUR Hit Again with Malicious Packages
Once again the Arch User Repository is plagued by a high volume of malicious packages.
-
Alpine Linux 3.24 Features Fresh Desktops and a Newer Kernel
If you're a fan of Alpine Linux, it's time to upgrade because the latest version has been released with KDE Plasma 6.6, Gnome 50, and Linux kernel 6.18 LTS.
-
EU Open Source Strategy Plays Key Role in Tech Sovereignty Package
Comprehensive measures adopted by the European Commission aim to reduce dependency on non-EU countries.
-
Linux Foundation Report Indicates AI Driving Tech Hiring
Within growing security and skills gaps, AI has been found to be a positive driving force behind tech hiring trends in Europe.
-
United Nations Open Source Portal Goes Live
A new open source portal seeks to coordinate and scale open source efforts across the United Nations system.
-
KDE Linux Drops AUR
KDE Linux developers have dropped the Arch User Repository from the build pipeline due to security concerns; other distributions should consider doing the same.
-
California May Exempt Linux from Its Age-Verification Law
After backlash from the Linux community, California may be backing off on its promise to force all operating systems to verify age, but one platform may still have to comply.