Virtualizing complex Linux systems
No Partition Table?
The reason fdisk reports a missing partition table is that the RAID controller shifts the Master Boot Record (MBR) to a currently unknown sector somewhere at the back of the disk. The good news is that you can find the MBR with forensic tools and some basic skills.
You can find an explanation of the MBR structure online [5]; in this case, all you need to know is that all popular systems have one thing in common by definition: Each MBR ends with a signature of 0x55 and 0xAA, or, in a null-indexed view, bytes 510 and 511 (Figure 4).

Luckily, The Sleuth Kit has exactly the right command for this: sigfind (Listing 1).
Listing 1
sigfind
In most cases, sigfind gives you enough information to load the partitions and fire up the RAID array. One thing is already clear; this is not a mirrored RAID, or it would have stored the same offsets on both disks. The partition table is 1024 bytes farther back than normal, as the mmls command shows (Listing 2). Remember, then, that the actual partition offset is 1024 plus 2048 bytes.
Listing 2
mmls -o
No MBR on the Second Disk
Unfortunately, the second disk has no MBR at all – in other words, this really is a RAID 0, which will not be easy to reconstruct. Without any information on the second disk, the only option an admin has is to use a system with an internal controller (as shown in Figure 1) to create an image from the 160GB disk. Using ewfacquire, you can create, for example, a help.E01 file:
-rw-r--r-- 1 root root 443976036 Jun 21 15:09 image_source1.E01
EWF uses very efficient compression methods, but you can only squeeze a 160GB disk into 444MB if it is more or less empty.
Analyzing the System Disk
To retrieve more information about the RAID array and access the EWF image, the next step is to investigate the disk on the Linux system. Figure 1 shows the sda1 partition on the 40GB disk sda, which you will now look at more closely. On the evaluation system, the disk will then become sdi. The command
fls -o 2048 /dev/sdi
tells you more (Figure 5): Yes, this disk really does contain a Linux system.

To determine the mountpoint of the RAID disks, you then need to read /etc/fstab (Listing 3). The plus signs show the directory depth – that is, the number of directories in the path to the result in question. Line 1 only has one plus sign at the start, and thus a directory depth of 1, so you can assume /etc/fstab resides here. The command
Listing 3
fls -r -o
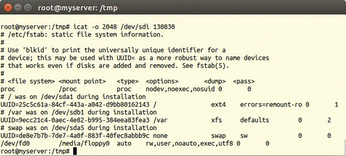
icat -o 2048 /dev/sdi 130830
shows the content (see Figure 6): /dev/sdb1 with the XFS filesystem is mounted in /var on the original system, at least if you believe the comments.
If you don't want to take this at face value, you can check the symlink targets on the system below /dev/disk/by-uuid/ and check which UUID is assigned to which partition.
For virtualization purposes, you still need to merge the 40GB disk and the two 80GB disks from the RAID 0 array. In order to do this, you need to sync the content of the two images to create one .vdi disk using Rsync. Because the RAID array was almost empty, you only need to assign an empty disk with 20GB capacity to the new VirtualBox instance. Now you have five steps to complete:
- Partitioning and formatting
- Transferring the files from the 40GB hard disk to
/with Rsync - Transferring the files from the 160GB RAID disk to
/var - Making the system bootable; that is, creating an MBR
- Modifying
/etc/fstaband/boot/grub/grub.cfgand making them bootable
After working your way through this list, you should have a new system with the data from the old machine, and you should be able to look forward to a successful boot.
« Previous 1 2 3 Next »
Buy this article as PDF
(incl. VAT)
Buy Linux Magazine
US / Canada
UK / Australia
Subscribe to our Linux Newsletters
Find Linux and Open Source Jobs
Subscribe to our ADMIN Newsletters
Support Our Work
Linux Magazine content is made possible with support from readers like you. Please consider contributing when you’ve found an article to be beneficial.

News
-
So Long Neofetch and Thanks for the Info
Today is a day that every Linux user who enjoys bragging about their system(s) will mourn, as Neofetch has come to an end.
-
Ubuntu 24.04 Comes with a “Flaw"
If you're thinking you might want to upgrade from your current Ubuntu release to the latest, there's something you might want to consider before doing so.
-
Canonical Releases Ubuntu 24.04
After a brief pause because of the XZ vulnerability, Ubuntu 24.04 is now available for install.
-
Linux Servers Targeted by Akira Ransomware
A group of bad actors who have already extorted $42 million have their sights set on the Linux platform.
-
TUXEDO Computers Unveils Linux Laptop Featuring AMD Ryzen CPU
This latest release is the first laptop to include the new CPU from Ryzen and Linux preinstalled.
-
XZ Gets the All-Clear
The back door xz vulnerability has been officially reverted for Fedora 40 and versions 38 and 39 were never affected.
-
Canonical Collaborates with Qualcomm on New Venture
This new joint effort is geared toward bringing Ubuntu and Ubuntu Core to Qualcomm-powered devices.
-
Kodi 21.0 Open-Source Entertainment Hub Released
After a year of development, the award-winning Kodi cross-platform, media center software is now available with many new additions and improvements.
-
Linux Usage Increases in Two Key Areas
If market share is your thing, you'll be happy to know that Linux is on the rise in two areas that, if they keep climbing, could have serious meaning for Linux's future.
-
Vulnerability Discovered in xz Libraries
An urgent alert for Fedora 40 has been posted and users should pay attention.