Virtualizing complex Linux systems
Network Block Devices
Network Block Devices (NBDs) have proved very useful because .vdi virtual hard disks are much easier to mount. The lines
modprobe nbd
qemu-nbd -c /dev/nbd0 <file.vdi>
create a block device that is available for external access for the tasks at hand. Now you need to create a filesystem with the partitioning shown in Listing 4.
Listing 4
NBD Partitioning
The former RAID system will not use any partitions but will be mounted directly below /var. The commands
mkfs.ext4 /dev/nbd0p1
mkswap /dev/nbd0p2
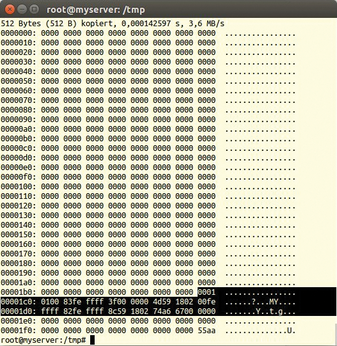
write the filesystem for / and swap; however, you only have part of an MBR, as the output from
dd if=/dev/nbd0 count=1 | xxd
proves (Figure 7). The 16 bytes for defining the root and swap partitions is underlined in black, followed by the terminating sequence 55aa.
Three Mountpoints for Synchronization
Now you need three mountpoints for synchronization purposes: /tmp/d will act as the destination, and as sources 1 and 2, you will have /tmp/s1 and /tmp/s2 – you need to run mkdir to create them. You can mount the target partition by typing:
mount /dev/nbd0p1 /tmp/d
The source partitions are still hidden in the compressed images and need to be prepared. For this to happen, you need to convert the compressed images to EWF format – using xmount, of course. The RAW images are then located in the directories /ewf and /ewf1, which still need to be created:
xmount --in ewf --out dd image_source1.E* /ewf
xmount --in ewf --out dd image_source2.E* /ewf2
To mount the RAW images, you need the loop devices /dev/loop0 and /dev/loop1. Loop0 shows the 40GB disk in partition 1, and Loop1 shows the start of the striped set. Both partitions have the typical offset of 2048 sectors:
losetup -o $((2048*512)) /dev/loop0 /ewf/image_source1.dd
losetup -o $((2048*512)) /dev/loop1 /ewf2/image_source2.dd
mount /dev/loop0 /tmp/s1
mount /dev/loop1 /tmp/s2
Two Rsync commands join the partitions:
cd /tmp/d
rsync -av /tmp/s1/* .
cd /tmp/d/var
rsync -av /tmp/s2/* .
The only thing left to do is modify the fstab and grub.cfg files (Listing 5). Instead of a UUID-based configuration, you will probably want to work with /dev/sda<x>, because this facilitates the migration. If you prefer the UUID, you need to create these devices manually.Additionally, you will want to clean up this temporary solution in grub.cfg after completing the virtualization, according to details you will find in the GRUB manual, but the current setup should work for the initial boot.
Listing 5
/etc/fstab and grub.cfg
GRUB and MBR
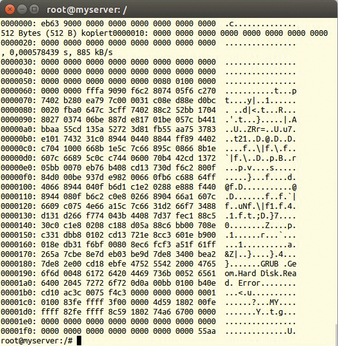
The final task is to create the new MBR. Again, you need to type the code shown in Listing 6 outside of the VDI using the NBD device in a chroot environment.
Listing 6
Creating a New MBR
Figure 8 shows that the MBR was successfully written and correctly populated with information. Before the first boot, admins who like to keep things tidy will want to clean up with:
umount /tmp/d/proc
umount /tmp/d/sys
umount /tmp/d/dev
umount /tmp/d/
qemu-nbd -d /dev/nbd0
Nothing can now prevent a successful boot with the virtualized system. If you have disks that were mirrored on hardware controllers – and provided the mirror was in a synchronized state – you only need to restore one disk. You can convert it to .dd format with Xmount. Sigfind provides the offset to the translated MBR, and you can then run losetup,
losetup -o $(((1024+2048)*512)) /dev/loop0 image.dd
to create a loopback device with an MBR offset of 1024, and the beginning of the first partition at sector 2048, where you can then mount it.
Infos
- VirtualBox: http://www.virtualbox.org
- VDI format: http://en.wikipedia.org/wiki/VirtualBox#Virtual_Disk_Image
- OVA format: http://en.wikipedia.org/wiki/Open_Virtualization_Format
- "Investigating Windows Systems" by Hans-Peter Merkel and Markus Feilner, Linux Pro Magazine, Issue 93, August 2008, pg. 34: http://www.linuxpromagazine.com/Issues/2008/93/Investigating-Windows-Systems
- MBR: http://en.wikipedia.org/wiki/Master_Boot_Record
The Author

Hans-Peter Merkel has focused on data forensics for many years in the open source community. He trains employees of law enforcement agencies in Europe, Asia, and Africa and is a founding member and chairman of FreiOSS and Linux4Afrika!.
« Previous 1 2 3
Buy this article as PDF
(incl. VAT)
Buy Linux Magazine
US / Canada
UK / Australia
Subscribe to our Linux Newsletters
Find Linux and Open Source Jobs
Subscribe to our ADMIN Newsletters
Support Our Work
Linux Magazine content is made possible with support from readers like you. Please consider contributing when you’ve found an article to be beneficial.

News
-
So Long Neofetch and Thanks for the Info
Today is a day that every Linux user who enjoys bragging about their system(s) will mourn, as Neofetch has come to an end.
-
Ubuntu 24.04 Comes with a “Flaw"
If you're thinking you might want to upgrade from your current Ubuntu release to the latest, there's something you might want to consider before doing so.
-
Canonical Releases Ubuntu 24.04
After a brief pause because of the XZ vulnerability, Ubuntu 24.04 is now available for install.
-
Linux Servers Targeted by Akira Ransomware
A group of bad actors who have already extorted $42 million have their sights set on the Linux platform.
-
TUXEDO Computers Unveils Linux Laptop Featuring AMD Ryzen CPU
This latest release is the first laptop to include the new CPU from Ryzen and Linux preinstalled.
-
XZ Gets the All-Clear
The back door xz vulnerability has been officially reverted for Fedora 40 and versions 38 and 39 were never affected.
-
Canonical Collaborates with Qualcomm on New Venture
This new joint effort is geared toward bringing Ubuntu and Ubuntu Core to Qualcomm-powered devices.
-
Kodi 21.0 Open-Source Entertainment Hub Released
After a year of development, the award-winning Kodi cross-platform, media center software is now available with many new additions and improvements.
-
Linux Usage Increases in Two Key Areas
If market share is your thing, you'll be happy to know that Linux is on the rise in two areas that, if they keep climbing, could have serious meaning for Linux's future.
-
Vulnerability Discovered in xz Libraries
An urgent alert for Fedora 40 has been posted and users should pay attention.