Water your plants with a Raspberry Pi
Watering Pi

© Lead Image © agor2012, 123RF.com
With a Pi Zero and a few components, you can build an inexpensive and reliable automatic watering system for your plants in next to no time.
Whether in an apartment, on a balcony, in a greenhouse, or in a garden, if you are not at home and want to water your plants remotely, an automated system is your only option. In this article, I show you how to harness the power of a Raspberry Pi Zero as a reliable helper to manage the watering system.
Design
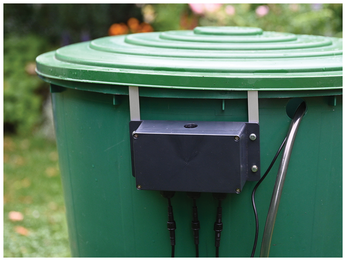
Automatic irrigation is nothing new. These systems not only exist on a large scale in agriculture and horticulture but have also been available for many years for domestic use. Some providers attach their systems directly to the water supply. In this project, I'll instead draw water from a 200-liter tank reservoir with a supply that will last for a couple of dry days (Figure 1). The advantage of a tank is that you do not have to deal with a pressure line and you do not lose an uncontrolled amount of water in the event of an accident. The aim is to create a robust solution that you can tailor entirely to your own needs, thanks to the flexibility of the Raspberry Pi and your own hardware and software.
The storage tank for just a room can be much smaller; in fact, a water bucket is all you need, with a submersible pump and a riser to deliver the irrigation water. Two pipes supply water to plants through a branch distributor. The whole thing can be controlled on demand by solenoid valves. The project design also uses two moisture sensors to check that the water reaches the plants. (See the "Parts List" box.)
Parts List
- Raspberry Pi Zero W (model 1 or 2)
- Centrifugal pump with 1.2m head
- Solenoid valves (x2)
- Relay modules (x3)
- ADC (ADS1115, or similar)
- Moisture sensors (x2)
- Plugin power supply (5V)
- Housing, wiring
- Various hoses and clamps
- Adapters, control valves, ground spikes
Getting Started
To get the Raspberry Pi up and running, it's a good idea to download a new Pi OS image in the usual way and transfer it to a microSD card. With the screen and keyboard plugged in, the boot options and network settings can be configured. A desktop environment is not needed, which is why I went for automated login from the CLI with SSH enabled. All further settings can then be configured in a terminal window from a computer on the same network. The Raspberry Pi needs a hostname that reminds you of the task in hand (e.g., watering in this case). The next step is to create a separate folder for the project files in your home directory.
Structure
The main electronics of the control system will live in a ready-made housing with a rubber seal in the lid and a terminal strip, on which all the external wires will be patched (Figure 2). Two small support plates are bolted on inside to fasten all the modules securely.
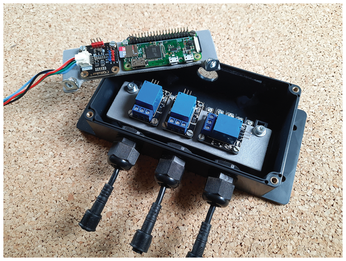
The housing for the control unit holds the Raspberry Pi, an analog-to-digital converter (ADC) module, and three relays. The external power supply, connections for two soil moisture sensors, two solenoid valves, and the pump are routed in from below with three four-core lines. At the top, where I sealed the unused screw hole with transparent material, an LED indicates operational readiness.
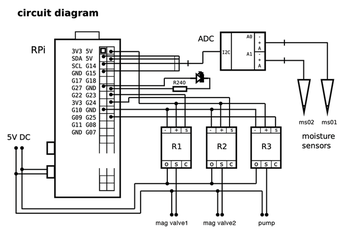
The Raspberry Pi needs a total of four GPIO pins for the control PINs on the relay boards and the signal LED; the ADC is connected over the I2C bus. The internal terminal strip routes the converter's analog inputs with the humidity sensors and the switching outputs of the relays for the pump and solenoid valves to the outside. The schematic (Figure 3) and associated program files are on the GitHub page for the project [1] [2].
Now it's time to connect the external hardware, pump, and solenoid valves to the hose material (Figure 4). Because no suitable distributor was available downstream of the pump, I soldered one myself from brass. The two control valves allow for a two-way system that can supply two groups of plants with different water needs.
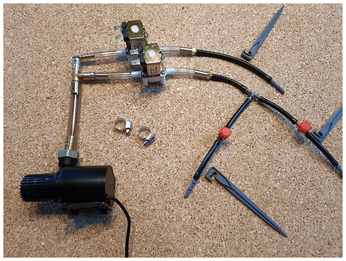
Thanks to the valves, the two main lines can also be reliably blocked against the reservoir being evacuated in idle condition. Distribution downstream can be done with a smaller hose diameter; T-pieces are used for more branches. Small regulators ensure that water reaches all the plant locations evenly; setting them up requires some trial and error. For an initial test, I first extended the connection on the centrifugal pump to allow immersion.
If everything works satisfactorily, you can then proceed to trim hoses and cables to the required lengths, route them correctly, and fasten them with ground spikes. Hose clamps around the thicker hoses reliably prevent them slipping off the connections while you are away.
Buy this article as PDF
(incl. VAT)
Buy Linux Magazine
US / Canada
UK / Australia
Subscribe to our Linux Newsletters
Find Linux and Open Source Jobs
Subscribe to our ADMIN Newsletters
Support Our Work
Linux Magazine content is made possible with support from readers like you. Please consider contributing when you’ve found an article to be beneficial.

News
-
Canonical Releases Ubuntu 24.04
After a brief pause because of the XZ vulnerability, Ubuntu 24.04 is now available for install.
-
Linux Servers Targeted by Akira Ransomware
A group of bad actors who have already extorted $42 million have their sights set on the Linux platform.
-
TUXEDO Computers Unveils Linux Laptop Featuring AMD Ryzen CPU
This latest release is the first laptop to include the new CPU from Ryzen and Linux preinstalled.
-
XZ Gets the All-Clear
The back door xz vulnerability has been officially reverted for Fedora 40 and versions 38 and 39 were never affected.
-
Canonical Collaborates with Qualcomm on New Venture
This new joint effort is geared toward bringing Ubuntu and Ubuntu Core to Qualcomm-powered devices.
-
Kodi 21.0 Open-Source Entertainment Hub Released
After a year of development, the award-winning Kodi cross-platform, media center software is now available with many new additions and improvements.
-
Linux Usage Increases in Two Key Areas
If market share is your thing, you'll be happy to know that Linux is on the rise in two areas that, if they keep climbing, could have serious meaning for Linux's future.
-
Vulnerability Discovered in xz Libraries
An urgent alert for Fedora 40 has been posted and users should pay attention.
-
Canonical Bumps LTS Support to 12 years
If you're worried that your Ubuntu LTS release won't be supported long enough to last, Canonical has a surprise for you in the form of 12 years of security coverage.
-
Fedora 40 Beta Released Soon
With the official release of Fedora 40 coming in April, it's almost time to download the beta and see what's new.