Creating vector graphics using Inkscape
Editing Splines
Next, you can achieve natural curvature by editing the individual splines and adding new tangents. Essentially, you move existing points so that they match the shape of an apple rather than a circle. To do so, it helps to use a drawing or photo of an apple as a template; thus, you can always refer to the real object.
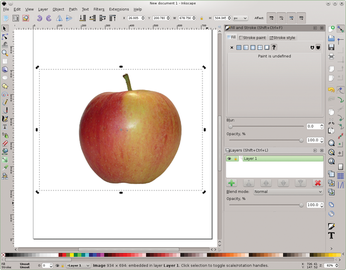
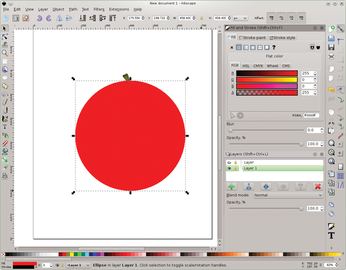
To this end, download an appropriate photo and open it in Inkscape, then work with layers: Click on Layers | Layers in the menu to open the Layers dialog box, and add a new layer by clicking on the green plus. When the photo is opened, make sure the picture is also selected and then copy it into the newly created layer. You now have a layer with the apple photo (Figure 2) as well as the working layer. You can move the photo under the working layer using the arrow buttons in the Layers dialog box, so you can now "trace" it (Figure 3).
If, when editing the contours of the apple, you notice that one of the segments cannot be adjusted as desired, simply add more segment separations. To do so, select both the left and the right point of the segment to be split while holding Shift to then add a point, as already described.
Of course, an apple also has a stem. The easiest way to design a stem is by drawing splines using the Bézier tool and then bending it using tangents. To do this, drag the path for the stem using the Bézier tool and place a point on the path at regular intervals by clicking. You will get a closed path by making the final click in the same place as the square for the first point. Inkscape recognizes it as such – this is important later, in particular for choosing a fill color.
If you still want to bend the points afterwards, you can move the points and work with tangents where necessary.
Working with Fill Colors
Until now, you have only arranged an object's outline into the desired shape, but now color comes into play. Existing paths can be given fill colors whereby some effects are also available that bring a bit of oomph to everything.
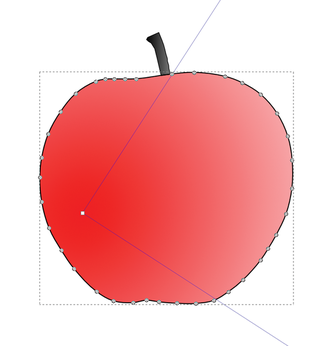
You can access the dialog for fill colors by selecting a path with the path tool and then selecting the Object | Fill and Stroke menu item. An additional dialog then appears in the right part next to the work area; here you can edit the parameters to your heart's content. A radial color gradient is, for example, impressive – this apple should be red.
Select the Radial gradient option for the fill colors and, after clicking Edit, set RGB as the color model. Enter 255 for red in the first number field and 0 in the two below. The fourth bar describes the strength of the color gradient, which you should leave as it is for now. The highlight is now exactly in the middle on the apple; two gripping lines branch off directly from the center point, each at a 90-degree angle. Use these to determine how much the color shadow drops out. You can place the accent on another part of the apple by moving the center point of the color effect (Figure 4). Repeat the same procedure for the stem.
Working with Text
Inkscape can also integrate text into a vector graphic. You will recognize the text tool by the "T" in its icon in the toolbar. Existing paths and text can also be combined. For a club logo, for example, you could have a ring with the actual logo and the name of the organization. Creating such logos is a very useful exercise – so open a new document in Inkscape, but please keep the apple you just created.
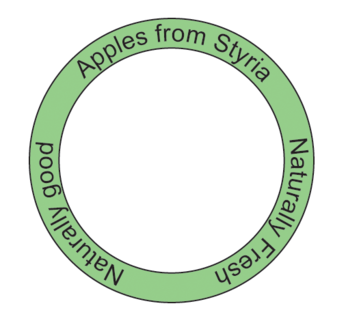
As before, start with a circle in the new document. Set that there is no fill color, but a black outline in its fill properties. Copy the created object and insert it into the document again. Overlap the two circles using the gripping (selection) tool so that they are congruent. Then, click Object | Transform object and then click Scale. Enter 80 for both Width and Height, which corresponds to 80 percent. Also check Scale proportionally. You will now see two rings, the large one and the one that has just been shrunk. Select them both and convert them into paths.
Next, enable the text tool and type some text into your fictional logo – like an advertising slogan – then select both the text and the small inner circle at the same time using the gripping tool. Finally, click Text | Put on Path in the menubar. After that, the text is oriented to the inside of the two circles. You can change the position with a further transformation using the Rotate button (Figure 5).
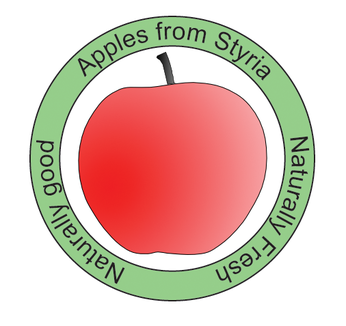
Finally, copy the previously created apple into the emblem. The resulting icon is 100 percent vectorized and could be printed just as sharply on a giant projection screen as on a letter-sized sheet of paper (Figure 6).
« Previous 1 2 3 4 Next »
Buy this article as PDF
(incl. VAT)
Buy Linux Magazine
US / Canada
UK / Australia
Subscribe to our Linux Newsletters
Find Linux and Open Source Jobs
Subscribe to our ADMIN Newsletters
Support Our Work
Linux Magazine content is made possible with support from readers like you. Please consider contributing when you’ve found an article to be beneficial.

News
-
New Slimbook EVO with Raw AMD Ryzen Power
If you're looking for serious power in a 14" ultrabook that is powered by Linux, Slimbook has just the thing for you.
-
The Gnome Foundation Struggling to Stay Afloat
The foundation behind the Gnome desktop environment is having to go through some serious belt-tightening due to continued financial problems.
-
Thousands of Linux Servers Infected with Stealth Malware Since 2021
Perfctl is capable of remaining undetected, which makes it dangerous and hard to mitigate.
-
Halcyon Creates Anti-Ransomware Protection for Linux
As more Linux systems are targeted by ransomware, Halcyon is stepping up its protection.
-
Valve and Arch Linux Announce Collaboration
Valve and Arch have come together for two projects that will have a serious impact on the Linux distribution.
-
Hacker Successfully Runs Linux on a CPU from the Early ‘70s
From the office of "Look what I can do," Dmitry Grinberg was able to get Linux running on a processor that was created in 1971.
-
OSI and LPI Form Strategic Alliance
With a goal of strengthening Linux and open source communities, this new alliance aims to nurture the growth of more highly skilled professionals.
-
Fedora 41 Beta Available with Some Interesting Additions
If you're a Fedora fan, you'll be excited to hear the beta version of the latest release is now available for testing and includes plenty of updates.
-
AlmaLinux Unveils New Hardware Certification Process
The AlmaLinux Hardware Certification Program run by the Certification Special Interest Group (SIG) aims to ensure seamless compatibility between AlmaLinux and a wide range of hardware configurations.
-
Wind River Introduces eLxr Pro Linux Solution
eLxr Pro offers an end-to-end Linux solution backed by expert commercial support.