Get creative with the FLUX Beamo laser and open source software
Inkscape
Installing Inkscape on Ubuntu is as easy as pie. If this amazing, free program isn't already installed, simply launch the Ubuntu Software Center and type Inkscape in the search box. Then type your password when prompted, and wait for Inkscape to install. Now it's time to get creative. Christa had this idea for a Christmas decoration showing the Three Wise Men, a star, and a camel. With her being one of those fortunate people who can imagine a scene in their heads and draw it on paper without needing photos or sketches as a reference, she just sat down and drew the image that you can see in Figure 6.
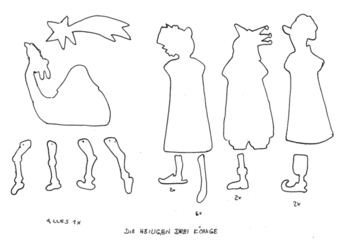
If you look closely at the figure, you're probably wondering what happened to the wise men's arms and legs. The idea here is that, if you want to keep something symmetrical, you just do the drawing work once and then scan it. Next, you load the scan in Inkscape, trace the drawing to create a vector diagram, and copy and paste the resulting object. While the kings' torsos are needed once each, we need six arms and two of each of the legs, as you can see from Christa's notes. If you are not good at drawing, don't worry, there are plenty of free-to-use sketches out there on the web that you can download and process using similar steps to the ones we will be following.
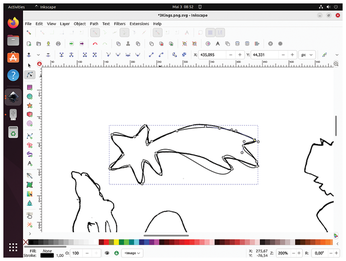
There are two schools of thought on converting a bitmap, such as a PNG file, to a vector format (SVG in Inkscape) for laser cutting. One approach is to select Path | Trace Bitmap and let the algorithm follow the contours of the original drawing. The other is to use the original drawing as a template and do the tracing work yourself. Although the automatic trace seems to be the easier option, it will probably give you a very complex vector diagram with a huge number of nodes. Despite selecting Path | Simplify to reduce the number of nodes, post-processing is likely to take longer than the manual approach. The Simplify results are not always what you expect and there may be some artifacts. But this is something you need to try out for yourself, and the decision will always be driven by the results of a trace.
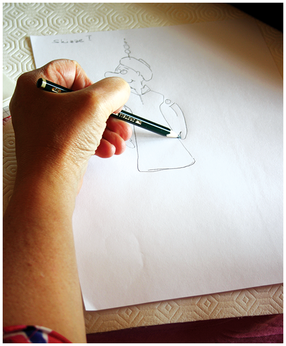
If you decide to do a manual trace (Figure 7) yourself, the steps are as follows: First select the Draw Bezier curves and straight lines tool in the buttonbar on the left of the Inkscape window. Click on a starting point and drag a line to the next point on the object you are tracing. Click again, drag again, and keep repeating until you have traced the whole object. When you are done, you will definitely need to select Edit paths by nodes and tidy up the curves and lines by clicking on the nodes and dragging the handles that Inkscape shows you. Once you have a vector replica of the object, you can delete the original hand-drawn object, but make sure you keep a backup copy, just in case you delete the wrong object – something that can easily happen.
After tracing an arm, we selected the object, right-clicked, selected Copy, and then clicked on a new location where we wanted to position the copy. Then it was just a matter of keeping on pasting until we had the right number of objects. This assumes that the wood doesn't have a "good" side and a "bad" side and that you can work with mirror-symmetrical blanks. Of course, we had to do this again for the sets of legs.
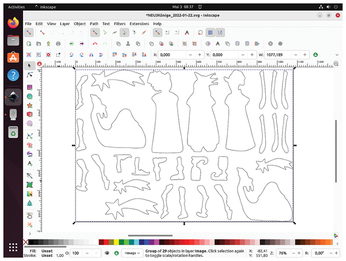
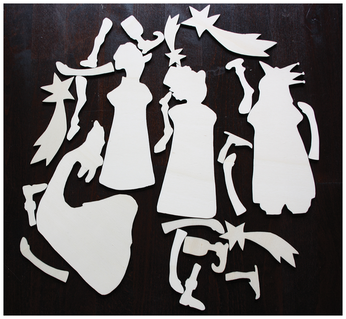
On our first attempt after converting the original drawing, and making sure we had the right number of arms and legs, we just ran out of space. If you look at Figure 8, you will see that the camel is far too small compared to the other figures, and the kings' arms look a little spindly. Because the laser cutting space of the FLUX Beamo is about the size of an A4 sheet of paper, we eventually had no option but to split the drawing across two A4 sheets of plywood. This gave us bigger kings, a bigger camel, and more sturdy arms that were less likely to break during the assembly and decorating process. Figure 9 shows one of the images featuring the camel and an assortment of legs both kingly and otherwise.
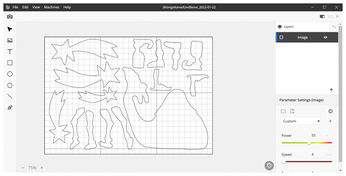
The next steps should be familiar from the test job with the FLUX Beamo logo. Lay a sheet of plywood on the grid in the laser workspace. Check the setting for the laser head – you only need to do this if you are not using the same type of wood for this job as for the test job. Click the Camera icon and drag across the entire workspace to find out where the piece of wood is. Note that there is a blind area at the top of the workspace that the camera can't see but the laser head can still reach. Center the SVG vector diagram in the laser workspace, making sure it fits nicely on the sheet of wood. Then check your settings for the laser power, speed, and number of repetitions. We discovered that poplar plywood is easiest to cut, needing just one repetition rather than the two repetitions you need for heavier birch wood. You can tell that the settings are right if the figures you cut drop out of the board when the laser has cut all around them. If this doesn't happen, don't panic, just relaunch the job with another repetition but without moving or changing anything (we wouldn't want to waste that expensive wood). On a safety note, it's always tempting to watch the laser at work, but looking directly at the bright spot of the laser beam is a not good for your eyes.
Making Up the Puzzle
A quick look at Figure 10 shows what you can expect when the laser has finished its work. It's pretty, but not something that you would want to give to a friend or sell to a customer to finish off. In fact, this is where the second creative part of this build starts. But first, there is a little preparatory work to complete. As this is a hanging decoration, thin wire is a great way to connect the parts. The holes for threading the wire need to be drilled before you start decorating, and it's a good idea to clean up the edges of the parts to remove the darker laser burn marks with some steel wool.
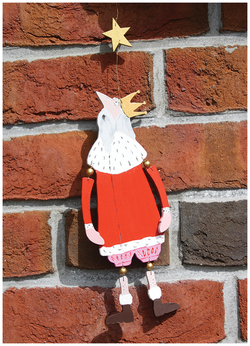
Again, Christa has a great eye for color and decoration. She knows exactly what she wants her Three Kings to look like (Figure 11). You will need acrylic paints for the artwork, which is really a matter of your own style and sense of aesthetics. The one thing you do need to think about is that wooden decorations on thin plywood will warp if you don't paint both sides. You can paint the rear side in black if it will not be visible when the ornament is hanging, or go the whole hog and do realistic front and rear sides for more attractive results. Figure 12 shows you a fully decorated and assembled figure, ready for the next craft fair or as a unique gift.
More Applications with Lasers
There are virtually no limits to your creativity with the FLUX Beamo. Other 2D projects include laser engraving rubber stamps and creating printed works of art with them, or engraving photos on plywood, acrylics, stone, bone, or glass. You can even laser-engrave creative patterns or lettering on your jeans to make a fashion statement or cut cardboard to make inventive pop-up greeting cards. FLUX even offers an extension kit for engraving cylindrical objects, such as glasses with a diameter of up to 80mm if you want to surprise a friend with a personalized champagne glass, for example.
« Previous 1 2 3 Next »
Buy this article as PDF
(incl. VAT)
Buy Linux Magazine
US / Canada
UK / Australia
Subscribe to our Linux Newsletters
Find Linux and Open Source Jobs
Subscribe to our ADMIN Newsletters
Support Our Work
Linux Magazine content is made possible with support from readers like you. Please consider contributing when you’ve found an article to be beneficial.

News
-
Canonical Releases Ubuntu 24.04
After a brief pause because of the XZ vulnerability, Ubuntu 24.04 is now available for install.
-
Linux Servers Targeted by Akira Ransomware
A group of bad actors who have already extorted $42 million have their sights set on the Linux platform.
-
TUXEDO Computers Unveils Linux Laptop Featuring AMD Ryzen CPU
This latest release is the first laptop to include the new CPU from Ryzen and Linux preinstalled.
-
XZ Gets the All-Clear
The back door xz vulnerability has been officially reverted for Fedora 40 and versions 38 and 39 were never affected.
-
Canonical Collaborates with Qualcomm on New Venture
This new joint effort is geared toward bringing Ubuntu and Ubuntu Core to Qualcomm-powered devices.
-
Kodi 21.0 Open-Source Entertainment Hub Released
After a year of development, the award-winning Kodi cross-platform, media center software is now available with many new additions and improvements.
-
Linux Usage Increases in Two Key Areas
If market share is your thing, you'll be happy to know that Linux is on the rise in two areas that, if they keep climbing, could have serious meaning for Linux's future.
-
Vulnerability Discovered in xz Libraries
An urgent alert for Fedora 40 has been posted and users should pay attention.
-
Canonical Bumps LTS Support to 12 years
If you're worried that your Ubuntu LTS release won't be supported long enough to last, Canonical has a surprise for you in the form of 12 years of security coverage.
-
Fedora 40 Beta Released Soon
With the official release of Fedora 40 coming in April, it's almost time to download the beta and see what's new.