


Stream Media Throughout Your Home
Stream to Devices
UMS has excellent compatibility with a wide range of devices, including smart TVs, gaming consoles, and even computers, as well as mobile devices that connect to UMS using DLNA-compatible apps.
All detected devices will be listed in the main admin page under the Detected media renderers tab (Figure 4). Once your device appears in the detected renderers list, you're ready to start streaming. The exact process varies slightly by device, but the general approach is the same.
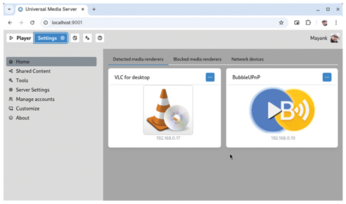
On your device, open the media player or DLNA browser application. Look for network sources, media servers, or DLNA devices in the menu. You should see the UMS server in the list of available servers. Select it and browse through your media folders just like you would on a local drive. Pick any media file to begin streaming.
In addition to these DLNA compatible players, you can also stream media to desktop players such as the VLC media player, which works with UMS straight out of the box. Open VLC and make sure the Playlist is visible by going to View | Playlist.
Browse to the Local Network section in the left sidebar, which will have the Universal Plug 'n' Play option. Expand this section to find your UMS server, and double-click it to see all available content. Browse through the folders and double-click any media file to begin playback.
UMS also ships with a web-based player that can be accessed from a web browser on any computer on the same network as UMS (Figure 5). This is perhaps the most convenient way to access your media because it doesn't require the installation of any specialized software besides a web browser.
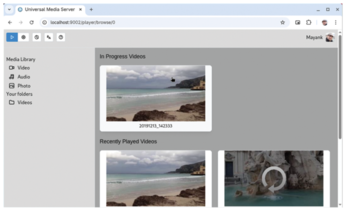
To access the web-based player, fire up the web browser and head to http://(server-ip):9002. Replace (server-ip) with the IP address of the machine running UMS. For example, if your server is at 192.168.1.100, you would enter http://192.168.1.100:9002. If you're accessing it from the same computer that's running UMS, you can use http://localhost:9002 instead.
The web-based player is intuitive to use. It'll show you all the shared directories, and you can play any media just as if it was on the local machine. The player has all the convenience features you'd expect, such as support for thumbnails, flexible viewing options including a picture-in-picture mode, and a full-screen mode. It also gives you the option to download the media to your computer for offline access.
UMS automatically organizes your media library based on file types and metadata, making it easier to navigate and discover content. For instance, it sorts videos into categories such as TV Shows, Movies, HD Videos, SD Videos, Most Played, In Progress, and so on. In the same vein, audio tracks can be browsed By Genre, By Artist, By Album, and more, and pictures can be browsed By Date.
Manage Users and Groups
One of UMS's most useful features for families and shared households is its comprehensive user and group management system. This allows you to control who can access which content, making it easy to create age-appropriate viewing experiences or simply organize content based on different people's preferences.
Groups are the key to organizing content access. You can create groups based on any criteria that make sense for your household. To create a group, bring up UMS's Settings panel, and head to Manage accounts. Then switch to the Groups section and click New Group. Give it a descriptive name (e.g., Kids, Adults, Guests) and click the Create button.
The default admin group has access to all of UMS's features. However, you can limit the permissions to any group you add. For instance, you don't want the Kids group to be able to manage the UMS server's settings. Instead, the Kids group can be restricted to browsing the web player.
After you've added a group, click on its name to bring up a long list of permissions, such as Manage Users, Modify Settings, Control devices, and so on. Toggle the checkbox next to the permissions you want the group to have, and click Update.
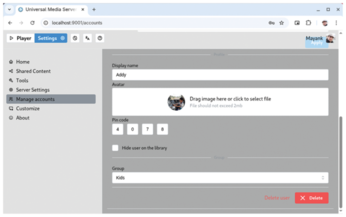
To set up multiple users, navigate to the Users section. Click New User, and fill in the details including a username and password, as well as the user's display name. Then use the Group pull-down menu to assign the user to one of the groups you created earlier. Once added, you can optionally assign an avatar image to the user and specify a four digit PIN to log into the account (Figure 6).
Restrict Access
You can now choose to share directories or online content with certain groups, which gives you granular control over your entire media library. For example, you can assign the accounts for your children to the Kids group and give that group access to the Family Movies directory, but not the Horror Movies folder.
To do this, head back to the Shared Content section and find the folder you want to restrict access to. Click on the hamburger menu adjacent to the group and select the Edit option. Find the Authorized groups pull-down menu and select any of the listed groups (Figure 7). When you hit Apply, the folder will only be visible to users who are part of the groups you've selected.
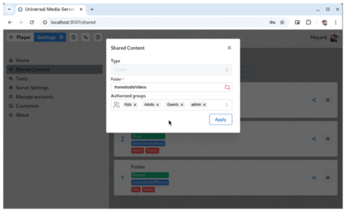
This granular control lets you, for instance, share the Animation Movies folder with the Kids, Adults, and Guests groups, while the Documentaries folder is restricted to the Adults group only.
You can also assign devices to specific users. This helps ensure appropriate content filtering is always in effect even on devices that don't have interactive user selection. For instance, the tablet in the kids' playroom can be permanently assigned to a child's account, while the bedroom TV can be assigned to an adult's account.
To assign a device, go to the Detected media renderers tab, find the device you want to restrict, and click on the three-dots menu. Then select the No account assigned option from the list of options that unfold. In the pop-up that appears, use the pull-down menu to find the account you want to link the device to. Once assigned, that device will automatically use the appropriate user profile and content restrictions.
The UMS web interface makes it easy to switch between user accounts. Look for the user icon in the top corner of the web player. When clicked, it brings up a list of all added users. Select the appropriate profile, and the interface instantly updates to show only the content available to that user.
« Previous 1 2 3 Next »
Buy this article as PDF
(incl. VAT)
Buy Linux Magazine
Subscribe to our Linux Newsletters
Find Linux and Open Source Jobs
Subscribe to our ADMIN Newsletters
Support Our Work
Linux Magazine content is made possible with support from readers like you. Please consider contributing when you’ve found an article to be beneficial.

News
-
The Bullet-Proof KDE Software Initiative Is Coming
KDE, Techpaladin, and Kubuntu Focus have announced a new initiative that will provide at least three years of support for KDE Plasma 6.6 LTS and related software.
-
Linux Mint Shares a Possible Kernel Cleanup Solution
For those on Linux Mint who like to keep multiple kernels around but don't want them to take up too much space, you might be getting a new automated tool.
-
CachyOS Gets an Update
CachyOS August 2026 release is now available with the latest version of KDE, some new features, and plenty of improvements.
-
The Linux Kernel Dev Staging Area Now Rejects AI-Generated Patches
Unless a kernel patch is a valid security fix, it will be rejected if it was created using AI.
-
Linux Surpasses Double-Digit Market Share
According to two sources, the Linux operating system has hit a major milestone in market share that naysayers thought would never happen.
-
AI Helped Develop a Linux Exploit
A use-after-free race exploit was discovered and exploited on CentOS Stream 9.
-
Yet Another Linux Kernel Vulnerability Discovered
Affecting millions of systems, a kernel flaw discovered by Qualys could allow users to gain root privileges.
-
Ubuntu 26.10 to Include Ubuntu Certified Hardware Check
If you've ever wondered if your laptop or PC is officially certified to run Ubuntu, that curiosity will soon be met.
-
Substantial Update to IPFire Now Available
The lastest version of IPFire features a fundamental change to how the system handles DNS.
-
Gnome Working on Test Center App to Make Testing Easier
It's now possible to test experimental features on the Gnome desktop without worrying that you'll break things.