An introduction to PostgreSQL
DIY Data Types
When none of the built-in data types are enough, you can easily build your own, defining a so-called composite data type. For example, if you define a new type that describes an address:
CREATE TYPE address_type AS (
  street VARCHAR(255),
  city VARCHAR(100),
  state CHAR(2),
  zip_code VARCHAR(10)
);
You can later use it in a table:
CREATE TABLE library_branch (
  branch_id SERIAL PRIMARY KEY,
  branch_name VARCHAR(255) NOT NULL,
  location address_type
);
Inserting is equally simple:
INSERT INTO library_branch (branch_name, location)
VALUES ('Downtown Branch', ROW('123 Main St', 'Anytown', 'NY','12345'));
When querying data, you use dot notation:
SELECT branch_name, location.city AS city
FROM library_branch;
Internally, PostgreSQL treats these types as if they were rows in a table, with the fields of the composite type corresponding to columns in a table. Composite types can be used as column data types in tables, as return types for functions, or as arguments for functions. This provides significant flexibility in passing complex structured data. While you cannot directly create indexes or enforce constraints on individual fields within a composite type when used as a column, you can achieve similar functionality by utilizing functional indexes or constraints on the table where the composite type is used.
Unfortunately, using composite types can introduce overhead compared to using simple types, especially if you frequently need to access or manipulate individual fields within the composite type. Also, while using composite types can make your schema more organized and semantically clear, they can also add complexity, particularly when it comes to writing queries and managing the database schema.
JSONB in a Sample App
Leaving academic discussion aside, I'll move to a practical example. As a web app developer, you may want to know if you can use PostgreSQL to provide persistence for a web app written in JavaScript. You also may be wondering how difficult it is to manage the database connection and how to deploy it. Finally, you may want to know if you can store data in JSON and query it natively. I'll provide a simple example answering some of these questions.
Traditionally, the equivalent of a "Hello, world!" application in front-end development is a simple task management app. Because this is an article on PostgreSQL, I'll concentrate on how JSON is sent by the back end.
Listing 1 contains a barebones Flask app with SQLAlchemy database management, whereas Listings 2 and 3 include the related HTML and vanilla JavaScript files (remember to put these files in the scripts subfolder). The HTML and JavaScript files communicate with the Flask back end listening on localhost on port 5000 using the tasks/ endpoint.
Listing 1
A Sample Flask App
01 from flask import Flask, request, jsonify, send_from_directory
02 from flask_sqlalchemy import SQLAlchemy
03 from flask_cors import CORS
04 from sqlalchemy.dialects.postgresql import JSONB
05
06 app = Flask(__name__, static_url_path='', static_folder='static')
07 CORS(app)  # Initialize CORS with default parameters
08
09 app.config['SQLALCHEMY_DATABASE_URI'] = 'postgresql://taskuser:taskpassword@postgres/taskdb'
10 app.config['SQLALCHEMY_TRACK_MODIFICATIONS'] = False
11 db = SQLAlchemy(app)
12
13 class Task(db.Model):
14   id = db.Column(db.Integer, primary_key=True)
15   name = db.Column(JSONB, nullable=False)  # Change to JSONB
16   parent_id = db.Column(db.Integer, db.ForeignKey('task.id'), nullable=True)
17   subtasks = db.relationship('Task', backref=db.backref('parent', remote_side=[id]), lazy=True)
18
19 with app.app_context():
20   db.create_all()
21
22 @app.route('/tasks', methods=['POST'])
23 def create_task():
24   data = request.get_json()
25   task = Task(name=data['name'], parent_id=data.get('parent_id'))
26   db.session.add(task)
27   db.session.commit()
28   return jsonify({'id': task.id, 'name': task.name, 'parent_id': task.parent_id}), 201
29
30 @app.route('/tasks', methods=['GET'])
31 def get_tasks():
32   tasks = Task.query.all()
33   tasks_list = []
34   for task in tasks:
35     tasks_list.append({
36     'id': task.id,
37     'name': task.name,
38     'parent_id': task.parent_id
39     })
40   return jsonify(tasks_list)
41
42 @app.route('/tasks/<int:task_id>', methods=['GET'])
43 def get_task_with_subtasks(task_id):
44   task = Task.query.get(task_id)
45   if not task:
46     return jsonify({'message': 'Task not found'}), 404
47
48   def serialize_task(task):
49     return {
50     'id': task.id,
51     'name': task.name,
52     'subtasks': [serialize_task(subtask) for subtask in task.subtasks]
53     }
54
55   return jsonify(serialize_task(task))
56
57 @app.route('/')
58 def index():
59   return send_from_directory('static', 'index.html')
60
61 if __name__ == '__main__':
62   app.run(debug=True)
Listing 2
script/index.html
<!DOCTYPE html>
<html lang="en">
<head>
  <meta charset="UTF-8">
  <title>Task Manager</title>
</head>
<body>
  <h1>Task Manager</h1>
  <div>
    <input type="text" id="taskName" placeholder="Task Name">
    <input type="number" id="parentTaskId" placeholder="Parent Task ID (Optional)">
    <button onclick="createTask()">Create Task</button>
  </div>
  <div id="tasks"></div>
  <script src="script.js"></script>
</body>
</html>
Listing 3
scripts/script.js
01 function createTask() {
02   const name = { text: document.getElementById('taskName').value };
03   const parent_id = document.getElementById('parentTaskId').value;
04
05   fetch('/tasks', {
06     method: 'POST',
07     headers: {
08     'Content-Type': 'application/json',
09     },
10     body: JSON.stringify({ name, parent_id: parent_id || null }),
11   })
12   .then(response => response.json())
13   .then(data => {
14     alert('Task Created: ' + data.name.text);
15     loadTasks();
16   })
17   .catch((error) => {
18     console.error('Error:', error);
19   });
20 }
21
22 function loadTasks() {
23   fetch('/tasks')
24   .then(response => response.json())
25   .then(tasks => {
26     const tasksElement = document.getElementById('tasks');
27     tasks Element.innerHTML = '';
28     tasks.forEach(task => {
29     const taskElement = document.createElement('div');
30     taskElement.textContent = `ID: ${task.id}, Name: ${task.name.text}, Parent ID: ${task.parent_id || 'None'}`;
31     tasksElement.appendChild(taskElement);
32     });
33   });
34 }
35
36 document.addEventListener('DOMContentLoaded', function() {
37   loadTasks();
38 });
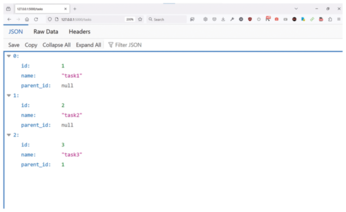
In the Flask app in Listing 1, the functions used to create and get tasks return JSON responses. When looking at the code, you may wonder exactly where the tasks are being saved in the PostgreSQL database. In lines 23-27, you see that the create_task() function calls db.session.add() and db.session.commit(). When the database transaction is committed successfully, the task is permanently stored in the PostgreSQL database as defined in the SQLAlchemy configuration. Now, when you type http://localhost:5000 in your browser, you should see the Flask app's main screen where you can add tasks and subtasks (Figure 1) and see the corresponding JSON structure (Figure 2).

To run the example Flask app, you will need a Dockerfile (Listing 4), a requirements.txt file for Python modules used (Listing 5), and, finally, the docker-compose.yml file with the instructions on how to run the Flask app and PostgreSQL (Listing 6). Listing 6 defines two Docker services (postgres and flaskapp) and one Docker volume (postgress_data) mounted at /var/lib/postgresql/data. Note that I have defined the connection parameters, including the password, directly in the files – in a real use case it should be stored in an appropriate secrets store such as Vault.
Listing 4
A Sample Dockerfile for the Flask App
FROM python:3.11-slim
WORKDIR /app
COPY requirements.txt .
RUN pip install -r requirements.txt
COPY . .
CMD ["flask", "run", "--host=0.0.0.0"]
Listing 5
requirements.txt
flask
flask_sqlalchemy
flask-cors
psycopg2-binary
Listing 6
docker-compose.yml
01 services:
02   postgres:
03   image: postgres:latest
04   environment:
05     POSTGRES_USER: taskuser
06     POSTGRES_PASSWORD: task password
07     POSTGRES_DB: taskdb
08   ports:
09     - "5432:5432"
10   volumes:
11     - postgres_data:/var/lib/postgresql/data
12
13   flask app:
14   build: .
15   ports:
16     - "5000:5000"
17   volumes:
18     - .:/app
19   environment:
20     FLASK_APP: app.py
21     FLASK_RUN_HOST: 0.0.0.0
22   depends_on:
23     - postgres
24   command: ["flask", "run", "--host=0.0.0.0"]
25
26 volumes:
27   postgres_data:
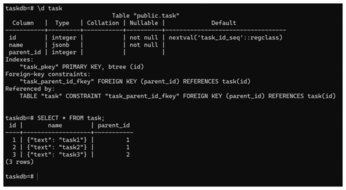
This example is interesting because the task data, although simple, is not stored as varchar but as JSONB. You can quickly check it by connecting to the local PostgreSQL instance using the pl sql tool and the URI defined in the Flask app:
psql "postgresql://taskuser:taskpassword@localhost/taskdb"
(Note: Typing the password as shown above is insecure because it can be revealed in your shell history.) After connecting to the database, you can describe the table task (\d task) and query it: Notice that the internal representation is JSONB, and the data displayed by the SELECT statement is JSON (Figure 3).
As you can see, creating a simple Flask app using PostgreSQL as an RDBMS with JSON/JSONB as the data type is quite easy. Even though a lot of usual chores related to handling database connections are outsourced to SQLAlchemy to make the code cleaner and shorter, I could have done it manually with relatively few changes. Although this example is by necessity oversimplified, it contains a fully working web app with the data passed between the front end and the database using the Flask back end.
What About Kubernetes?
As PostgreSQL has matured over the years, the support for running it on a Kubernetes cluster has also improved. Generally speaking, when using Kubernetes, you have two distinct options as far as persistent data is concerned: You can either use databases inside the cluster or outside of it. Both have different trade-offs, with running outside the cluster being the traditional and generally more predominant option. However, in recent years, more and more companies have begun using operators to run their databases inside the cluster and are very happy with it. In fact, some users think running PostgreSQL in Kubernetes is now better than running PostgreSQL on virtual machines – thanks to the hard work of many people and projects such as CloudNativePG.
CloudNativePG is a Kubernetes operator using primary/standby architecture and streaming replication. When the primary dies, the operator chooses the new one from among the read replicas. It also readjusts the number of replicas together with all related resources such as persistent volumes (PVs) and persistent volume claims (PVCs), scaling them up and down depending on your requirements. It also performs several other tasks making sure applications connecting to the cluster see it as one coherent and performant database in spite of its content being distributed over several machines. For an excellent case analysis of this type of setup, see Chris Milsted and Gabriele Bartolini's presentation on running PostgreSQL in a Kubernetes cluster [12].
Buy this article as PDF
(incl. VAT)
Buy Linux Magazine
Subscribe to our Linux Newsletters
Find Linux and Open Source Jobs
Subscribe to our ADMIN Newsletters
Support Our Work
Linux Magazine content is made possible with support from readers like you. Please consider contributing when you’ve found an article to be beneficial.

News
-
Substantial Update to IPFire Now Available
The lastest version of IPFire features a fundamental change to how the system handles DNS.
-
Gnome Working on Test Center App to Make Testing Easier
It's now possible to test experimental features on the Gnome desktop without worrying that you'll break things.
-
New Vulnerability Discovered in Linux Kernel
Hiding out for nearly 15 years, the Ghostlock vulnerability allows a standard logged-in user to gain root privileges.
-
New Linux Flaw Lets Attackers Escape VMs
A 16-year-old vulnerability allows an attacker to escape a virtual machine, gain access to the host, and execute malicious code.
-
Hannah Montana Linux Is Back!
Developer Noah Cagle decided the world needed the once obscure but beloved Linux distribution and gave it a decidedly pink refresh.
-
System76 Refreshes the Lemur Laptop
If you're looking for a laptop with tons of power and battery, look no further than the latest iteration of the System76 Lemur Pro.
-
More than 43 Million Lines of Code in Linux Kernel 7.2
Using the cloc utility, Michael Larabel of Phoronix discovered that Linux kernel 7.2 has over 43 million lines of code.
-
Kubuntu Focus Goes Ultra
The Kubuntu Focus team has upped the performance ante of its M2 and Zr laptops with the latest, greatest CPUs from Intel.
-
Linux Gamers May Soon See Less Mouse Lag in KDE Plasma
Gamers using KDE’s Plasma desktop have been suffering from a slight input delay in mouse movement that could lead to getting fragged.
-
Three Lines of Code Improve Linux Storage Performance
A developer changed three lines of code, giving Linux storage performance a 5% bump.