Designing cross-platform GUI apps with Fyne
Displaying a Data List
To complete the user interface, you need to define the main to-do list. The List widget is ideal for this task, but it is a little more complex than the previously discussed widgets. List is a "collection widget" (along with Table and Tree) designed to handle lots of data at high performance.
I will create a list using widget.NewList. Rather than passing static data, widget.NewList uses callbacks to understand how content should be displayed. The three callbacks it uses define the number of list items, how an item is created, and what data each row should contain. This more complex setup means that Fyne can reuse widgets as a user scrolls, which is much faster and more efficient for CPU and memory.
For now, I will use dummy content in the sample to-do list. It will display five items, and each one will show "TODO Item" (as the data for the third callback doesn't yet exist to display). For each row in List, I use a Check widget to give each item a checkbox, which will allow users to mark completed items and display the associated text. This code, together with the earlier items, comprises the entire user interface. For simplicity, the graphical setup code is moved into a new function called loadUI as shown in Listing 4.
Listing 4
ui.go
01 package main
02
03 import (
04   "log"
05
06   "fyne.io/fyne/v2"
07   "fyne.io/fyne/v2/container"
08   "fyne.io/fyne/v2/theme"
09   "fyne.io/fyne/v2/widget"
10 )
11
12 func loadUI() fyne.CanvasObject {
13   list := widget.NewList(
14     func() int {
15       return 5
16     },
17     func() fyne.CanvasObject {
18       return widget.NewCheck("TODO Item",
19         func(bool) {})
20     },
21     func(id widget.ListItemID, o fyne.CanvasObject) {
22     })
23
24   input := widget.NewEntry()
25   input.SetPlaceHolder("New item")
26   add := widget.NewButtonWithIcon("",
27     theme.ContentAddIcon(), func() {
28     log.Println("new item tapped")
29   })
30   head := container.NewBorder(nil, nil, nil, add, input)
31
32   return container.NewBorder(head, nil, nil, nil, list)
33 }
Launching the GUI
Because the code is now in the loadUI function, you also need to update the main function to set the content to be the result of calling loadUI.
A list can be very small, but you want to see multiple items at the same time. To do this, you call Resize on Window with a suitable size (not pixels because a Fyne size will be the same across different output devices). The last three lines of the main function become:
w.SetContent(loadUI())
w.Resize(fyne.NewSize(200, 280))
w.ShowAndRun()
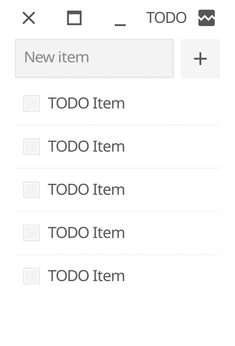
When you run the updated code, you will see the new user interface appear on your screen (Figure 2).
Remembering To-Dos
You want to be able to add items and mark them as done in your app. To do this, you will use a new global variable, todos, which is a slice of strings (denoted as []string). You will manipulate this slice when adding or deleting items, and your list will always draw this data's current state. First, you add a new todos variable to main.go. You also need to keep a reference to the list variable created earlier so it can be updated (shown in Listing 5).
Listing 5
Storing Data
var (
  todos []string
  list  *widget.List
)
Buy this article as PDF
(incl. VAT)
Buy Linux Magazine
US / Canada
UK / Australia