Designing cross-platform GUI apps with Fyne
Adding Items
When the user taps on the add button created in Listing 3, a new item will be added to the to-do list. To do this, you make a more useful tapped handler for the button. Instead of logging to the console, you will use the code in Listing 6, which asks for a new item to be added and then clears the input text to get ready for another to-do item.
Listing 6
Adding a To-Do Item via Tapping
add := widget.NewButtonWithIcon("",
theme.ContentAddIcon(),
func() {
  addTODO(input.Text)
  input.SetText("")
})
Because some users prefer to run an app from the keyboard, you will also want this functionality when the user hits Return or Enter. Thankfully, the Entry widget has an OnSubmitted callback that you can set as shown in Listing 7.
Listing 7
Adding a To-Do Item via the Keyboard
input.OnSubmitted = func(item string) {
  addTODO(item)
  input.SetText("")
}
Both handlers call a new addTODO function, which simply appends a new item to the slice and refreshes the list (see Listing 8).
Listing 8
data.go
01 package main
02
03 import "fyne.io/fyne/v2"
04
05 func addTODO(todo string) {
06   todos = append(todos, todo)
07   list.Refresh()
08 }
09
10 func deleteTODO(todo string) {
11   for i, text := range todos {
12     if text != todo {
13       continue
14     }
15
16     todos = append(todos[:i], todos[i+1:]...)
17     break
18   }
19   list.Refresh()
20 }
Populating the List
Now that you have some data to display, you need to tell the list how to update accordingly. To do this, you add some code to the third callback of the List widget. This code will set the Check widget's text and make sure that it is not checked (because the list currently only has pending to-do items). Listing 9 achieves this using a replacement callback function.
Listing 9
Displaying To-Do Content
01 func(id widget.ListItemID, o fyne.CanvasObject) {
02   check := o.(*widget.Check)
03   check.SetChecked(false)
04   check.Text = todos[id]
05   check.Refresh()
06 }
Line 1 of Listing 9 makes sure you can use the Check widget's functionality. The list does not know what type of content it displays, so you need to do a type cast to match the widget you created in the second callback function. With this in place, you will see your to-do list – all that is left is to delete them!
Deleting Items
The to-do list is only keeping track of pending items, so you want to remove any to-do item once it is checked. For this, you can set the OnChanged callback to your Check widget (Listing 10), much like you set OnSubmitted on the Entry widget.
Listing 10
Deleting To-Do Items
check.OnChanged = func(done bool) {
  if !done {
    return
  }
  deleteTODO(check.Text)
}
The OnChanged callback will be called if the item is checked or unchecked – which is why you first test that it is being marked as completed using the bool parameter. Assuming it should be deleted, you call the helper function deleteTODO from Listing 8.
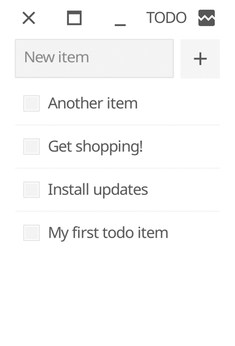
The method shown in Listing 8 is a little complicated because there is no built-in way to delete an item from a slice in Go. Listing 8 performs "re-slicing," which sets the to-do list to a join of two other lists (a list for before and one for after the item is deleted). The code then refreshes the list as before, so your item disappears. If you run your app once more, you will see that it is empty, but you can add new items and mark them as done as often as you like, as shown in Figure 3.
Buy this article as PDF
(incl. VAT)
Buy Linux Magazine
US / Canada
UK / Australia