Industrial network communications
XML Databases
In the earlier Python OPC UA server example, variables were added dynamically when the server was started. This method works fine for simple testing, but it can be awkward for larger tag databases.
All industrial control vendors will have proprietary solutions to create OPC UA XML configuration files from process control logic, piping and instrument drawings (P&IDs), or instrument lists.
OPC UA XML configuration files follow a defined standard, so an XML file exported from a Python server can be imported into a Node-RED server or another standard OPC UA server.
The Python opcua library syntax to import and export XML files is:
# to export from the online system to an XML file:
# where: s = opcua.Server()
s.export_xml_by_ns("mytags.xml")
# to import an XML file:
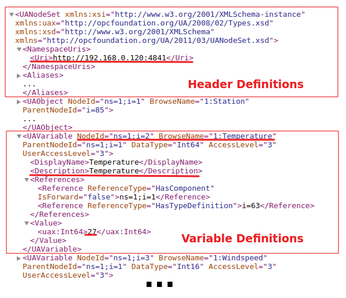
s.import_xml("mytags2.xml","/mypath")The XML files can be viewed in a web browser; unfortunately, the format is a little ugly (Figure 4). The file starts with a header area, followed by object (<UAObject>) and variable definitions (<UAVariable>). The variable section defines the variable's NodeID, name, and description.
The Free OPC UA Modeler tool can help with the creation and modification of XML databases. With opcua-modeler, you can insert new variables, objects, or properties into a new or existing XML structure. In Figure 5, I add a variable called Waveheight, which I save to the XML file. In the final project, I use this XML file with Node-RED dashboards.
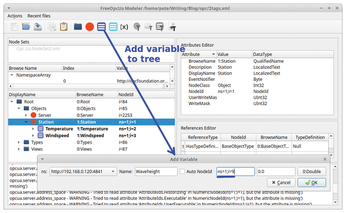
Although the modeler tool works great for manually adding or deleting a few variables (Figure 5), it can be awkward when a hundred variables need to be added.
CSV to XML
A CSV file is an easy format for defining tag databases. For example, a mytags.csv file could be defined with three fields; tagname, description, and default value:
# mytags.csv - simple tag database
# format: tagname, description, default value
#
TI-101,temperature at river, 25
PI-101,pressure at river, 14
A basic CSV to XML import tool can be created to meet your project requirements. A number of good programming options can help you with this migration. For my project, I created a small Bash/Awk program to translate the three-field CSV file to the required OPC UA XML format (Listing 4).
Listing 4
CSV to OPC UA XML
01 #!/usr/bin/bash
02 # csv2xml.sh - create an OPC UA XML file from CSV
03 #
04
05 # add the xml header info
06 awk ' BEGIN {
07   print "<?xml version=\"1.0\" encoding=\"utf-8\"?>"
08   print "<UANodeSet xmlns=\"http://opcfoundation.org/UA/2011/03/UANodeSet.xsd\""
09   print "           xmlns:uax=\"http://opcfoundation.org/UA/2008/02/Types.xsd\""
10   print "           xmlns:xsd=\"http://www.w3.org/2001/XMLSchema\""
11   print "           xmlns:xsi=\"http://www.w3.org/2001/XMLSchema-instance\">"
12   print "<NamespaceUris>"
13   print "  <Uri>http://192.168.0.120:4841</Uri>" ; # This address would be passed in
14   print "</NamespaceUris>"
15 }'
16
17 # Read the input CSV format and process to XML
18 awk ' {
19    FS="," ; # separate fields with a comma
20   # Skip any comment lines that start with a #
21   if ( substr($1,1,1) != "#" )
22   {
23     i = i+1 ; # increment the NodeID index
24     print "<UAVariable BrowseName=\"1:"$1"\" DataType=\"Int32\" NodeId=\"ns=1;i="i"\" ParentNodeId=\"i=85\">"
25     print "  <DisplayName>"$1"</DisplayName>" ; # set the display name to the 1st field
26     print "  <Description>"$2"</Description>" ; # set the description to the 2nd field
27     print "      <References>"
28     print "        <Reference IsForward=\"false\" ReferenceType=\"HasComponent\">i=85</Reference>"
29     print "      </References>"
30     print "    <Value>"
31     print "      <uax:Int32>"$3"</uax:Int32>" ; # set the default value to the 3rd field
32     print "    </Value>"
33     print "</UAVariable>"
34   }
35 }
36 END{ print "</UANodeSet>"} '
In the Bash script, the first awk section (lines 6-15) prints out the XML header information, and the second awk section (lines 18-36) reads the input (CSV) text line by line. A comma field separator (line 19) maps the three CSV fields to the variables $1, $2, and $3. The UAVariable definition is printed with $1 as the variable name (lines 24-25), $2 as the description (line 26), and $3 as the default value (line 31). The awk variable i increments the NodeID index (line 23).
To run this script to read the CSV file mytags.csv and create the XML file mytags.xml, enter:
cat mytags.csv | /csv2xml.sh > mytags.xml
Now that I have a tool to create XML configuration files, I can devise small test systems that easily scale up to larger tag counts. Also, having a starting file in CSV lets me manage my tag changes and additions in Excel or LibreOffice.
Node-RED OPC UA Server
The Node-RED node-red-contrib-opcua node [7] includes an OPC UA server and most of the common OPC UA client functions. It can be installed within Node-RED from the Manage Palette option.
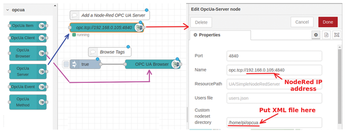
Figure 6 shows the setup of a Node-RED OPC UA server with a browser node that lists objects configured in the server. The OpcUa server node name is defined (<IP-address>:4840 in this case), and the Custom nodeset directory is set to /home/pi/opcua, into which I copy the XML file that I created from the CSV file (mytags.xml).
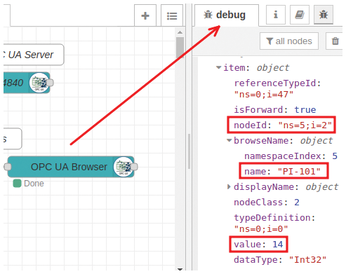
The OpcUa Browser node sends messages directly to the debug pane (Figure 7), which allows me to see the objects and variables I defined in my XML file.
The next step is to look at writing and reading values. Figure 8 shows the Node-RED logic to write a random number and then read the value back as a subscribed datapoint. The simplest way to communicate with an OPC UA server is to use an OpcUa Item node to define the NodeID and an OpcUa Client node to initiate an action.
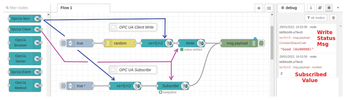
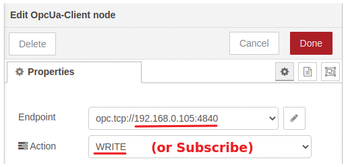
The pressure NodeID ns=5;i=2 from Figure 7 is entered into the OpcUA Item node. The OpcUa Client node needs a defined Endpoint address and Action (Figure 9). When a WRITE action is issued, a Good or Bad status message is returned.
The OpcUa Client node supports a number of actions. Rather than a READ action, as used in the Python client app, a SUBSCRIBE action returns a value whenever the value changes.
« Previous 1 2 3 Next »
Buy this article as PDF
(incl. VAT)
Buy Linux Magazine
US / Canada
UK / Australia
Subscribe to our Linux Newsletters
Find Linux and Open Source Jobs
Subscribe to our ADMIN Newsletters
Support Our Work
Linux Magazine content is made possible with support from readers like you. Please consider contributing when you’ve found an article to be beneficial.

News
-
So Long Neofetch and Thanks for the Info
Today is a day that every Linux user who enjoys bragging about their system(s) will mourn, as Neofetch has come to an end.
-
Ubuntu 24.04 Comes with a “Flaw"
If you're thinking you might want to upgrade from your current Ubuntu release to the latest, there's something you might want to consider before doing so.
-
Canonical Releases Ubuntu 24.04
After a brief pause because of the XZ vulnerability, Ubuntu 24.04 is now available for install.
-
Linux Servers Targeted by Akira Ransomware
A group of bad actors who have already extorted $42 million have their sights set on the Linux platform.
-
TUXEDO Computers Unveils Linux Laptop Featuring AMD Ryzen CPU
This latest release is the first laptop to include the new CPU from Ryzen and Linux preinstalled.
-
XZ Gets the All-Clear
The back door xz vulnerability has been officially reverted for Fedora 40 and versions 38 and 39 were never affected.
-
Canonical Collaborates with Qualcomm on New Venture
This new joint effort is geared toward bringing Ubuntu and Ubuntu Core to Qualcomm-powered devices.
-
Kodi 21.0 Open-Source Entertainment Hub Released
After a year of development, the award-winning Kodi cross-platform, media center software is now available with many new additions and improvements.
-
Linux Usage Increases in Two Key Areas
If market share is your thing, you'll be happy to know that Linux is on the rise in two areas that, if they keep climbing, could have serious meaning for Linux's future.
-
Vulnerability Discovered in xz Libraries
An urgent alert for Fedora 40 has been posted and users should pay attention.