Monitoring Linux system calls with Falco
How Falco Works
Primarily, Falco relies on system calls to extract system events. This method is recommended when you have direct access to the Linux kernel. When you do not have direct access to the Linux kernel, you should use plugins to track the system state.
Figure 1 shows the detailed architecture of the Falco stack. At the lower layer is the Falco driver. The driver is solely responsible for collecting the raw system state. After the Falco driver collects the system state, it does not transfer the system state directly to the Falco rules engine. If you have ever used auditd [7], you would realize that auditd displays excessive information to stdout or logfiles. Unlike auditd, Falco only logs details requested by users.
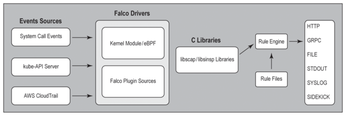
The kernel module passes the raw system state to libscap via a shared buffer. Libscap then extracts the non-Falco context and hands it over to libsinsp for further processing.
Libscap controls both the kernel module and the eBPF probe, loads drivers, and starts and stops system state captures. Libscap also reads the data that Falco drivers produce and loads, manages, and runs plugins.
Libsinsp receives system events from libscap to filter events, map events to rules, and output necessary information to appropriate channels.
Falco is just a detection tool. It does not prevent or thwart malicious acts on your system. If you are interested in detecting and also preventing unauthorized activities, consider Tetragon or OSSEC-HIDS. Both of these tools are open-source. Tetragon is natively fit for a distributed environment, whereas OSSEC-HIDS is designed to operate on an individual host system.
Running Falco in a Monolithic Environment
The /etc/falco directory includes a configuration file to specify where to send system events, define a rule's priority, and configure other settings. In addition, the /etc/falco directory includes a subdirectory to define custom rules. Before you define rules in the yaml file to track events, you'll need to install Falco.
Begin by updating the Apt repository:
apt update
Import the Falco GPG Key:
curl -fsSL https://falco.org/repo/falcosecurity-packages.asc |
sudo gpg --dearmor -o /usr/share/keyrings/falco-archive-keyring.gpg
Set up the Apt repository:
sudo bash -c 'cat <\< EOF \> /etc/apt/sources.list.d/falcosecurity.list
deb [signed-by=/usr/share/keyrings/falco-archive-keyring.gpg] https://download.falco.org/packages/deb stable main
EOF'
Update the Apt repository:
sudo apt update -y
Install dialog using the apt command:
sudo apt-get install -y dialog
Install Falco:
sudo apt install -y falco
Next, configure Falco to log system events to logfiles instead of displaying to stdout. You can decide to display events to the terminal and log events to the syslog server.
Execute the following command to edit the Falco configuration file:
vim etc/falco.yaml
Inside the falco.yaml file, enable the syslog_output channel to prompt Falco to send event output to a syslog server:
syslog_output:
     enabled: true
If you don't want Falco to log output to the terminal, disable stdout_output via the following:
stdout_output:
  enabled: false
Now add your own rules to monitor specific system activities on a Linux host. Create a file inside the rules.d folder using the following command:
touch /etc/falco/rules.d/custom.yaml
Copy and paste the following rule in Listing 2 into the custom.yaml file.
Listing 2
Falco Rule
- rule: reading sensitive file
  desc: Detects when a user reads /etc/ folder
  condition: open_read and fd.name startswith /etc/passwd
  output: "suspicious file read detected file=%fd.name accessed by user=%user.name"
  priority: WARNING
  tags: [network, filesystem]
Because you have enabled automatic rules updates, there is no need to start Falco manually via the systemctl command each time you edit the custom.yaml file or change Falco configuration settings.
Execute the command in Listing 3 to check if Falco restarted successfully.
Listing 3
Checking Falco Status
systemctl status falco-modern-bpf.service
root@yosemite:/etc/falco# systemctl status falco-modern-bpf.service
? falco-modern-bpf.service - Falco: Container Native Runtime Security with mode>
     Loaded: loaded (/lib/systemd/system/falco-modern-bpf.service; enabled; pre>
     Active: active (running) since Wed 2025-07-23 11:28:21 EDT; 10min ago
       Docs: https://falco.org/docs/
   Main PID: 52594 (falco)
      Tasks: 17 (limit: 14142)
     Memory: 118.0M
        CPU: 31.444s
     CGroup: /system.slice/falco-modern-bpf.service
             ??52594 /usr/bin/falco -o engine.kind=modern_ebpf
Test the rule in the custom.yaml file by running the following command:
cat /etc/passwd
Then use the tail command on the syslog server to find out whether logs are being sent to the syslog server:
tail -f /var/log/syslog
An event logged by Falco might appear as follows:
falco: 23:48:19.199676729: Warning "suspicious file read detected file=/etc/passwd accessed by user=root"
Running Falco in a Distributed Environment
Falco provides other ways of ingesting events in a distributed environment. In a Kubernetes environment, you can track events on worker nodes by deploying Falco as DaemonSets. Deploying Falco as DaemonSets ensures that for every worker node, the scheduler schedules a pod to each worker node in the cluster.
Also, it's possible to install Falco on each worker node in the cluster via Ansible. You can use Ansible [8] to check the status of the Falco service on each worker node by scheduling playbooks to run at specific intervals via a cron job, but using the DaemonSet controller to check Falco's liveness on each worker node is better because it loops continually, checking for updates.
The following command builds a test cluster using minikube [9]. The command creates a standalone cluster – both worker components and control plane run on the same node:
curl -LO https://storage.googleapis.com/minikube/releases/latest/minikube_latest_amd64.deb
sudo dpkg -i minikube_latest_amd64.deb
Start the cluster using the following command:
minikube start --driver=docker
Run the following commands to test whether the cluster is correctly deployed and ready to receive requests from clients:
kubectl get componentstatus
Next, you can deploy Falco to the cluster via Helm. You can, however, create a manifest without using Helm.
Run the commands in Listing 4 to download and install Helm.
Listing 4
Installing Helm
 curl https://baltocdn.com/helm/signing.asc | gpg --dearmor | sudo tee /usr/share/keyrings/helm.gpg > /dev/null
sudo apt-get install apt-transport-https --yes
echo "deb [arch=$(dpkg --print-architecture) signed-by=/usr/share/keyrings/helm.gpg] \
  https://baltocdn.com/helm/stable/debian/ all main" | \
  sudo tee /etc/apt/sources.list.d/helm-stable-debian.list
sudo apt-get update
sudo apt-get install helm
Once Helm is set up on your system, you can install Falco with the following commands:
helm repo add falcosecurity https://falcosecurity.github.io/charts
helm repo update
Use the following command to create a namespace for Falco:
kubectl create -n falco
Then run the following command to install Falco. This command deploys Falco within the namespace falco:
helm install falco -n falco --set tty=true --set driver.kind=ebpf falcosecurity/falco
It might take some time for Falco pods to start, so wait for a few seconds before you execute the command
kubectl get pods --namespace falco
Otherwise, use the following command to get continual updates:
kubectl get pods ---namespace falco --watch
To use Ansible to deploy Falco to a minikube cluster, execute the following commands to install Ansible:
sudo apt install pipx
pipx ensurepath
pipx install ansible
Afterwards, create an inventory file using the touch command:
touch hosts.yaml
Copy and paste the following into the hosts.yaml file:
[minikube]
127.0.0.1
I decided to use a localhost address because both Ansible and Falco reside on the same node hosting the minikube cluster. You can replace it with IP addresses of worker nodes if you are working with distributed nodes.
The Ansible playbook in Listing 5 installs Falco.
Listing 5
Falco Ansible Playbook
- hosts: minikube
  connection: local
  tasks:
  -  name: Add Falco GPG key
           apt_key:
           url: https://falco.org/repo/falcosecurity-packages.asc
           state: present
  -  name: Write content to a file
           ansible.builtin.copy:
           content: "deb [signed-by=/usr/share/keyrings/falco-archive-keyring.gpg] >
             \https://download.falco.org/packages/deb stable main"
           dest: /etc/apt/sources.list.d/falco.list
  -  name: Install falco
           ansible.builtin.apt:
           name: falco
           state: present
  -  name: start falco service
           ansible.builtin.systemd:
           name: falco-modern-bpf.service
           state: restarted
           become: true # Required to manage systemd services
Although Ansible is able to detect if a package is already installed, I'll create a separate playbook to check Falco liveness periodically (Listing 6). This prevents Ansible from iterating through previous tasks anytime a cron job executes to check Falco status.
Listing 6
Playbook for Checking Liveness
---
- hosts: minikube
  connection: local
  tasks:
  -  name: check falco liveness
     ansible.builtin.systemd_service:
     state: started
     name: falco-modern-bpf.service
The playbook in Listing 6 ensures that Falco is always active by restarting it if Falco is not active.
Now create a cron job using the following to run the playbook to check for Falco liveness every minute.
* * * * * ./ansible-directory/ansible-playbook test.yml > /dev/null 2>&1
You can also use a Python script to check Falco liveness (Listing 7).
Listing 7
Checking Liveness with Python
#! bin/sh
cd  to/ansible/playbook/current/directory
./ansible-playbook playbook.yaml
* * * * *   ./bash/script/directory > /dev/null 2>&1
« Previous 1 2 3 Next »
Buy this article as PDF
(incl. VAT)
Buy Linux Magazine
US / Canada
UK / Australia
Subscribe to our Linux Newsletters
Find Linux and Open Source Jobs
Subscribe to our ADMIN Newsletters
Support Our Work
Linux Magazine content is made possible with support from readers like you. Please consider contributing when you’ve found an article to be beneficial.

News
-
Parrot OS Switches to KDE Plasma Desktop
Yet another distro is making the move to the KDE Plasma desktop.
-
TUXEDO Announces Gemini 17
TUXEDO Computers has released the fourth generation of its Gemini laptop with plenty of updates.
-
Two New Distros Adopt Enlightenment
MX Moksha and AV Linux 25 join ranks with Bodhi Linux and embrace the Enlightenment desktop.
-
Solus Linux 4.8 Removes Python 2
Solus Linux 4.8 has been released with the latest Linux kernel, updated desktops, and a key removal.
-
Zorin OS 18 Hits over a Million Downloads
If you doubt Linux isn't gaining popularity, you only have to look at Zorin OS's download numbers.
-
TUXEDO Computers Scraps Snapdragon X1E-Based Laptop
Due to issues with a Snapdragon CPU, TUXEDO Computers has cancelled its plans to release a laptop based on this elite hardware.
-
Debian Unleashes Debian Libre Live
Debian Libre Live keeps your machine free of proprietary software.
-
Valve Announces Pending Release of Steam Machine
Shout it to the heavens: Steam Machine, powered by Linux, is set to arrive in 2026.
-
Happy Birthday, ADMIN Magazine!
ADMIN is celebrating its 15th anniversary with issue #90.
-
Another Linux Malware Discovered
Russian hackers use Hyper-V to hide malware within Linux virtual machines.