Pi-Top: The Missing Manual
Pop the Top
ByFollow along as we assemble, customize, and accessorize a Pi-Top kit – the do-it-yourself laptop for the Raspberry Pi.
In the subculture that has grown up around the credit card-sized Raspberry Pi CPU, the star for 2015 is the Pi-Top. A modular, do-it-yourself laptop made of mostly free hardware and software, the Pi-Top raised more than twice the target in its first fundraising campaign and should reach three times the target in its current campaign for the pi-topCEED. “I’ve been very impressed with how far and how fast it’s developed,” says Eben Upton, the founder of Raspberry Pi, and he is far from the only one, as several thousand Pi-Tops have been shipped in the first month of doing business.
If you are a computer technician or an experienced member of the Maker movement, you will likely have few problems assembling a Pi-Top. The structure is simpler than that of most computers, and you might assemble it in less than an hour. However, if – like me – you have almost no experience with hardware, you will probably need more time.
Some people might welcome the chance to learn from their mistakes. However, for those who just want to get their Pi-Top up and running, here are some hints to make the experience quicker and smoother – not only in putting your new laptop together but also in customizing and accessorizing it afterwards.
Preparing to Install
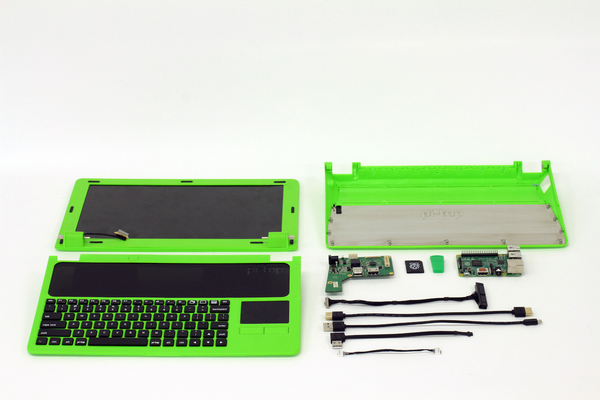
The Pi-Top ships in a tightly packed box. To start, find the hand-sized instruction manual; then, as you take parts out of the box, check them off against pages 2 and 3 of the manual (Figure 1). The cables are particularly easy to miss, because they are in an almost invisible pocket on the bottom of one of the pieces of foam packing. They are not labeled, either, but the illustrations in the manual should be enough for you to identify each one.
Note, too, that what appears to be an SD card is, on closer examination, a case for a microSD card. Try pulling at its edges until the microSD card slides out.
The screws, nuts, and spacers are in a ziplock bag, along with two Allen wrenches. Few spares are included for any of these items, so keep careful track of them. Work on a clean surface and consider spreading paper beneath your work space so that anything you drop has a better chance of being retrieved. Unless you have small, adroit fingers, you likely will drop at least one or two screws or nuts, because they are only 2.5mm in diameter. If you have a computer toolkit or access to a hackery, pliers from a computer tool kit will make working with the small parts easier.
The manual is well organized and easy to follow, with timely warnings about the sequence of events. However, it consists mostly of illustrations, some of which are not particularly clear. The size of the manual means that some of the illustrations are no larger than the objects they represent, which, combined with the detail of the drawings, makes the illustrations difficult to interpret. If necessary, you can open the online version of the manual, which you can expand on screen to several times the actual size (Figure 2).
If you still run into difficulties, the Pi-Top has an online forum, and you can file a support ticket, as well. In my experience, the company is quick to respond, but if you are working in the evening on the Pacific coast of North America, remember that Pi-Top employees will probably take some time to respond, because they are probably asleep. The good news is that when you check in the next morning, an email should be waiting for you.
Assembling the Pi-Top
The first steps in putting a Pi-Top together involve readying the printed circuit boards, the Hub, and the Raspberry Pi. When you add screws and nuts to the boards, be sure you are using the silver-colored screws, not the copper-colored spacers, which are used later. Also, although the illustration on page 5 of the manual is ambiguous, the slot for the microSD card is on the bottom of the Raspberry Pi – a fact that should become obvious when you investigate.
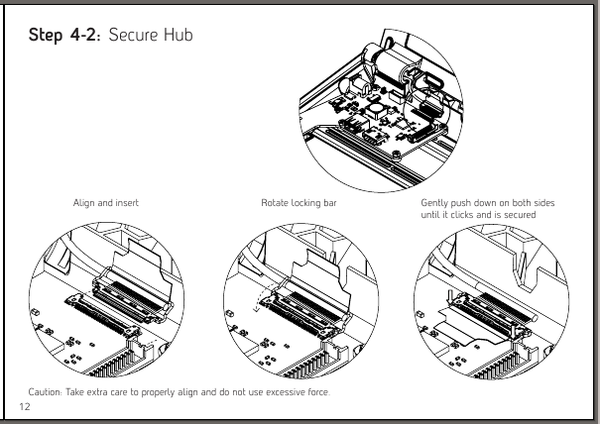
The steps to assemble the case and position the Hub on pages 6-14 are well documented with arrows and warnings that are easy to follow. However, remember to be gentle when moving pieces of the case into place so that none snap. In my experience, too, the Hub can be positioned above the battery in several ways without actually being properly connected.
Similarly, take time to consider exactly where to position the Raspberry Pi. The natural impulse is to place the Pi so that the USB ports fill the hold on the right side of the base. However, this is not what the pictures on pages 16 and 17 show, and you may find some of the cables are too short to connect the Pi and the Hub if you attempt this approach. Additionally, if there is any chance that you might use the Pi’s Ethernet port rather the wireless dongle, positioning the Pi about five centimeters from the hold will allow you to connect the Ethernet cable easily by sliding back the plastic cover. In this case, you can consider the hole in the case an aid to improving the air flow to cool your system.
The rest of the assembly involves connecting cables and snapping the top of the case into place (pages 18-28). The manual’s illustrations are at their best in this section, and, at any rate, the cables are different enough in appearance and end configuration that mixing them up should be impossible. Still, the manual is correct in suggesting that the keyboard connector can slip loose, so taping it in position may help prevent future problems.
To boot your finished Pi-Top, plug in the power cable. When you reach the login screen, your first step should be to check to see that the battery is charging. If it is not, check the Hub’s position over the battery. This check will be much easier if you follow the manual’s instructions and do not tighten the spacers or the nut holding the arm of the Hub in position any more than absolutely necessary. If you do, you run a risk of stripping the spacers or damaging the circuit board as you tighten and loosen the screw.
If the Pi-Top does not boot at all, the most likely problem is a loose cable, although you might go through the manual again page by page. Even if you have a defective battery, the Pi-Top should still boot with the power cord. If it fails to boot, check that no cables are loose. If the Pi-Top still fails to boot, remove the microSD card and use a card reader on another computer to see that it is readable (you can buy a microSD card reader for $10). If the card is good, at this point, you can feel justified in contacting support for further help.
Accessorizing the Pi-Top
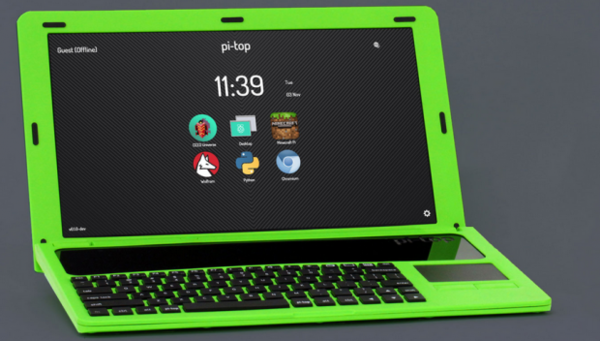
When your Pi-Top boots, you can start to customize – a topic that is barely covered by the manual. Pi-Tops boot the Raspbian Debian derivative overlaid with the pi-topOS shell using an LXDE desktop (Figure 3). You can change the desktop as easily as you can in any Linux distribution, but remember that the Raspberry Pi has only a gigabyte of RAM, and the microSD card has only 8GB of memory. You can run a recent version of KDE on a Pi-Top, but it is going to devour huge chunks of your resources. Although you can replace the microSD card with one with more memory, flashing it via a card reader, the RAM limitation remains.
Other software choices depend on whether you plan to use the Pi-Top in another do-it-yourself project or as a regular laptop. If you plan to use it as ordinary laptop, you can install web and mail browsers, and even LibreOffice. In general, however, you should plan on using the Pi-Top in the same way you would a tablet or low-end laptop.
Take time, too, to consider how you will use the Pi-Top’s accounts. The interface offers you a choice of using a Guest account with limited access or logging in to a password-protected account. The password-protected account registers you with the Pi-Top account and is used for upgrades and installing additional software via sudo. Be aware, however, that a registered account is supposed to allow remote login to any other Pi-Top. If that seems unsecure to you, look up how to disable sudo and use a root account, or at least plan on using a Guest account most of the time.
Another consideration is the hardware you will need. The Pi-Top comes with four USB ports, of which two are taken up by the wireless dongle and the keyboard connector, so you might want to buy a USB hub to extend your options. Because the touchpad is to the right of the keyboard, left-handed users may prefer to add a mouse. Given how little memory is available on the microSD card, you should plan on using a flash drive or a portable hard drive. Also, the Pi-Top does not include sound, so you might want an external sound card and speaker.
Doing It Yourself
If all these points sound too complicated, you can ignore them and venture forth on your own. I managed without them, making just about every mistake possible, and I know firsthand that working through problems to create your own machine gives a sense of possession that buying a fully built computer can never hope to equal.
Still, for those who only want results, here’s a chance to learn from my mistakes. The Pi-Top is a unique and intriguing new product, and with these pointers, you have no reason not to explore it. These suggestions should help you be up and running more quickly, while still having the satisfaction of doing the construction yourself.
Subscribe to our Linux Newsletters
Find Linux and Open Source Jobs
Subscribe to our ADMIN Newsletters
Support Our Work
Linux Magazine content is made possible with support from readers like you. Please consider contributing when you’ve found an article to be beneficial.

News
-
United Nations Open Source Portal Goes Live
A new open source portal seeks to coordinate and scale open source efforts across the United Nations system.
-
KDE Linux Drops AUR
KDE Linux developers have dropped the Arch User Repository from the build pipeline due to security concerns; other distributions should consider doing the same.
-
California May Exempt Linux from Its Age-Verification Law
After backlash from the Linux community, California may be backing off on its promise to force all operating systems to verify age, but one platform may still have to comply.
-
Another Logic Bug Found in Linux Kernel
Qualys has discovered a vulnerability in the Linux kernel that can be used to elevate standard user privileges.
-
Ubuntu Core 26 Offers Game-Changing Enterprise Features
Ubuntu Core 26 could be a game-changer for organizations looking for increased security and reliability.
-
AI Flooding the Linux Kernel Security Mailing List
AI is giving Linus Torvalds a headache, but not in the way you might think.
-
Top Priorities for Open Source Pros Seeking a New Job
Professional fulfillment tops the list, according to LPI report.
-
Container-Based Fedora Hummingbird Designed for Agent-First Builders
Fedora Hummingbird brings the same approach to the host OS as it does to containers to level up security.
-
Linux kernel Developers Considering a Kill Switch
With the rise of Linux vulnerabilities, the kernel developers are now considering adding a component that could help temporarily mitigate against them… in the form of a kill switch.
-
Fedora 44 Now Gaming Ready
The latest version of Fedora has been released with gaming support.