Understanding the GRUB 2 bootloader
Booting from an ISO File
To illustrate how to use GRUB 2 configuration files, I'll show how to use GRUB 2 to boot from an ISO file. This example also has practical utility: It lets you install from a distribution without needing to burn the image to a USB stick or a DVD. You just use the ISO file you downloaded.
To boot from an ISO file, you'll use a loop device [7], which is a virtual block device that treats a file like a virtual disk. When you use this virtual disk at boot time, you can boot directly from this file, which is where GRUB 2 comes into play. GRUB 2 lets you inspect the ISO file before booting. This file provides the correct parameters for booting.
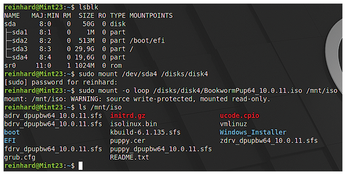
I put all of my ISO files in a separate partition (Figure 6). First, I mount this partition, and then I mount the ISO file as a partition on my filesystem. Going into the partition, you will see the names of the two files needed for booting: the kernel (vmlinuz) and the RAM filesystem (initrd.gz), which are located in the root of the ISO file.
With this knowledge, you are now ready to boot using GRUB 2. From the command line, type c in the GRUB 2 menu to enter the GRUB 2 shell. Once the shell opens, use ls to look at the disks and partitions.
As shown in Figure 6, the ISO files are located in partition 4, but you can verify this with
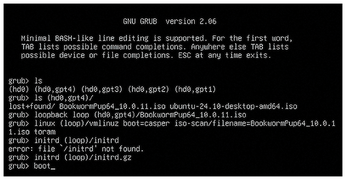
ls(hd0,gpt4)/
to confirm that the files are really there. Next, you need to communicate this knowledge to the loopback. Instead of typing the ISO file name, you can press the tab key to complete the file name for you. You also need to give GRUB 2 the kernel name, tell GRUB 2 to load it into RAM, and inform GRUB 2 of initrd's location. That's it.
Looking at Figure 7, you'll see I entered initrd instead of initrd.gz in the first trial, which caused the GRUB 2 shell to throw an error. If you don't get an error message, you know you entered the correct file names.
Now tell GRUB 2 to boot. Voila, it boots your ISO file.
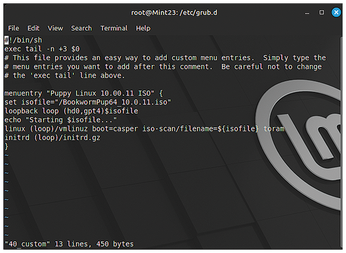
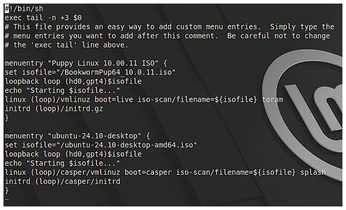
Next you can try to integrate the ISO file boot into your bootloader so that you have a choice at boot time. You will do nearly the same thing as you did for the GRUB 2 shell. The only difference is that you put the information you entered using the shell into the custom file found at /etc/grub.d. As root, use the file 40_custom (without removing the exec tail line) and attach the code (see Figure 8). I recommend getting elevated rights with
sudo su -
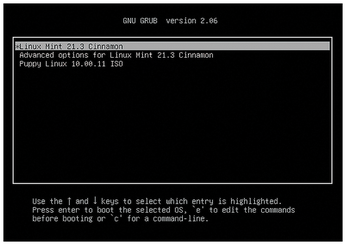
Save the file and reconfigure GRUB 2 with update-grub. Once you reboot, you will see the new boot entry (Figure 9), which will allow you to boot from the Puppy Linux ISO.
The exact location and names for linuz and imageram may differ between ISO files. You should always inspect the files and adapt your configuration accordingly. In Figure 10, I added the Ubuntu ISO file to show how the parameters can differ between ISO files. For instance, the linuz file is in another location and the initrd file's location and name have changed. With the Ubuntu ISO, you will also notice that linuz and initrd are in the casper directory; casper is a tool designed for booting Live Linux systems.
You will find examples online that demonstrate how to configure the custom GRUB 2 file. Be aware that these instructions, found in user forums, may contain errors. When doing a custom configuration, make sure you know what you are doing based on your ISO distribution. I found LinuxBabe [8] useful; it provides a long list of ISO distributions (including Microsoft Windows), along with comments on the parameters used.
Remember that any customizations should be added to the custom file in /etc/config/grub instead of grub.cfg, which is overwritten when the kernel is updated.
GRUB 2 for Windows
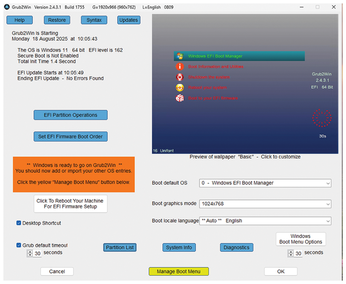
If you want to use GRUB 2 on Windows, you will need Grub2Win [9]. You can download Grub2Win as a ZIP file from SourceForge. The ZIP file contains the installer, which downloads the software required and performs the installation. Once installed, Grub2Win will assist you in the configuration, which is a straightforward process.
Grub2Win, with its GUI interface (Figure 11), shares similar concepts to the Linux version, so I will not repeat the instructions on how to use GRUB 2 with Windows. Once installed, Grub2Win will even survive a Windows software update. An outstanding user manual completes this useful software.
Conclusion
GRUB 2 is a sophisticated, highly-configurable software system, which may initially seem complex. When using GRUB 2, it is important to understand the boot process, so you know what to do when things go wrong. Now that you understand how the GRUB 2 bootloader works, you can easily find more detailed instructions to further customize the GRUB 2 boot process to meet your needs. Remember, use a virtual machine like VirtualBox when experimenting with GRUB 2, EFI, and BIOS.
Infos
- GRUB 2: https://www.gnu.org/software/grub
- GRUB 2 manual: https://www.gnu.org/software/grub/manual/grub/
- UEFI installation and configuration: https://linuxconfig.org/how-to-manage-efi-boot-manager-entries-on-linux
- UEFI shell download: https://github.com/pbatard/UEFI-Shell/releases
- Debian EFI shell: https://packages.debian.org/sid/efi-shell-x64
- Installing GRUB 2: https://www.fosslinux.com/115040/a-complete-guide-to-installing-grub-bootloader-on-linux.htm
- Loop device: https://www.lenovo.com/us/en/glossary/loop-device
- Booting from ISO images: https://www.linuxbabe.com/desktop-linux/boot-from-iso-files-using-grub2-boot-loader
- Grub2Win: https://sourceforge.net/projects/grub2win/files/
The Author

Reinhard E. Voglmaier discovered his love for computer science while writing his diploma thesis at the Max Planck Institute for Extraterrestrial Physics in Germany. He started his career as IT project manager, and subsequently took on the role of intranet manager, in a pharmaceutical company, overseeing web services and addressing cybersecurity concerns. Following his retirement, he continues to lead the expert charter GRC in Digital Health for ISACA Germany and is engaged in a computer linguistics project at the University of Innsbruck.
« Previous 1 2 3
Buy this article as PDF
(incl. VAT)
Buy Linux Magazine
US / Canada
UK / Australia
Subscribe to our Linux Newsletters
Find Linux and Open Source Jobs
Subscribe to our ADMIN Newsletters
Support Our Work
Linux Magazine content is made possible with support from readers like you. Please consider contributing when you’ve found an article to be beneficial.

News
-
Photoshop on Linux?
A developer has patched Wine so that it'll run specific versions of Photoshop that depend on Adobe Creative Cloud.
-
Linux Mint 22.3 Now Available with New Tools
Linux Mint 22.3 has been released with a pair of new tools for system admins and some pretty cool new features.
-
New Linux Malware Targets Cloud-Based Linux Installations
VoidLink, a new Linux malware, should be of real concern because of its stealth and customization.
-
Say Goodbye to Middle-Mouse Paste
Both Gnome and Firefox have proposed getting rid of a long-time favorite Linux feature.
-
Manjaro 26.0 Primary Desktop Environments Default to Wayland
If you want to stick with X.Org, you'll be limited to the desktop environments you can choose.
-
Mozilla Plans to AI-ify Firefox
With a new CEO in control, Mozilla is doubling down on a strategy of trust, all the while leaning into AI.
-
Gnome Says No to AI-Generated Extensions
If you're a developer wanting to create a new Gnome extension, you'd best set aside that AI code generator, because the extension team will have none of that.
-
Parrot OS Switches to KDE Plasma Desktop
Yet another distro is making the move to the KDE Plasma desktop.
-
TUXEDO Announces Gemini 17
TUXEDO Computers has released the fourth generation of its Gemini laptop with plenty of updates.
-
Two New Distros Adopt Enlightenment
MX Moksha and AV Linux 25 join ranks with Bodhi Linux and embrace the Enlightenment desktop.