Messaging off the grid with Meshtastic
Choosing Hardware
Now that you know about the technical possibilities and restrictions of a Meshtastic network, it's time to look at the hardware you need. There's actually quite a diverse range of supported devices [6]. Getting started with Meshtastic shouldn't cost that much. In theory, any microcontroller with a LoRa chip can serve as a Meshtastic device. Some devices can be used standalone because they have a display and (touch) keyboard; others need to be paired over Bluetooth with the Meshtastic app on your mobile phone to send and receive messages.
Two main microcontroller families used for Meshtastic are the nRF52840 and the ESP32. Devices based on the nRF52840 consume less power and are generally preferred for handhelds and solar-powered applications, but they only have Bluetooth to pair with your phone. On the other hand, ESP32-based devices typically have higher power demands but are often cheaper. These devices feature both Bluetooth and WiFi, making them suitable, for example, to relay Meshtastic messages over the Internet through the MQTT [7] protocol.
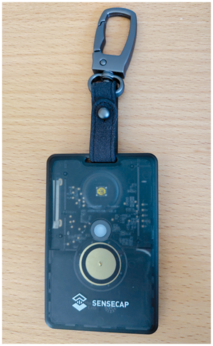
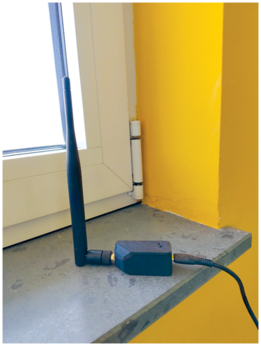
The cheapest option is probably Seeed Studio's XIAO ESP32S3 & Wio-SX1262 Kit, priced at $9.90. This thumb-sized development board features an ESP32S3 microcontroller coupled with a daughter board housing an SX1262 LoRa chip. Note that this price excludes a protective case. Other popular (albeit pricier) options include the Heltec LoRa 32 V3 (ESP32), the Nano G2 Ultra (nRF52840), the Station G2 (ESP32), the WisMesh Pocket V2 (nRF52840), and the LilyGo T-Echo (nRF52840). Another noteworthy device based on the nRF52840 is Seeed Studio's SenseCAP Card Tracker T1000-E. This IP65-rated device, the size of a credit card, includes internal Bluetooth and LoRa antennas, a rechargeable battery, a GPS, a temperature sensor, and an accelerometer. It lasts a day or two on a single battery charge
Supported devices are extensively documented on Meshtastic's website, including links to where you can buy them. Have a look through the list and decide which devices are suitable for your intended use. For instance, if you'd like to carry a Meshtastic device with you every day, you can't find anything better than the SenseCAP Card Tracker T1000-E (Figure 1) at the moment. Conversely, for a stationary device at home capable of relaying Meshtastic messages through MQTT to your home-automation system or even across the Internet, a XIAO ESP32S3 & Wio-SX1262 Kit fitted inside a protective case (Figure 2) offers an affordable solution.
Installing the Firmware
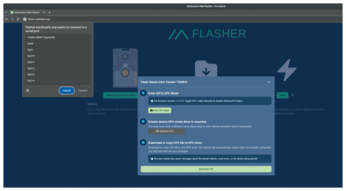
The process of flashing the firmware [8] varies between devices, but the Web Flasher [9] provides you with a guided walkthrough. Note that this only works in Google Chrome or other Chromium-based web browsers, as it uses the Web Serial API. Plug in your device via USB, making sure that you're using a data cable and not merely a power-only cable. Look at the kernel ring buffer using the dmesg command, keeping an eye out for a line with cdc_acm, which reveals the serial port name, such as ttyACM0.
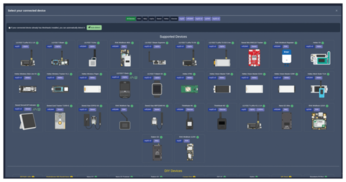
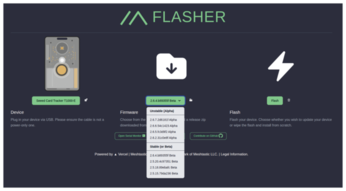
With your device connected via USB, click on Select Target Device in the Web Flasher, prompting a display of supported devices (Figure 3). Click on the picture of your device. In the next step, choose the firmware version you wish to install. Clicking on the green button in the middle allows you to choose between stable, beta, or alpha releases (Figure 4). The version selected by default is often an appropriate choice, even if it's a beta. Then click on Flash. Carefully read the release notes outlining known issues and warnings, and then proceed by clicking on Continue if you want to move ahead.
In this stage, the Web Flasher shows instructions detailing how to put your device in Device Firmware Update (DFU) mode. Often you can just click on Enter DFU Mode, select the device's serial port from the drop-down list shown by your web browser, and then click on Connect (Figure 5). This will mount the device's storage on your computer. Click on the Download UF2 button in the Web Flasher and then just drag and drop the downloaded .uf2 file to the mounted drive. After the file has been written to the drive, it automatically unmounts and you can unplug the USB cable.
Configuring the App
Now your Meshtastic device is all set, it's time to install Meshtastic's mobile app, available for Android and iOS. A web client (Figure 6) exists as well. However, to connect via Bluetooth or a serial connection, the web client requires using Chrome. In the rest of this article, I'll use the Android app.

The app automatically detects Meshtastic devices using Bluetooth or WiFi, displaying them in a list. Tap on the device you want to use. You'll notice the region is marked UNSET alongside the message You must set a region!. This selection should match the frequency band of your region and device. Consult Meshtastic's documentation page detailing LoRa regions by country [10] and pick the correct one from the drop-down list that appears upon clicking on UNSET.
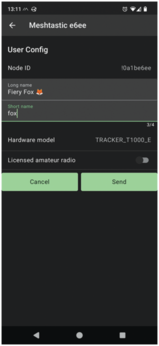
Now, tap on the three dots located at the top right, and then access Radio configuration where you will find all the settings for your Meshtastic device. First, tap on User. This is the place to change your device's long name (39 characters) and short name (4 characters). You can even use emojis in both names, although one emoji uses four characters due to being a Unicode character (Figure 7). After changing the names, tap on Send to send the configuration change to the device. The device then reboots and the app automatically reconnects with it.
Continuing, tap again on the three dots and Radio configuration, but this time choose Bluetooth. If your device uses a fixed PIN for Bluetooth pairing, the pin is shown here. If it's something trivial like 123456, change it and tap on Send to prevent other people in your proximity from messing with your Meshtastic device. Don't be concerned about the disconnection error you're seeing: After the device reconnects, you can verify that the PIN has been changed.
Buy this article as PDF
(incl. VAT)
Buy Linux Magazine
US / Canada
UK / Australia
Subscribe to our Linux Newsletters
Find Linux and Open Source Jobs
Subscribe to our ADMIN Newsletters
Support Our Work
Linux Magazine content is made possible with support from readers like you. Please consider contributing when you’ve found an article to be beneficial.

News
-
Parrot OS Switches to KDE Plasma Desktop
Yet another distro is making the move to the KDE Plasma desktop.
-
TUXEDO Announces Gemini 17
TUXEDO Computers has released the fourth generation of its Gemini laptop with plenty of updates.
-
Two New Distros Adopt Enlightenment
MX Moksha and AV Linux 25 join ranks with Bodhi Linux and embrace the Enlightenment desktop.
-
Solus Linux 4.8 Removes Python 2
Solus Linux 4.8 has been released with the latest Linux kernel, updated desktops, and a key removal.
-
Zorin OS 18 Hits over a Million Downloads
If you doubt Linux isn't gaining popularity, you only have to look at Zorin OS's download numbers.
-
TUXEDO Computers Scraps Snapdragon X1E-Based Laptop
Due to issues with a Snapdragon CPU, TUXEDO Computers has cancelled its plans to release a laptop based on this elite hardware.
-
Debian Unleashes Debian Libre Live
Debian Libre Live keeps your machine free of proprietary software.
-
Valve Announces Pending Release of Steam Machine
Shout it to the heavens: Steam Machine, powered by Linux, is set to arrive in 2026.
-
Happy Birthday, ADMIN Magazine!
ADMIN is celebrating its 15th anniversary with issue #90.
-
Another Linux Malware Discovered
Russian hackers use Hyper-V to hide malware within Linux virtual machines.