Messaging off the grid with Meshtastic
Standalone Devices
Last year, two new user interfaces specifically designed for standalone Meshtastic devices were developed, although they're still experimental. Both interfaces make the standalone devices much more usable than with the original interface. The first one is called the Meshtastic UI (MUI), and it supports ESP32-S3 devices with an LED display, such as the LilyGo T-Deck and the Seeed SenseCAP Indicator. Support for MUI is indicated in the Web Flasher with the Meshtastic logo and an icon of a display with UI in it.
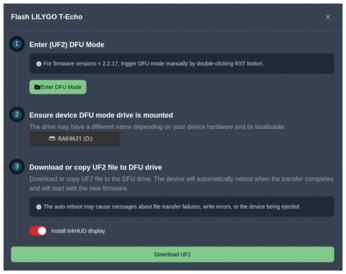
Another new user interface is InkHUD, specifically developed for devices with e-paper display, such as the LilyGo T-Echo (Figure 12). If you want to flash one of these new user interfaces onto your device, choose a 2.6+ version in the Web Flasher. After clicking on Flash and then Continue, toggle the Meshtastic UI or InkHUD option right above the Download UF2 button (Figure 13).
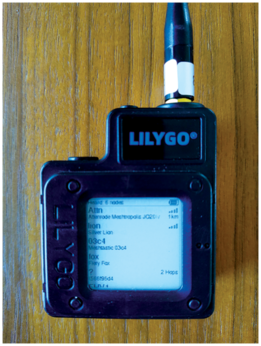
InkHUD is designed to navigate through menus with only a single button. Simply press the button to navigate to the next screen or the next option in a menu, and long-press to open a menu, confirm a choice, or toggle an option. Thanks to the e-paper technology, the display can stay always on without using energy (e-paper displays only use energy at the moment they're changing what's on the display). You can also customize what's displayed by enabling and disabling specific applets.
Extending Functionality with Modules
The Meshtastic firmware includes various modules to extend the functionality of your devices. You can find them under Module configuration in the app's radio configuration screen. For instance, the External Notification module enables alerts with a buzzer or an LED upon receiving a message. The firmware images for the different devices are already configured with the correct pin numbers, but if you use custom hardware you can change this configuration.
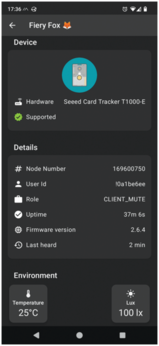
The Telemetry module periodically sends various types of data over the mesh network: device metrics, environmental metrics, air quality metrics, power metrics, and health metrics (not enabled in the firmware by default). You can enable or disable each of these types individually, and you can change the update interval as well. The device will automatically detect supported sensors at startup. The app also presents the last known sensor measurements in the device list or if you tap on the device's short name and choose More details (Figure 14).
MQTT
MQTT is a network protocol that is popular for home automation and Internet of Things scenarios. You can configure ESP32 devices that are connected via WiFi or Ethernet to forward Meshtastic messages to an MQTT broker. This feature allows users on your local mesh network to communicate with others on another mesh network, with the device that connects to the MQTT broker essentially operating as a bridge or gateway. This option requires enabling WiFi or Ethernet in the network configuration.
Then, within the MQTT module configuration, toggle the MQTT enabled option and specify the address, username, and password (both can be empty for anonymous access) for your MQTT broker. If you're connecting to a public MQTT broker, make sure to keep encryption enabled; otherwise all Meshtastic messages will be sent in plaintext. If you want to easily integrate your Meshtastic messages with a home-automation system (e.g., for reading telemetry), you can enable JSON output. You can also specify the root topic to use for messages sent to the MQTT broker.
Even after this MQTT module is configured, Meshtastic messages received by this device aren't forwarded to the MQTT broker yet. You need to specify this channel by channel. Open Channels in the radio configuration screen and tap on a channel to edit it. If you enable the uplink there, the device will send messages received from the local mesh network to the MQTT broker. If you enable the downlink, the device will forward messages received from the MQTT broker to the local mesh network.
Moreover, each device must consent to allow its messages to uplink to an MQTT broker through your Meshtastic/MQTT gateway. This is done in the LoRa configuration screen by enabling OK to MQTT. On the other hand, Ignore MQTT lets the device ignore any messages it receives via LoRa that originally came via MQTT.
All in all, using MQTT for your Meshtastic mesh network requires some thoughtful configuration. It is good to consider your options carefully, because most users will assume their messages stay local. It is also recommended to set up a dedicated, mains-powered Meshtastic device to connect to your MQTT broker or a public broker, ensuring uninterrupted operation.
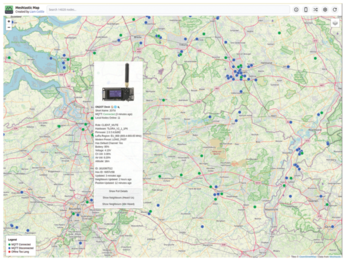
One useful application of this MQTT link is mapping Meshtastic users. For instance, Liam Cottle's map [11] lets you discover other Meshtastic users in your region (Figure 15). His website provides instructions for connecting with his MQTT broker. To be able to show your position on the map, your device has to send its position on the default channel, but the position can be with low precision to preserve privacy.
Buy this article as PDF
(incl. VAT)
Buy Linux Magazine
US / Canada
UK / Australia
Subscribe to our Linux Newsletters
Find Linux and Open Source Jobs
Subscribe to our ADMIN Newsletters
Support Our Work
Linux Magazine content is made possible with support from readers like you. Please consider contributing when you’ve found an article to be beneficial.

News
-
Parrot OS Switches to KDE Plasma Desktop
Yet another distro is making the move to the KDE Plasma desktop.
-
TUXEDO Announces Gemini 17
TUXEDO Computers has released the fourth generation of its Gemini laptop with plenty of updates.
-
Two New Distros Adopt Enlightenment
MX Moksha and AV Linux 25 join ranks with Bodhi Linux and embrace the Enlightenment desktop.
-
Solus Linux 4.8 Removes Python 2
Solus Linux 4.8 has been released with the latest Linux kernel, updated desktops, and a key removal.
-
Zorin OS 18 Hits over a Million Downloads
If you doubt Linux isn't gaining popularity, you only have to look at Zorin OS's download numbers.
-
TUXEDO Computers Scraps Snapdragon X1E-Based Laptop
Due to issues with a Snapdragon CPU, TUXEDO Computers has cancelled its plans to release a laptop based on this elite hardware.
-
Debian Unleashes Debian Libre Live
Debian Libre Live keeps your machine free of proprietary software.
-
Valve Announces Pending Release of Steam Machine
Shout it to the heavens: Steam Machine, powered by Linux, is set to arrive in 2026.
-
Happy Birthday, ADMIN Magazine!
ADMIN is celebrating its 15th anniversary with issue #90.
-
Another Linux Malware Discovered
Russian hackers use Hyper-V to hide malware within Linux virtual machines.