


Making art in the terminal window
Plasmosis
To illustrate these principles, I will re-create an effect from the 90s demoscene as a practical example: the Plasma effect. I will combine True Color gradients, double-pixel rendering, and double buffering to create an animated display that flows across the terminal window. The overall effect, shown in Figure 5, is reminiscent of the northern lights, yet entirely generated by code, fully contained in the terminal without any graphical libraries.
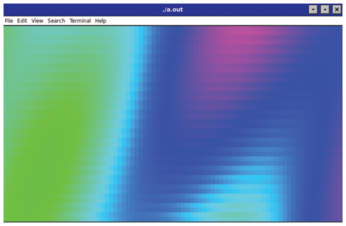
At the heart of the plasma animation is a procedural motion function (Listing 4), primarily composed of sine and cosine waves, which calculates the color for a given (x,y) position, depending on the time factor (t).
Listing 4
The Noise Function
static float noise2D(float x, float y, float t){
    return std::sin(x*0.15f + t*0.7f) * std::cos(y*0.12f - t*0.5f) * 0.5f
         + std::sin(x*0.05f - y*0.08f + t*1.0f) * 0.25f
         + std::sin(x*0.2f + y*0.15f + t*0.3f) * 0.25f;
}
This function defines the displacement of "light particles" in both horizontal and vertical directions. By adjusting the coefficients and phase shifts, each point on the grid moves with a natural, undulating pattern, mimicking the flowing curtains of a real plasma. The time parameter t continuously increments, ensuring the movement is smooth across frames.
To create a realistic glow, the plasma effect uses True Color RGB output, rather than the limited 256-color palette familiar from the 90s demoscene. For a smoother effect, use a gentle subpixel effect, as presented in Listing 5.
Listing 5
The Subpixel Effect
const int subpix = 2;
std::vector<float> x_offsets(subpix), y_offsets(subpix);
for(int i=0;i<subpix;i++){
    x_offsets[i] = (float)i/subpix * 0.5f;
    y_offsets[i] = (float)i/subpix * 0.5f;
}
Here I choose 2x2=4 subpixels per terminal pixel. The offsets are very small (max = 0.5) – to sample the noise inside the bounds of the cell, not beyond it. These offsets shift the noise input in both x and y. Then, for each pixel (for both the upper and lower half-blocks), I use the supersampling as shown in Listing 6.
Listing 6
Subpixel Supersampling
float v_up = 0, v_down = 0;
for(int sx=0; sx<subpix; sx++){
    for(int sy=0; sy<subpix; sy++){
        v_up   += noise2D(nx + x_offsets[sx],
                          ny_up + y_offsets[sy], t);
        v_down += noise2D(nx + x_offsets[sx],
                          ny_down + y_offsets[sy], t); } }
v_up   /= (subpix*subpix);
v_down /= (subpix*subpix);
This mapping ensures that subtle variations in noise translate into smooth color transitions. When combined with double pixel rendering (drawing two vertical pixels per character), the vertical resolution of the color flow is effectively doubled, creating a continuous curtain.
The next interesting piece of code is the one that actually renders the plasma effect (Listing 7).
Listing 7
The Plasma Effect
float hue_up = fmod((v_up+1.0f)/2.0f*360.0f +
                    30.0f*std::sin(t + nx*0.5f + ny_up*0.3f),
                    360.0f);
float hue_down = fmod((v_down+1.0f)/2.0f*360.0f +
                      30.0f*std::sin(t + nx*0.5f + ny_down*0.3f),
                      360.0f);
RGB c_up = hsv2rgb(hue_up, 1.0f, 1.0f);
RGB c_down = hsv2rgb(hue_down, 1.0f, 1.0f);
To understand Listing 7, you need to break it down to its pieces.
The first component is:
(v_up + 1.0f) / 2.0f * 360.0f
The noise function produces values in the approximate range of -1.0 : +1.0, and this line simply normalizes that range into 0.0 : 360.0 degrees (the entire hue wheel, remembering the RGB/HSV cube drawing), so, in the end, I have the mapping of:
- Darker noise regions : purple/blue
- Mid noise : green
- Bright noise : yellow/red
This mapping gives me the baseline color structure, turning noise into a continuous color gradient. This alone would provide a smooth but somewhat static color field, but the part making the colors come alive and dance is the following:
30.0f * std::sin(t + nx*0.5f + ny_up*0.3f)
This statement adds a time-varying oscillation to the hue, by drawing in a time component, and it makes the solution environmentally aware by dragging in the nx and ny_up (or low) spacial components.
Feel free to modify the AMPLITUDE variable, which controls how far the hue is shifted:
- Small value : subtle shimmer
- Large value : chaotic rainbow explosion
Since the hue value is circular, it must always stay between 0 and 360, otherwise the HSV:RGB conversion might behave unexpectedly. I will wrap this code within the confines of an fmod call.
This deeper understanding of motion, color, and structure provides a solid foundation for exploring more ambitious ideas. The terminal is no longer just a canvas of characters – it is becoming a medium of expression. So turn the page, leave the comfort of shifting colors behind, and venture into something richer and more intricate.
Beyond the Plaintext
Up to this point, the work I have described has relied on the terminal's built-in character set: a rich repertoire of Unicode blocks, shapes, and line-drawing symbols. These characters are wonderfully expressive for procedural art, but they represent only a tiny fraction of what artistic text can look like.
The next step is to go beyond the limitations of plaintext and begin working directly with font files. Whether you want to draw text at arbitrary sizes, generate ASCII renderings of binary data, or simply understand how letters become pixels, you can bridge between raw bitmap fonts and artistic representation to allow text to become data you can shape, render, and variegate.
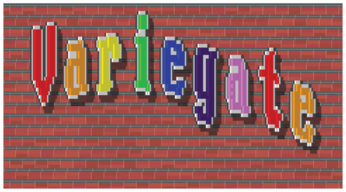
In order to achieve a wonderful looking, almost graffiti-like text rendering in a console, as shown in Figure 6, you need to create a system that combines modern terminal features (like the presented 24-bit True Color drawing) with classic graphics programming techniques to achieve a fluffy-graffiti text effect.
The Screen Buffer
The most fundamental change is that you have to stop printing to the terminal directly. Instead, create a complete, in-memory representation of the entire terminal screen. This representation is known as a screen buffer.
I will define the screen buffer as:
using ScreenBuffer = std::vector<std::vector<ScreenCell>>;
The buffer is a 2D grid where every single cell is represented by a ScreenCell struct (Listing 8). This struct is the heart of our rendering engine.
Listing 8
Screen Cell Definition
struct ScreenCell {
    std::string character = " "; // The Unicode char to display
    Color fg = COLOR_BLACK;   // The foreground color
    Color bg = COLOR_BLACK;   // The background color
    int draw_priority = 0;    // The "layer" this cell belongs to
};
The draw_priority function is used when deciding the layering of the drawing. The entire program follows the following priority system:
- Priority 0: The Brick Wall (the lowest layer)
- Priority 1: The Graffiti Shadow
- Priority 2: The Graffiti's White Border
- Priority 3: The Graffiti's Black Border
- Priority 4: The Graffiti's Inner Fill (the highest layer; it is the actual color of the letter. I have decided to go for a rainbow-like color scheme, because why not?)
When a function wants to "draw" to a cell, it checks if its priority is higher than the priority of what's already there. This allows the text's fill (4) to draw over its own border (3), which draws over the shadow (1), which draws over the wall (0).
Think of the draw_priority in each ScreenCell as its layer number. When I build a frame, I start at the bottom layer (the wall) and build up: I first draw the wall, giving every cell a draw_priority = 0.
Next, I try to draw the shadow. The shadow-drawing code only draws on top of cells that have draw_priority == 0. When it does, it darkens the cell and sets its priority to 1.
Finally, I draw the graffiti text (borders and fill). This pass calculates its own priority (2 for white, 3 for black, 4 for fill) and only draws to a cell if (new_priority > existing_priority).
The rainbow fill (priority = 4) can then draw over the black border (priority = 3), which draws over the white border (priority = 2), which draws over both the shadow (priority = 1) and the wall (priority = 0) without any of them getting mixed up.
This logic is located in the stampBrush function. This function is called for every "dot" of graffiti and is responsible for actually modifying the screen buffer.
The function is split into two main parts. The first part is the shadow pass (Drawing Priority 1 over 0). When stampBrush is called with isShadow == true, it checks to see if:
(buffer[y][x].draw_priority == 0)
The shadow is only allowed to draw on top of the wall.
The second part is the text pass (Drawing Priorities 4 > 3 > 2 > 1 > 0). When stampBrush is called with isShadow == false, it checks if:
(priority > buffer[y][x].draw_priority)
This check ensures that a new, higher-priority pixel (like the fill) can overwrite a lower-priority one (like the border or the shadow), but not the other way around.
Finally, the main() loop calls draw_frame() 30 times per second. This function's job is to:
- Redraw the wall onto the buffer, setting all priorities to 0.
- Render the graffiti (shadow and text) onto the buffer using priorities 1-4 with the presented stamping technique.
- Loop through the entire completed buffer and print it to the terminal as one massive, optimized string of ANSI color codes and characters.
This stateful buffer system is what allows me to build up a complex scene layer by layer before showing the final result.
Buy this article as PDF
(incl. VAT)
Buy Linux Magazine
Subscribe to our Linux Newsletters
Find Linux and Open Source Jobs
Subscribe to our ADMIN Newsletters
Support Our Work
Linux Magazine content is made possible with support from readers like you. Please consider contributing when you’ve found an article to be beneficial.

News
-
AI Helped Develop a Linux Exploit
A use-after-free race exploit was discovered and exploited on CentOS Stream 9.
-
Yet Another Linux Kernel Vulnerability Discovered
Affecting millions of systems, a kernel flaw discovered by Qualys could allow users to gain root privileges.
-
Ubuntu 26.10 to Include Ubuntu Certified Hardware Check
If you've ever wondered if your laptop or PC is officially certified to run Ubuntu, that curiosity will soon be met.
-
Substantial Update to IPFire Now Available
The lastest version of IPFire features a fundamental change to how the system handles DNS.
-
Gnome Working on Test Center App to Make Testing Easier
It's now possible to test experimental features on the Gnome desktop without worrying that you'll break things.
-
New Vulnerability Discovered in Linux Kernel
Hiding out for nearly 15 years, the Ghostlock vulnerability allows a standard logged-in user to gain root privileges.
-
New Linux Flaw Lets Attackers Escape VMs
A 16-year-old vulnerability allows an attacker to escape a virtual machine, gain access to the host, and execute malicious code.
-
Hannah Montana Linux Is Back!
Developer Noah Cagle decided the world needed the once obscure but beloved Linux distribution and gave it a decidedly pink refresh.
-
System76 Refreshes the Lemur Laptop
If you're looking for a laptop with tons of power and battery, look no further than the latest iteration of the System76 Lemur Pro.
-
More than 43 Million Lines of Code in Linux Kernel 7.2
Using the cloc utility, Michael Larabel of Phoronix discovered that Linux kernel 7.2 has over 43 million lines of code.